


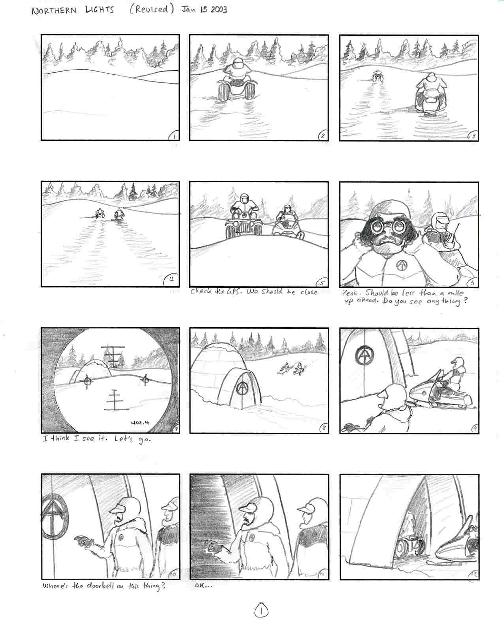
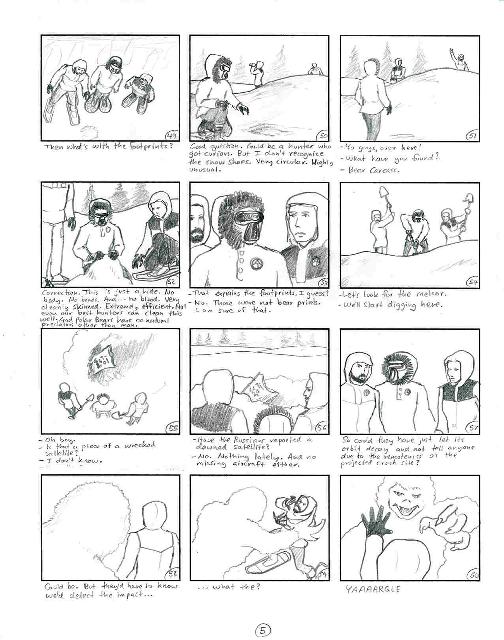
This story was a long time in production. I knew that I wanted to shoot a story in the snow. I had seen one GI Joe collector creat a snow story and I liked the look. So I came up with the story for "Lightfall". When I originally created the storyboard, it was March of 2001, and there was a nice layer of snow lying on a local soccer field, and I thought to myself "there's a great setting!"
Earlier that year I saw, for the first time, the Dogloo, an igloo-like dog house that I knew had to be in my story. I knew this would make a cool entrance hut for a larger underground complex.
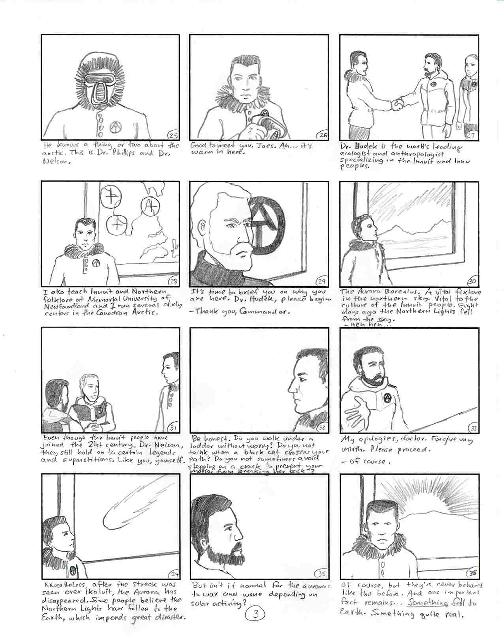
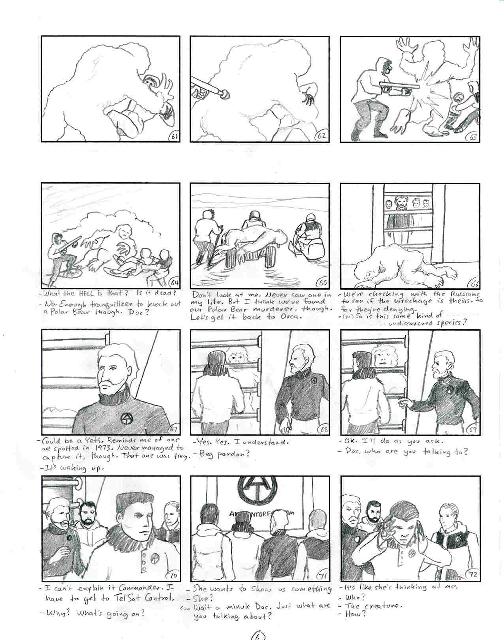
So I began thinking of the story. At the same time, my daughter was reading this gorgeously illustrated book about the Northern Lights, and I had the gem of the idea. I also knew I needed a Yeti, and the closest thing that I knew of that existed was the Wampa figure from Hasbro's Star Wars line, but could not find one for a reasonable price. I did, however, find the Mugatu from Star Trek, and that was going to be the creature in this story. Since then, however, Hasbro gave us the Yeti in their new Adventure Team set, "Search for the Yeti." This figure is stuffed, but has a wire infrastructure. Note how well he can be posed, as he walks away near the end. It really looks like his weight is accurate, and the distribution of it well depicted, thanks to its great flexibility and stability.
As for a title, I was going to call it "Northern Lights" or "Aurora Borealis", but that was not descriptive enough, and too generic. So I thought of the falling of the lights, and decided upon "Lightfall."
By the time the storyboard was finished, and I began thinking about pre-production, the snow faded into spring, and it was far too late to work on the story in 2001. So I figured I'd shoot it in 2002, and I continued gathering the necessary parts for the story. I wanted to feature a polar bear, so I borrowed one for the shoot. However, that year we got absolutely no snow!
Well, I had the bear in-hand, so I used it in the filming of my story "Search for the Albino Bigfoot Sasquatch". (We did get one nice snowfall while I was shooting that story, allowing me to get the image of the bear back in the arctic.)
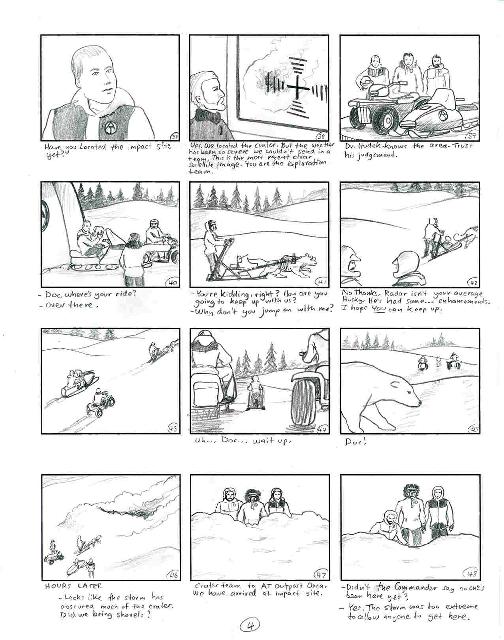
2003 gave us the most snow in years! It was perfect. So I got my act together and shot it during one very cold, very wet day in February, with Sean Dickinson helping immensely, by setting up most of the figures, sweeping footprints, and just keeping it all together.
However, as the cold, wet day went on, the light began to fade, and the rain began. The second exterior segment, the arrival and events at the crater, could not be shot that day. So I went back the following Monday morning, which was sunny and not as cold, and shot that segment alone from the time I saw my daughter off at her school bus stop, and before I went to work.
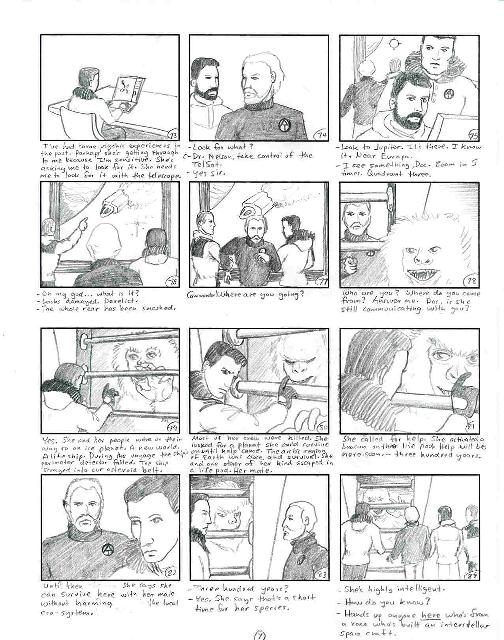
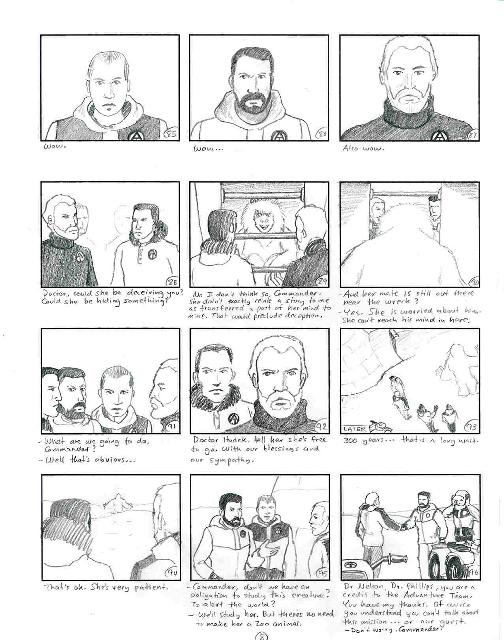
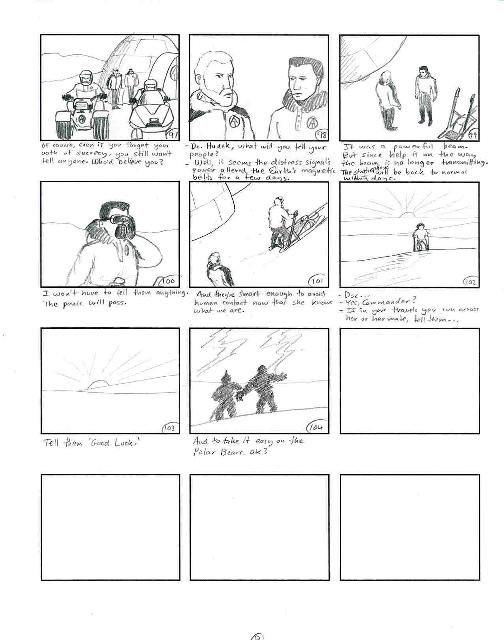
The storyboard went through a few revisions, but remained very similar through the last two years, which to me meant the story was fairly solid. Usually, if a story isn't good, I'll see it after separating myself from it for a while. I kept coming back to this one to see if it needed changing, and found it was ok as it was.
Click on any page to see an enlargement.
 |
 |
 |
 |
 |
 |
 |
 |
 |
So did I mention the first shoot day was cold and wet? We were fighting a rainy forecast, and got the shots we needed as quickly as possible, but while it was not yet raining, there was a nice drizzly mist in the air, making everything wet. The storyboard sheets were soaked through in minutes.
Here are a few images of the first exterior shoot. This was February 1, 2003.
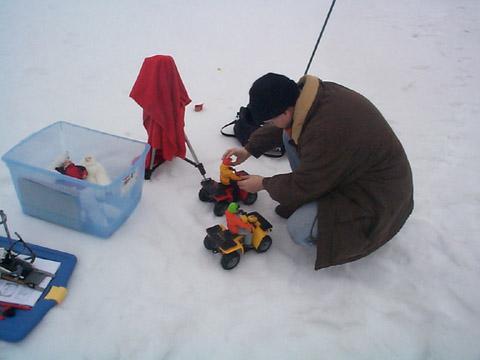
That's me, setting Phillips and Nelson up on their ATVs.
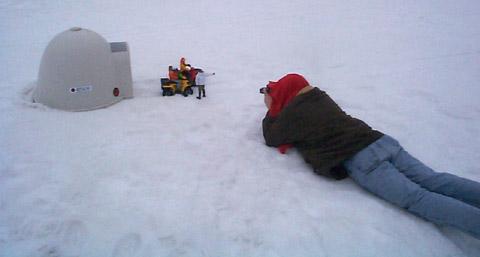
And here's me taking a typical shot. The towel in the shot was necessary in
order to see the LCD screen, and get the shot.
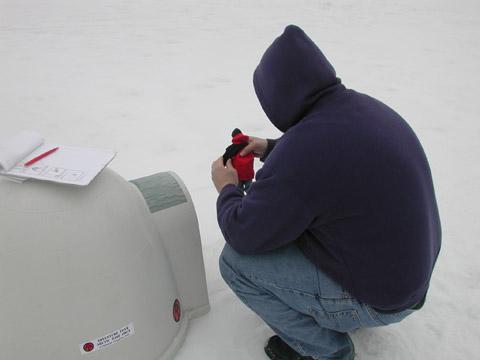
Sean Dickinson poses the Commander for a shot.

Here's me, after the shoot. I'm soaked through, and partially coated with snow-ice
crystals.
As you can see, I was down in the snow for most of the shoot. The fronts of my thighs were slightly numb for over a week. Consider that a lesson learned!
The next day, shoot two, February 3, 2003, I didn't get nearly as wet, since the entire location was on an angled hill, I didn't have to lie down in the snow once.
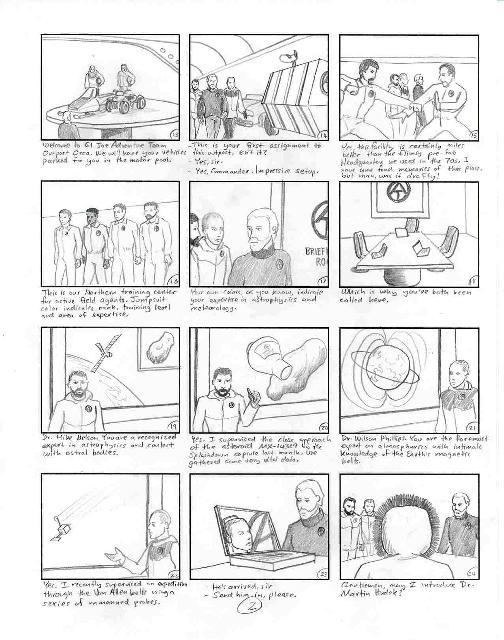
Once the exteriors were shot, I knew I could begin work on the interior component of the story. The story demanded a slightly more elaborate set than I've used previously, which consisted of just a few sheets of beige foam-core board, sometimes with a door, or even working lights.
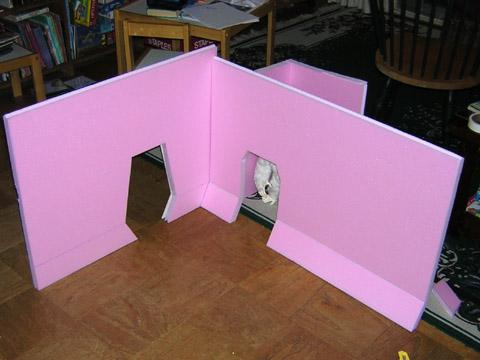
Rather than use foam-core board for this set, I decided early on to use insulating styrofoam, which is thick, relatively easy to work with, and would hold up very well, visually. I found sheets 3' by 8' or so, for about $6 each.
To begin with, I needed a holding cell, connecting some way to the main Adventure Team Conference Room. So I came up with the following design concept sketch.
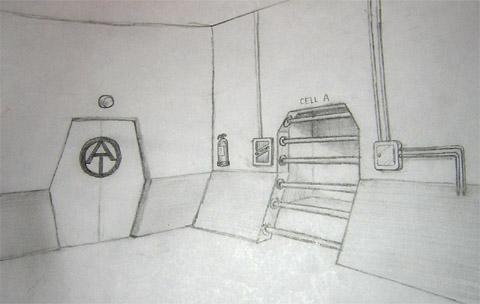
As you can see, I held fairly tightly to the design when cutting the walls, including the interesting lower-wall angle that adds a bit of science-fiction high-tech look to the place. The one detail I wish I hadn't forgotten was the fire extinguisher. When we assembled the sets and began shooting, I completely forgot it.
Here, the sheets are cut and assembled before painting, to make sure it all fits together:
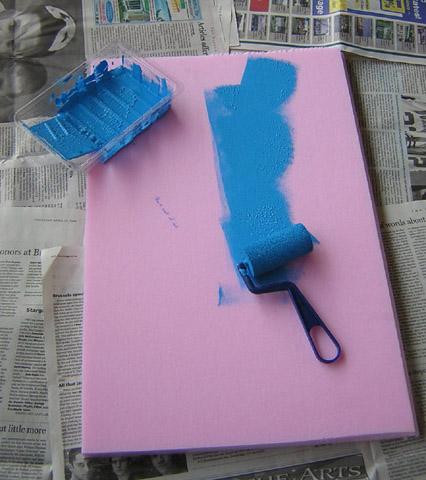
A small, sponge mini-roller was used for painting craft paint, all found at WalMart, created a very nice finish on the raw, unprimed styrofoam. Later, I masked out the top and painted the bottom of the wall in a darker blue tone. I found that the main blue was a bit brighter than I had planned, but it turned out ok.
We used one of the conference rooms at my office for the third shoot - April 21, 2003, the interiors - again, mostly because I loved the surface of the conference table. That marbling makes a great floor. I lugged the sets in, and Sean and I set them up. To connect adjoining walls, I used long wood screws, which worked in the styrofoam perfectly, correcting a slight warping the styrofoam material had.
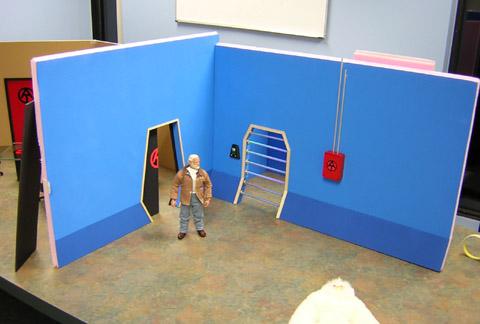
As you can see here, the set really did stay true to the concept sketch. The cell's bars are actually pencils poked into the styrofoam, with finishing washers to make them look cool and high-tech. They shine with an irridescence to give the indication that they may be made up of energy, or be electrified in some way. With all the high-tech feel, I opted to use unpainted wood for the doors' moulding strips, for a counterpoint of natural material.
This door uses two pieces of black foam-core with an AT logo on it. I only put one sticker on, so each time the camera moved from room to room, we had to reverse the doors so the logo pointed towards the camera.
The wall to the AT conference room had a corresponding doorway cut into it to connect smoothly to the cell area:
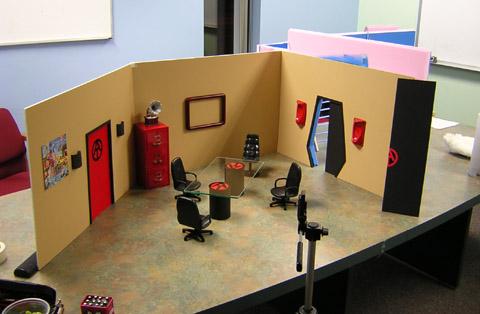
The sweetest new addition to my decorative pieces are the three new office chairs
which were originally clocks that hold business cards. Found three of them at
a local "Tuesday Morning" shop. I wish I could have found more!
Not shown here, but visible in the story, is the coat rack in the corner, seen previously in my Doctor Who story, Redemption.
I found that evening that I had forgotten a shot, so I shot the hand-shake with Dr. Hudek the next day at lunch hour. That was the fourth shoot.
Still, there was one more scene to shoot - the transition between the outside and inside of the huge underground Adventure Team Outpost Orca. This was done on April 23, 2003.
Using another piece of styrofoam and yellow electrical tape, I created the octagonal elevator platform, resting on three sugar tins, painted silver.
The sad thing is I lined an office wall with nearly a dozen of my vehicles, and the angles of the photographs show only two! But luckily the Iron Giant, as seen in the GI Joe vs. Aliens story, is visible. A bit of internal consistency I wanted to maintain.
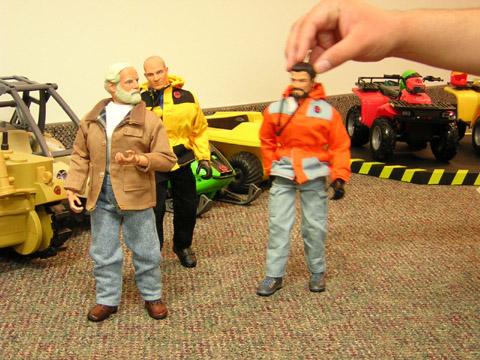
Here, Sean Dickinson steadies Dr. Mike Nelson. Some of my AT vehicles are visible
here.
Once this shoot was completed, I could begin editing. Well, the fact was I had the editing and text ready for the exteriors ever since a few days after those shoots were completed. I could now finally fill the holes in the story and see how it would all look.
The only thing left - the compositing.
Many of the exterior shots had power lines and other unsightly features in them. I had to use some painting techniques to remove those features.
Of course we all know the arctic has no trees, but since Massachusetts has plenty of trees, I was kind of stuck. I had originally lined up this gorgeous parcel of land to shoot on, but the school that owned the property renegged, and refused to allow me entrance to their grounds. This was sad, because the land was a long, sloping hill that goes up to a flat, treeless horizon - perfect arctic.
And since it would take a long time, and it required way too much fakery, I opted not to digitally remove the trees, but kept them in instead. So I guess the Orca base, at least, is in the sub-arctic, below the tree line.
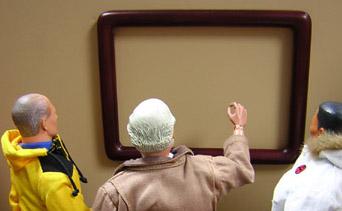
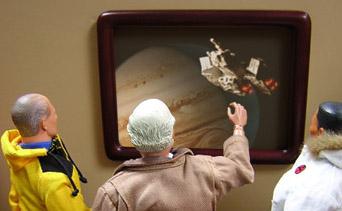
However many shots required compositing work. During much of the exposition, the characters stand in front of an empty picture frame, and their backgrounds are revealed. Later, the screen must show the exploration of Jupiter, and the UI for the TelSat command.
To do this, I shot two satellite probes I had, from Hot Wheels' Space Exploration series, and a Galoob Micromachine Nostromo from Alien. I composited these over images of space, and for the ship, hand-drew in a little flame for the damage.
This was achieved with plenty of internet searching to find appropriate images. I composited them together, then added them into the story images, cutting away anything that should be in the foreground, such as hands and heads. The results worked out fairly well.
Here's an example:
 |
 |
|
Before - empty photo frame
|
After - Jupiter, and space ship.
|
A lot of shots required this treatment, but I'm happy with the final result.
The web page editing was easy, then came this page. I like to keep a long, detailed page of notes and thoughts, in case anyone's interested in why the hell I put myself through all this just for a story featuring GI Joes. Perhaps I'll inspire someone to put their own story together, and I can read that.
I've thought about it a lot. I guess it comes from a long desire to work in films or comics. I find that this medium is as good as the medium of the comic book, and for me, better, as my illustrative skills are somewhat less than my skills with toys and physical sets.
The main reason I do it is for this very second you're experiencing now. You are reading this, and that makes me happy. It's all worth it. I hope you enjoy it. If not, that's ok too.
Shameless Attempt For Donations
When I first opened my PayPal Tip Jar, it stirred the soup of controversy in the Sandbox (alt.toys.gi-joe newsgroup) when some people thought it crude of me to ask for money for what is, essentially, a hobby of mine. A small group of people thought I was charging for my stories.
I'm not.
I simply ask that if you have some extra cash, and feel like it, to toss some in the tip jar. All proceeds help create the next story, either by providing cash for sets and construction materials, characters, clothing, not to mention the continual monthly cost of my pop-up-free, banner-free web space. There is absolutely no obligation whatever.
This story is completely free. Enjoy! Spread it around. And if the spirit moves you, click on the Tip Jar, and donate a few sheckles towards the cause. It's really that simple. There's only one rule: You must be able to spare the change, and have no regrets in tossing it into the jar. And of course, you must have a valid PayPal account.
|
If you enjoyed this story, and would like to help make
more stories, please consider making a small donation via PayPal by clicking
the button below.
|
![]()
![]()
![]()

|
|