 m
m 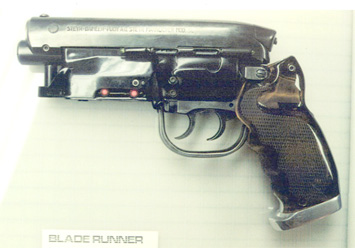
Conversion Page
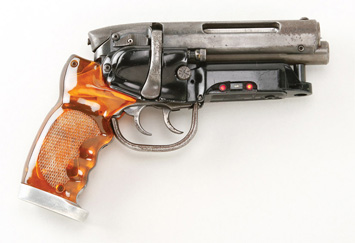
For years I've wanted a model of the pistol Rick Deckard uses in the film Blade Runner. These, however, are not cheap. Sometimes you can find a resin model on eBay and sometimes there are other prop replicas. The resin models go for well over a hundred bucks, and the others can go for $300 or more.
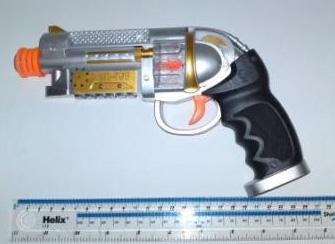
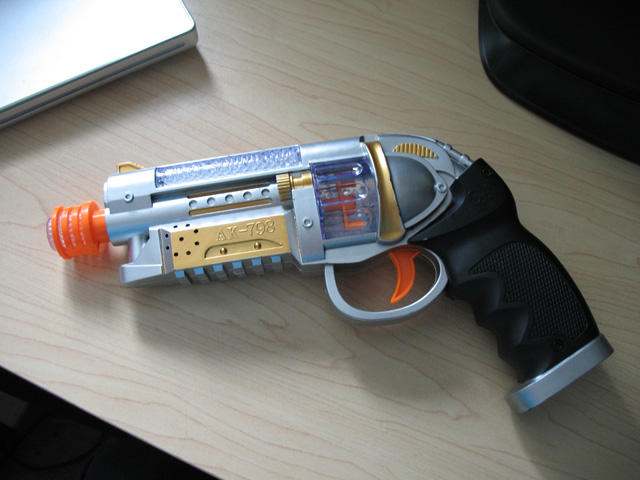
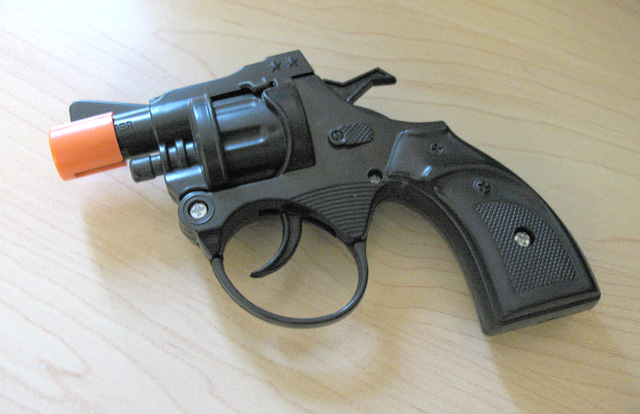
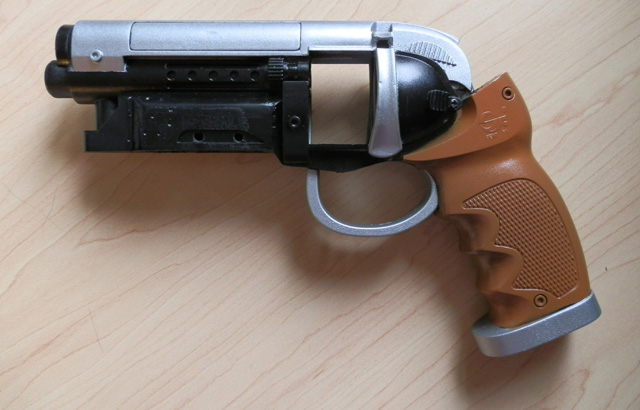
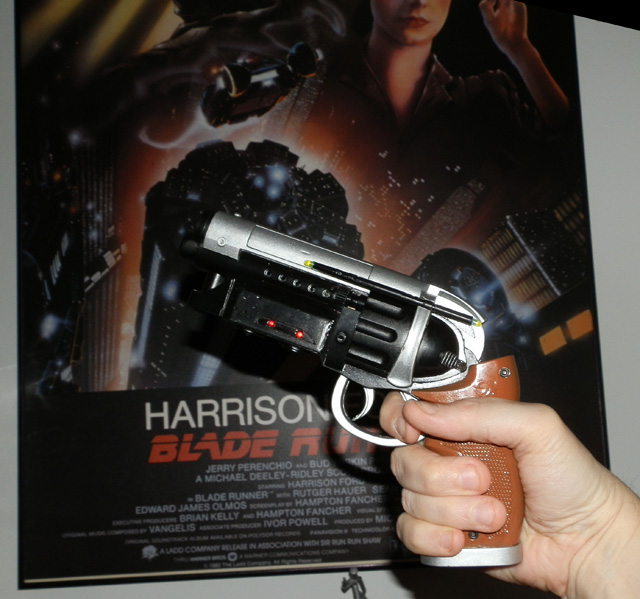
Recently I stumbled across this item, sold on eBay from a UK seller.
It is a cheap, Chinese toy, modeled on the classic Blade Runner pistol. I recognized the iconic shape immediately.
m
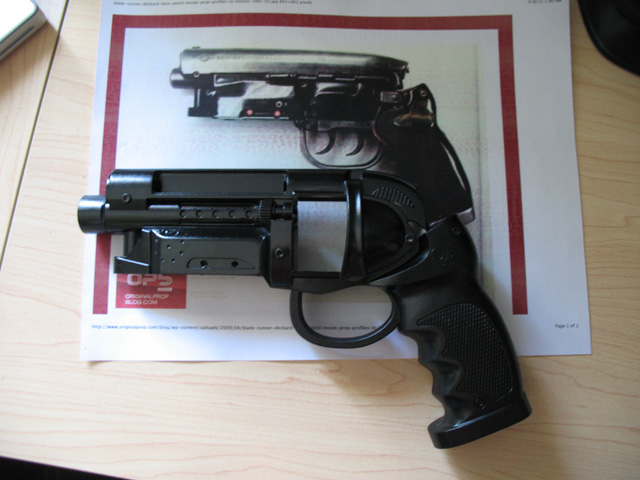
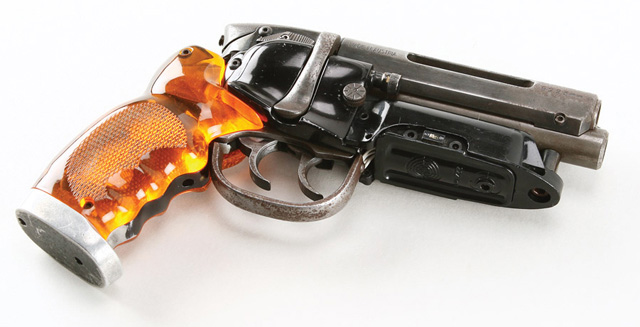
Immediately I noticed the resemblance to the famed PKD Special (a name fans began to call this gun after the movie's release.) Note the similarity:
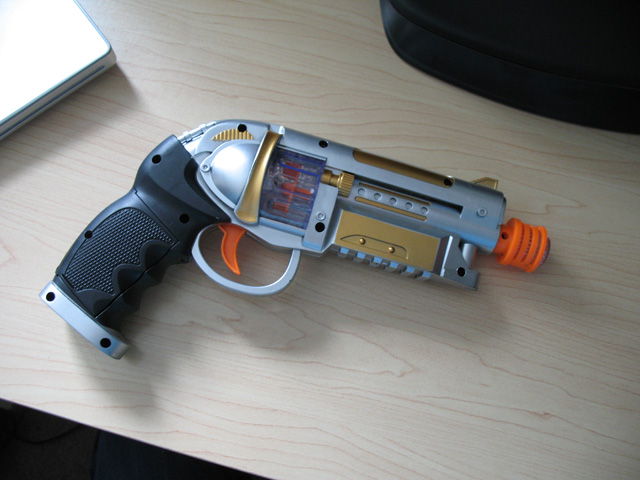
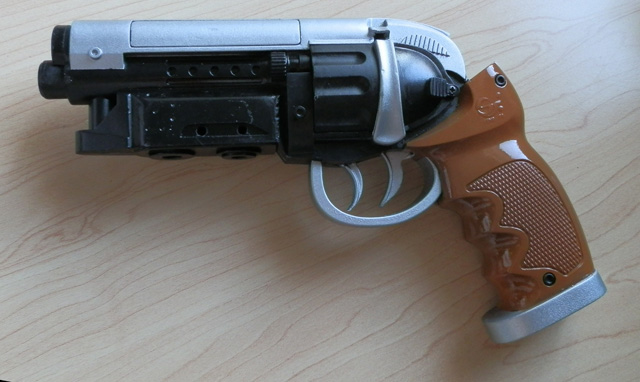
Ironically, it looks more like the other side of this asymmetrical pistol:
 m
m 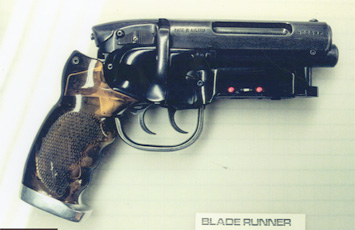
Selling price, shipped from the UK was less than $15.00
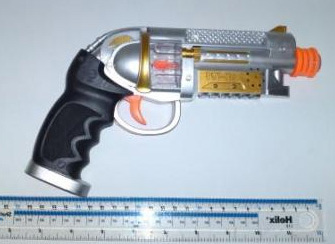
Of course there are some dis-similarities, like the fact that the Chinese toy gun is symmetrical, so the curved bolt lever is on both sides in the toy, whereas it's only on the right side on the real prop.
Also, the real prop has amber grips on a metal frame, lending a depth that you just can't achieve on a solid piece. I'd have to make do.
So I ordered one of these, and in just over a week it arrived.
The original has electronics. Three AA batteries fit in the grip, and the trigger activates annoying gun and yelling sounds, as well as flashes two blue LEDs, one in the barrel and one in the bullet chamber. Inside the bullet chamber is a fan powered by a motor. The fan blows around small sphers of styrofoam. A fun effect for a toy, I'm sure. Then the orange barrel that protrudes from the front reciprocates quickly back and forth, powered by the same motor. From the muzzle comes a yellow light (a light bulb smaller than an incandescent christmas tree bulb). Last, a real red laser pointer shoots out the front just above the barrel.
Stage 1 - Examining and Planning
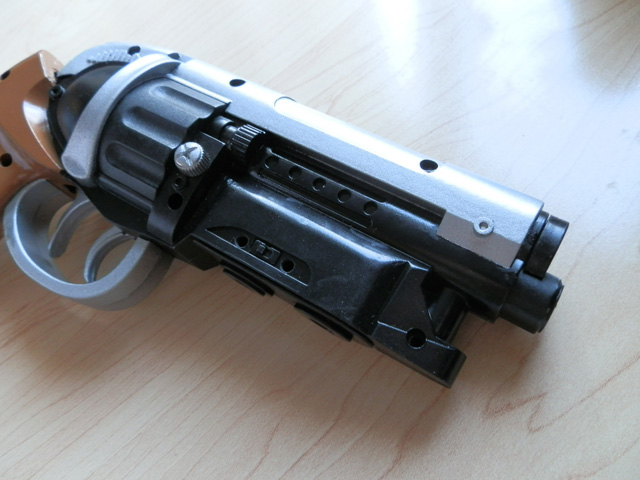
Here is the actual item, in my hot little hands. Let's go over the major differences between this and the real prop.
As I mentioned, the screw holes are ugly, and the thing is essentially symmetrical, but I'll make do. Let's start with the major differences, and what I'd have to do to fix that.
(Note: I never set out to make an exact replica of the movie prop, because it would take more skill and time than I have. I'm calling this approximation the PKD Detective Special v2.0, a sister model of Deckard's gun, carried by newer Blade Runners. Deckard retired, remember? Never got the upgrade.)
One trigger. I'd have to fix that. But on the good side: the working trigger actually triggers the electronics. I'll keep that functionality.
Orange barrel. Has to go. But there's enough plastic cylinder behind that ugly flared nozzle to make a more realistic under-barrel.
The bevels of the gold piece under the barrels are sharp. The real deal is smooth. Easy fix.
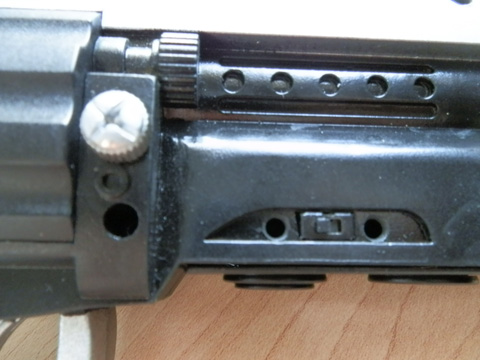
The ribbing under the under-barrel section has to go. The original has a plate with circles and a red LED.
The bullet cylinder. On the real prop this is a smooth shape of metal. I'm just going to keep it like this for ease sake.
Gun sight. A rhomboid gun sight typical of a Smith & Wesson pistol has to go. In its place I'd have to put a round nub, either a screw head or a rivet.
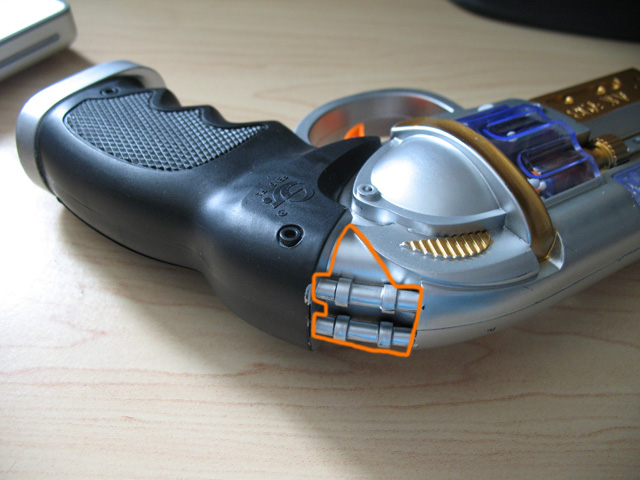
The space between the upper grip and the rear of the pistol carriage has a plastic volume, and two little cylinders attached. Those will have to go to make the iconic gap.
The pistol grip is perfect. Except that it, too, is symmetrical, it doesn't have to change. Making it look amber won't be easy, so I'll likely just make it look orange-ish, and very shiny.
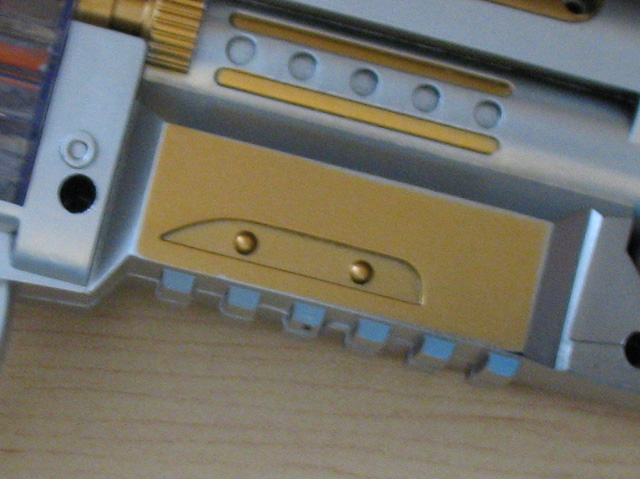
Little nubs on the gold underbarrel piece have to be drilled out to put real LEDs in there.
The text "AK-798" will have to be sanded off.
Likewise, though you can't really see it clearly, on the left side, the barrel has a clear blue plastic piece. It has text on it as well that reads: "LASER SOUND GUN". I'll have to file that off as well.
Stage 2 - Removing the Electronics
The gun comes apart after removing a number of small black screws. These gaping screw holes are normal for toys, but will make the final less realistic. I may have to deal with that... but later.
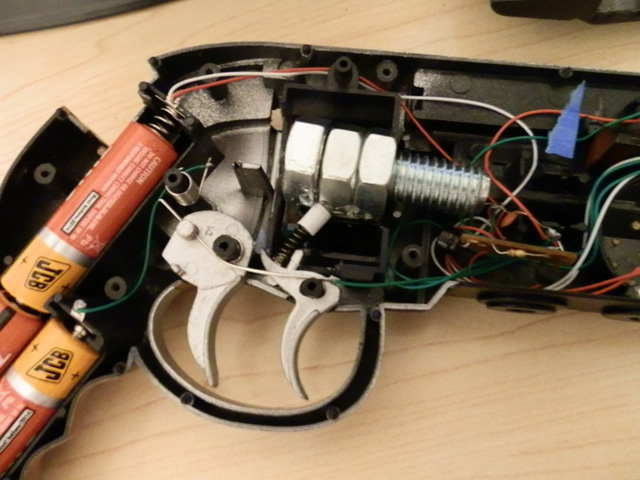
The battery compartment cover slips out, the batteries come out, and all of the electronics lift neatly out of the gun without complaint.
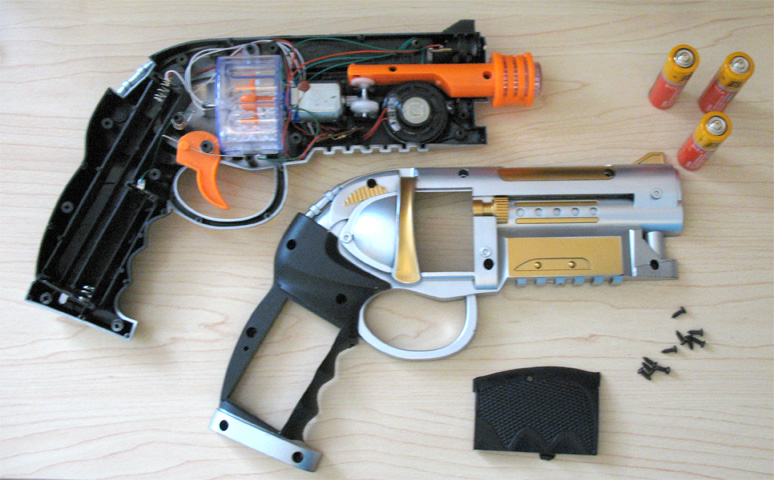
The electronics are confined to the left half of the gun. I'll have to try to keep my revisions similarly constrained, though some items may make it difficult to do that.
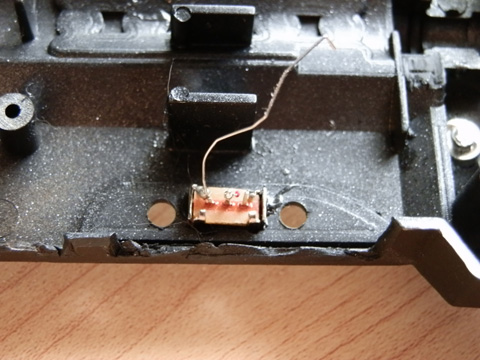
A closer look at the electronics:
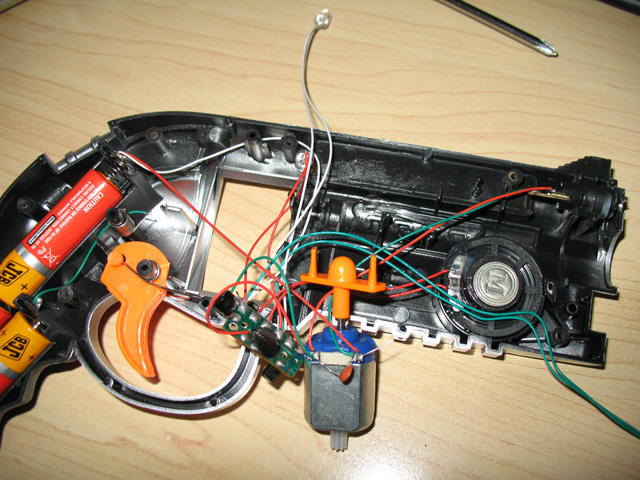
I drew a diagram of the circuitry so I could remove any of it I had to and rewire it later. It turns out I had to remove or break very little.
I decided the motor had to go. There is a capacitor running across the two leads of the motor, in parallel with the motor, but in serial with the laser pointer, so I couldn't just cut the motor out of the circuit. I had to snip the copper leads of the motor, rendering the motor more or less useless. But I wasn't going to need it anyway.
(I wish I had rethought that. The vibration and sound might help. But I re-thought it after I had removed the brass leads to the motor.)
I left the speaker in for weight, (but decided it didn't contribute enough weight, and removed it.) Turns out I could simply snip the wires to the speaker and it affected none of the other circuitry. Bye-bye speaker.
There is a circuit board that controls sound and all the other electronics, including the LEDs. I would have to solder all the new LEDs to this if I wanted it to work with the trigger.
However, later consideration made me want, rather, to put the five red LEDs (two on each side of the underbarrel, and one on the very bottom of the underbarrel) on a switch, which exsists on the original prop between the two LEDs on the right half of the gun. My plan is to make that switch active, powering those five LEDs, directly from the battery with resistors attached, rather than hooking those up to the trigger.
Stage 3 - Aesthetics - First Steps
First to the aesthetics. Time to break out a Dremel and some cutting tools and go nuts. Plenty of spray paint.
Not owning a spray gun, I used store-bought Krylon spray paint. There is a Hammered Metal silver paint I like, though as I went, I realized it's too silver. Next time I tackle one of these guns, I'll probably buy a spray gun and mix the silver with Satin Black and get a somewhat silver finish, and not this bright silver one. Oh well, live and learn.
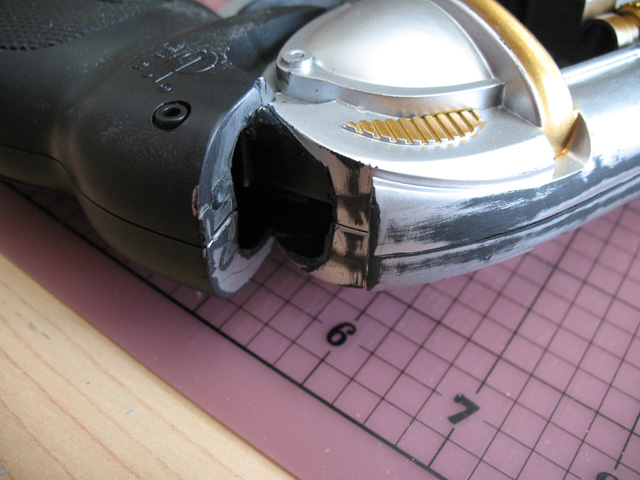
First I removed the extra plastic at the joining of the handgrip and the end of the carriage. Immediately the Blade Runner shape began to emerge.
The result leaves a gaping hole that will have to be filled later.
And I removed the ribbed plating under the under-barrel, and began sanding rough edtes, as well as the bevels on the underbarrel to remove the AK-798 text. I filled the speaker holes with plastic wood.
On the real prop there is a push switch where a right-handed user's thumb would be. I scoured Dollar Tree and found a small green pistol that had such a molding, and bought this for two reasons:
1 - To get this little switch
2 - To test paint the handle to get a nice orange brown finish
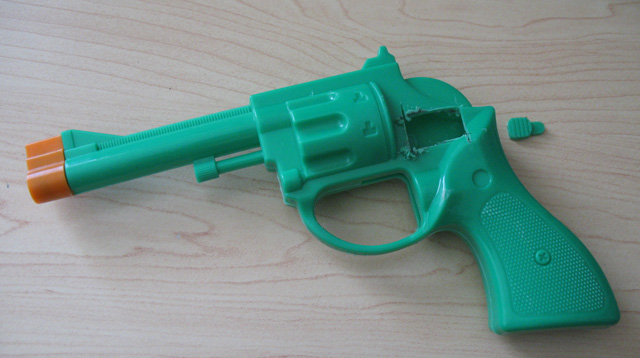
Here's a test fitting of the switch:
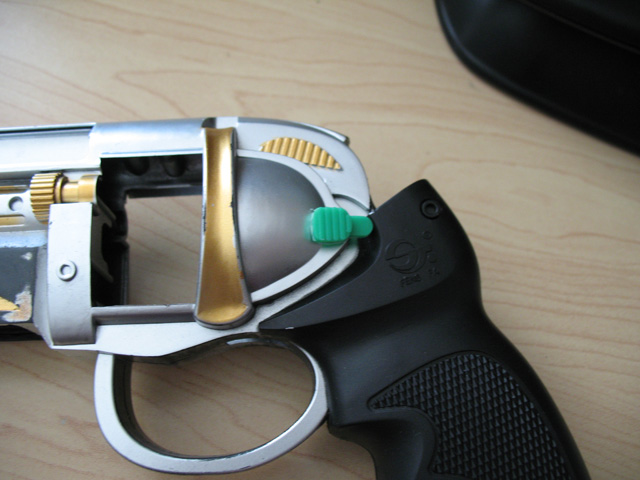
I'll attach it with a screw later, after painting.
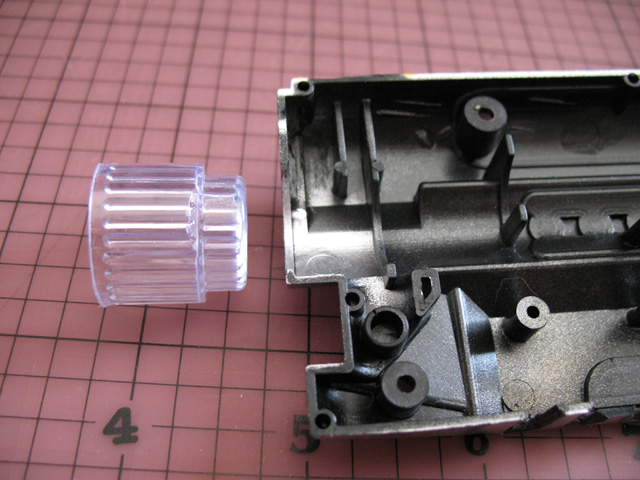
Then I thought about the lower gun barrel, and how to extend it. At first I thought the clear plastic piece inside the orange flaring would work. I would just have to grind an edge inside the bevel to allow it to be held in place when the two halves of the pistol were put together (without this it was too large to fit, and would need gluing.)
NOTE: I abandoned this for a better idea. So if you're following along, don't do this:
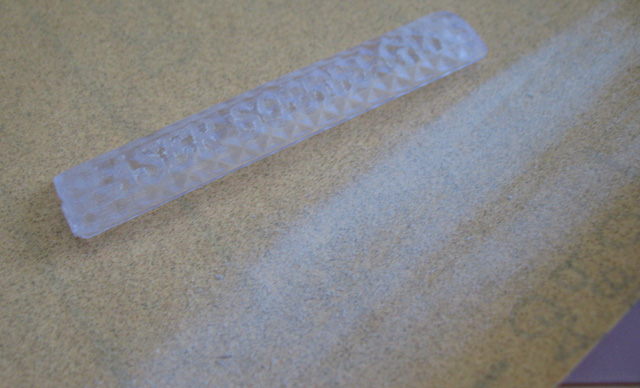
Next would be my treatment of the blue plastic barrel filler. Removing the text with sand paper.
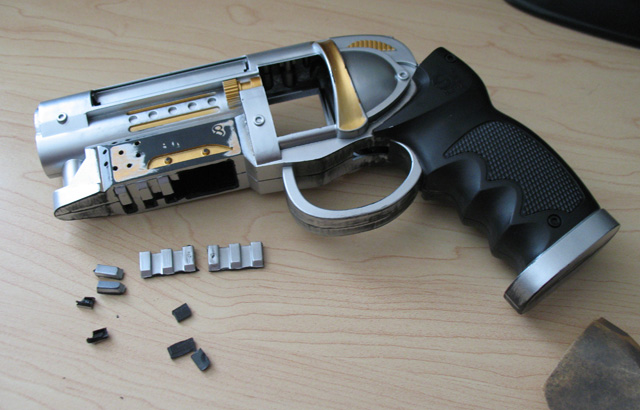
I also removed the two halves of the rhomboid gun sight:
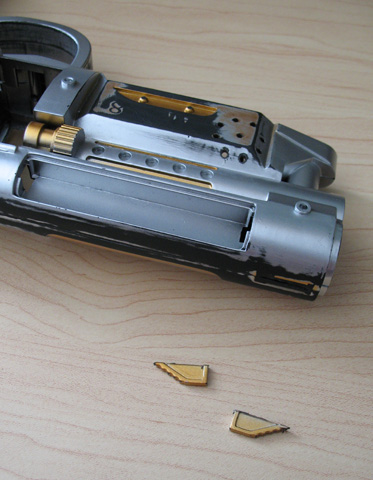
And sanded the remaining area smooth.
Then I drilled out the nubs for the red LEDs to go in. I'd have to smooth out the flash left by the drill:
This picture is also a good image of the small circles and lines (in gold) cut into the barrel, just above the two holes, which are not on the original prop, and I couldn't be bothered to try to hide. So I'm leaving these be...
Then I painted this Satin Black along with the entire pistol, including the now-abandoned original attempt at extending the barrel: (Note the plastic barrel cover isn't in place in this image.)
Not a bad start. Not a bad start at all.
Stage 4 - Aesthetics - Step 2 - Details
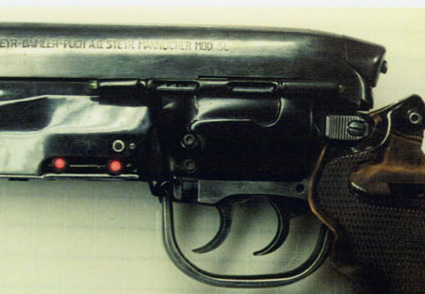
The original prop can be seen with a tubular device on the side that is speculated to be some kind of laser sight. You can see it in this pic.
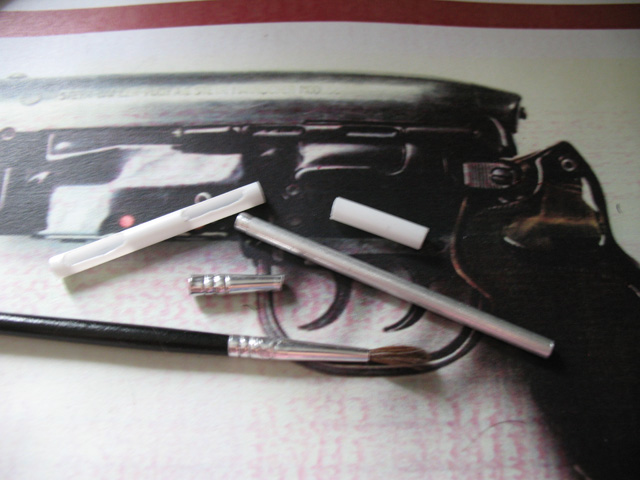
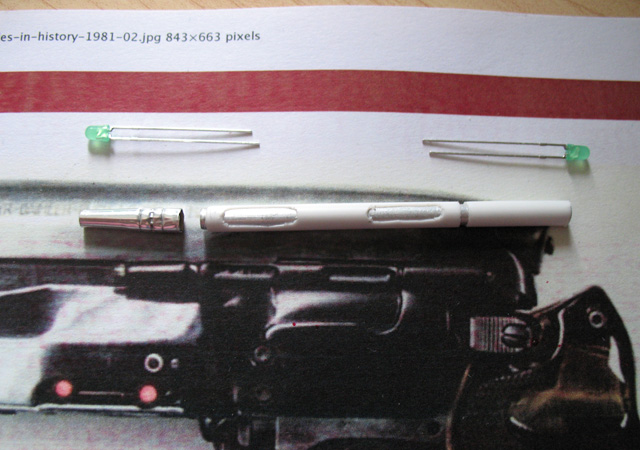
I had some aluminum tubing from previous projects, but drilling out smooth grooves proved impossible for me. So I sought out a thich plastic straw, or something equivalent. I found a plastic stick that holds mylar balloons for kids, at an iParty store. It fit over the smaller aluminum tube perfectly.
For the front, I found a ferule of a paint brush to fit the bill.
On either end of this, which is hard to see in the above picture, is a small green miniature LED.
So I cobbled together something that wasn't too embarrassing. Truthfully, I'm a bit embarrassed at my shoddy work on the plastic straw, and will likely redo it:
I went to Radio Shack to find some LEDs. Almost all of them had to be smaller than the standard LED size, and it was hard to find green miniatures.
I bought a 20 pack assortment which included some green minis and some red minis, but to do more guns, I found this interesting do-it-yourself electronics kit which included 16 mini LEDs, including some green, and some yellow, but mostly red. Economy-wise, it was cheaper to buy this set, so I did:
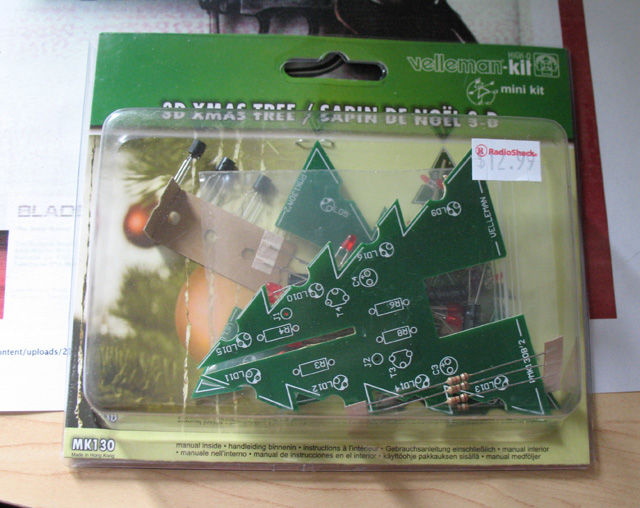
I assembled this (except the LEDs), and painted it black. No pic of the painted one yet... later. Here it is, unpainted, almost assembled.
This would necessitate a groove cut into the left side of the gun's bolt lever, which shouldn't be there in the first place, in order to align it along the barrel.
But on to other things:
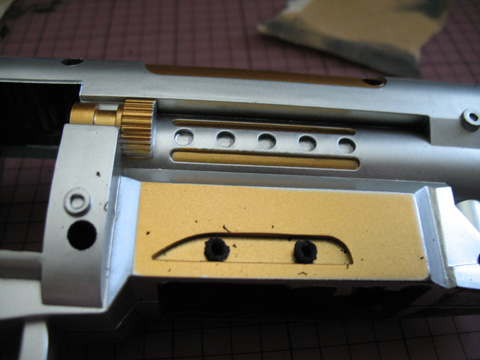
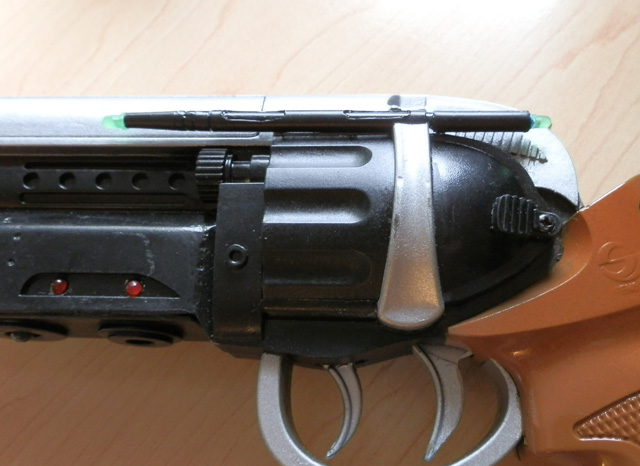
In this picture, you can see the underplate with the red LED and concentric circles. Though the LED is not bisible here, it's in the front-most hole on the plate.
Here, also note the simple switch between the two underbarrel LEDs. I'll add that later. Also the second trigger and the large metal screw-head just in front of the bolt-action lever are visible.
Let's start with that plate:
I took a CD cover and cut a rough rectangle, and then sanded the edges and smoothed out the front to a round shape. I drilled a hole for the LED.
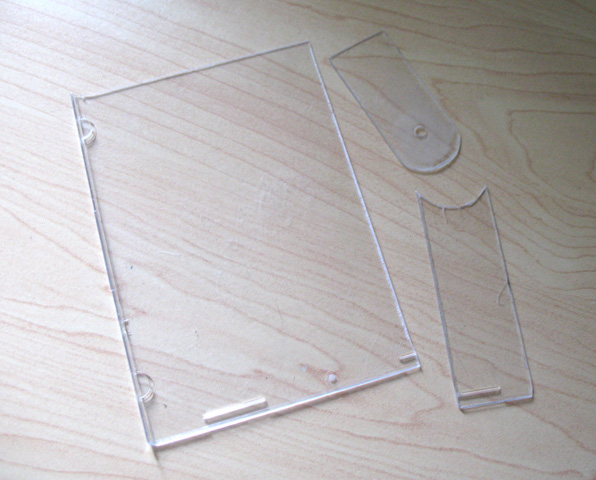
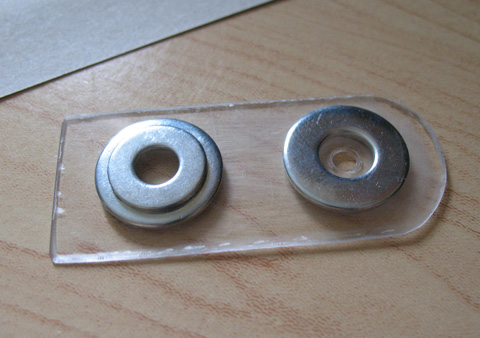
Using metal washers (and binary expoxy) I replicated this fairly well.
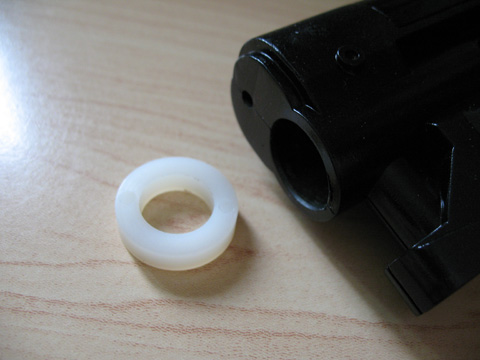
Next I thought I would figure out the extender on the upper barrel. It should be circular, but with a piece cut out to accommodate the lower barrel.
I decided to use a section of the original orange barrel, smoothed out, and a washer added to simulate a bullet-sized bore hole for that.
The washer (a vinyl washer found at Ace Home Hardware) would do the trick.
Here are some of the recent parts painted black, including the now abandoned lower barrel extender (Sorry... low-light photo)

Now for the second trigger. I scoured stores looking for the perfect item and found this detective's .38 famous in many TV cop shows of the 1970s.
I removed the trigger:
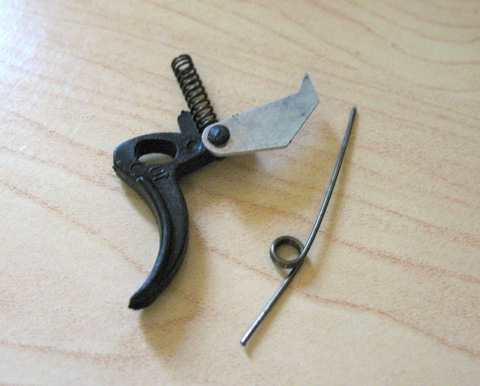
I figured I wouldn't need the metal part or the spring wire. Since it has a small spring already, I'll try to adapt that to allow the trigger some real action.
Had to just groove out a small space for it on both halves of the gun. And perhaps not by coincidence (I think the makers toyed with putting in the second trigger but abandoned the idea) there is a post perfectly positioned for the second trigger:
I am determined that this spring not be just aesthetic, though it may not have any electronic function... maybe...
Stage 5 - Aesthetics - The Grip and Finishing Details
Most pictures of the real PKD Special show parts of the gun in silver, or at least a shinier metal than black. Then other parts of the gun are black. To achieve that, with simply spray cans, and not a spray gun which would allow me to mix colors, I opted to go with a metallic paint that dries to a dappled finish.
I masked off the black portions of the gun and sprayed it:
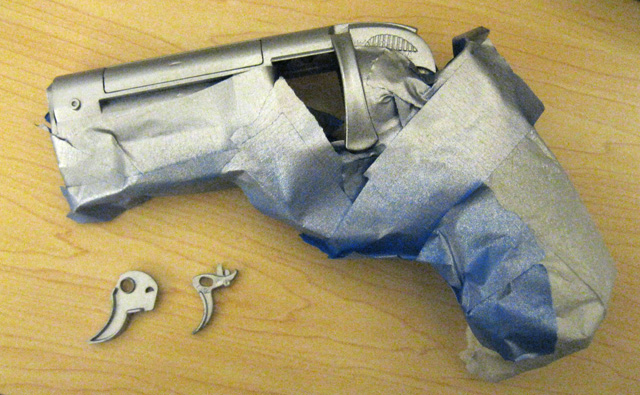
In the photo you also see both triggers painted silver. I removed the masking:
The grip of the real PKD Special is very special indeed. It's made of amber plastic or resin. It is translucent. Sadly, I cannot achieve that effect on this gun because the handle is quite definitely solid.
However, I attempted, using a brown spray paint, and an orange spray paint, applied in various coats, along with several coats of clear gloss, to achieve at least the right color and sheen.
After painting it with brown, then lightly spraying with orange, and then lightly again with brown to achieve a kind of amber color, I peeled the tape off to see the result:
Stupidly, had to re-mask it to paint the clear gloss coats. (I should have just left it...) Anyway, after remasking and spraying about 5-7 coats of clear, you get this:
And so that's about the best I can expect for this handle.
On the right side of the PKD Special is a metal bolt that closely resembles a computer case bolt. The original has some extra cuts, so I used a Dremel to add cuts to a standard computer case hand-bolt, drilled a hole in the body and screwed this in, epoxying it in place. I had painted the bolt silver, but in reality, it didn't help much. Probably best to leave it alone.
Stage 6 - Additions and Electronics
My plan was to use the basics of the electronics inside. Because the speaker was loud and obnoxious, I removed that by simply cutting the wires attaching it.
Then I removed the motor, because I wouldn't need that either. However, there was a capacitor across the motor's leads that was important to the laser pointer operation, so I simply cut the leads to the motor itself, leaving the circuitry as it was.
Slider Switch and four mini LEDs
The real prop gun has a small slider switch between the two mini red LEDs on the right-hand side of the gun.
My aim was to add a mirco slider switch and five LEDs to the circuitry. I bought small switches at Radio Shack, but they were too big. By serendipity, I had, earlier last year, cannibalized several motorized battle bugs (for the motors) and kept the switches, which were perfectly sized.
Four mini LEDs would replace the plastic nubs seen here:
I drilled those nubs out, making holes for the LEDs, and installed a micro slider switch. I cut the shaft of the switch down a bit so it wouldn't stick out too much, and painted it black:
Wiring the inside of this thing was incredibly frustrating. I could not find hobby wire as fine as the wiring already existing inside the gun. I tried a couple of gauges but whenever I did anything the wiring was so stiff it was impossible to place inside, and putting LEDs into place with such stiff wiring separating them became just way too frustrating.
Note to self: Next time, glue the LEDs in place, and solder them using finer wire in place.
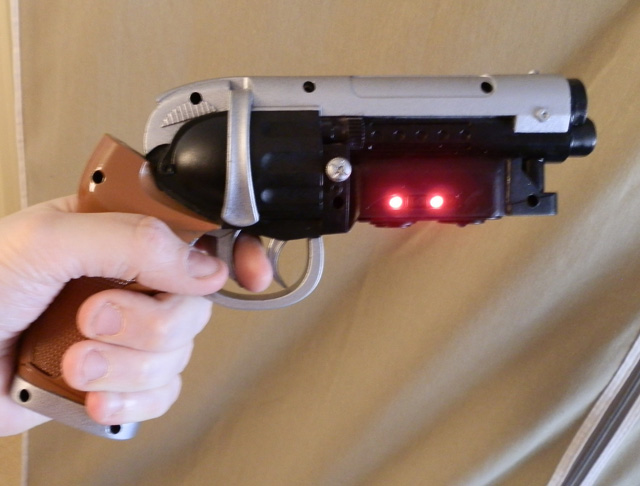
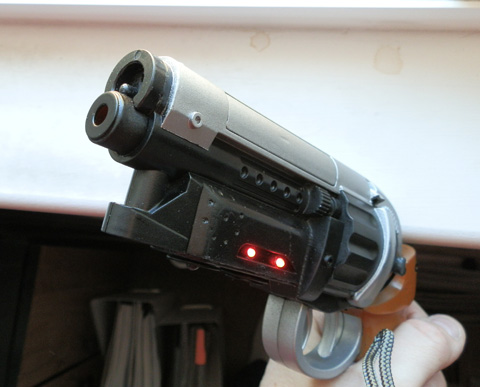
The result is four LEDs (two on either side of the under-barrel) that come on when you slide the switch to the ON position:
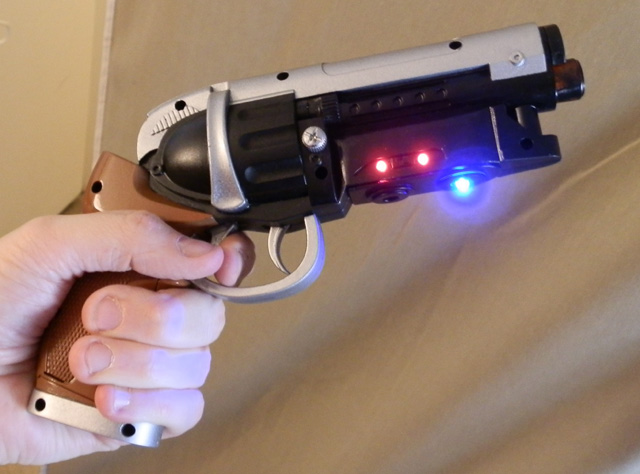
Bottom LED
Underneath the gun, the plate I made had room for a standard sized red LED, which is what belongs there. However, nothing I could do would allow me to replace the blue flashing LED of the same size with the red one. Whenever I wired the red one inline, the blue one stopped working, and the red one never did.
So I compromised and left the flashing blue LED to hang out at the bottom.
This now flashes when the trigger is pulled. It flashes bright blue. Oh well, maybe next time I'll figure out how to replace it with a real red LED.
The Second Trigger
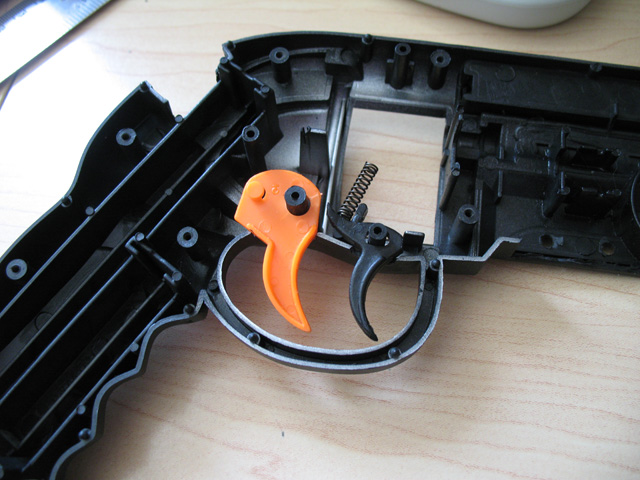
As noted before, the second trigger fell into place easily, as there was already a post for it inside the gun's structure, like they planned it this way.
I removed the back flashing from the main trigger to make it match the original, and the second trigger.
Note to self: This was maybe a mistake. The flashing made the trigger wider, and more stable as it pivoted inside the trigger slot. Still, when the spring was replaced on the trigger, it was fairly stable as it was. But perhaps next time, leave the trigger alone?
Notice also that for weight, I added a heavy metal bolt and several heavy metal nuts. I used the nuts to position the bolt using one of the plastic pieces inside the gun.
I had to cut away parts of the two-piece cylinder chamber, and that allowed the bolt to fit.
This also allowed me an anchor for the spring that belonged to the second trigger. In order to make sure the spring wouldn't just fly all over the place, I used a piece of plastic straw, epoxied onto the bolt, to secure the spring.
The smaller, front trigger works, but is not hooked up to anything, so it doesn't actually DO anything. I could easily have made it do something.
Target Sight
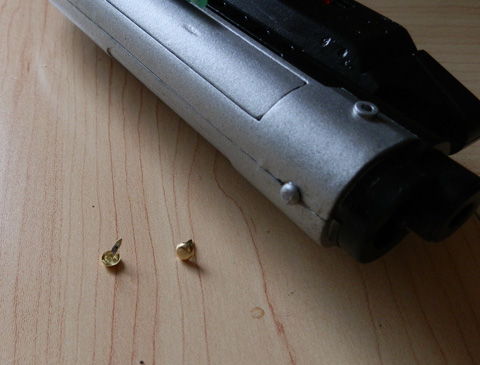
To put a visual target sight at the top of the barrel, I used a small brass brad, painted silver.
Seen here, the brad's "fingers" were pried apart, and one half was epoxied inside the gun's barrel on the left half. This way, when I closed the gun it would shut nicely, but I could open it again. Had I glued it to both sides, opening the gun would have been difficult.
I pulled the same trick on the overbarrel extender and the underbarrel panel.
Front Nub
There is a nub in front of the original. Hard to see in most photos. All I did was cut a small piece of plastic off a toy missile and painted it black, epoxying it to the underbarrel:
The Laser Sight?
Let's pretend that the dual green LED tubing on the left side is some kind of laser sighting system. I can't really see it having any use, what with a second LED aming back at the shooter. But what the hell.
I connected the two green mini LEDs to wiring that attached to the gun's trigger. (Arduous process). Feeding the wire through the tubing and into a hole in the side, then into the gun's body, I made sure the trigger operated the two LEDs.
I epoxied the "laser sight" to the side of the gun.
DONE.
WHEW!