
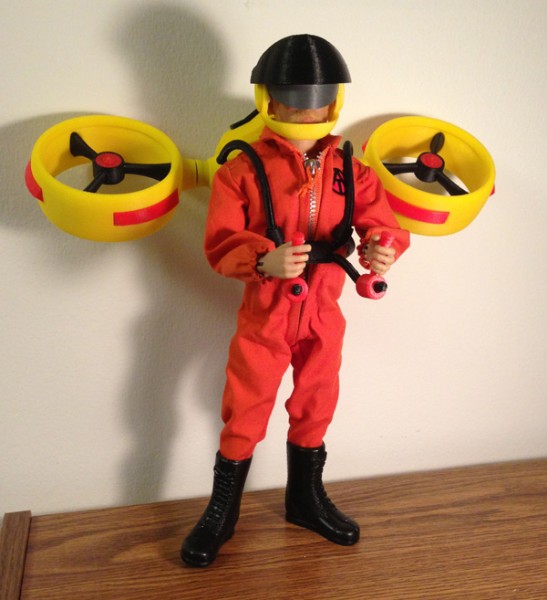
My latest project for Cotswold Collectibles is one they have been after me to do for a while now, ever since I showed it to Greg Brown at the Dallas GI Joe Convention.
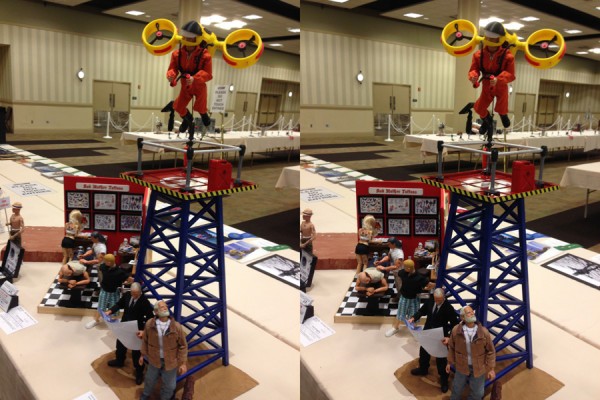
(Cross-eye stereo pic)
But I was very concerned that certain aspects of the design were fine for me, knowing what I know about it, but I was very hesitant to sell it to others due to extreme fragility in more than one aspect of the design.
Breakable Design
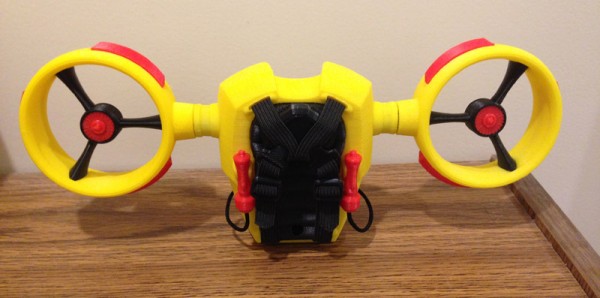
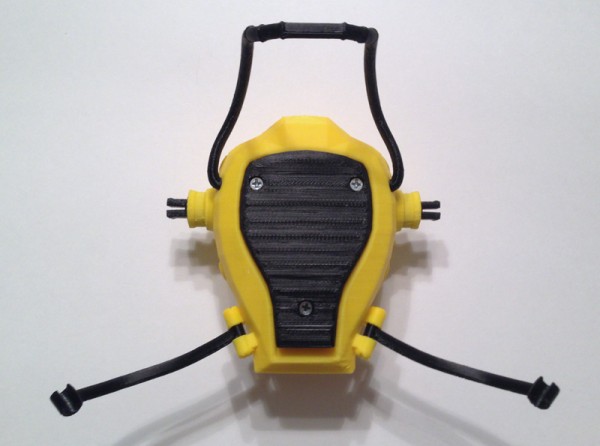
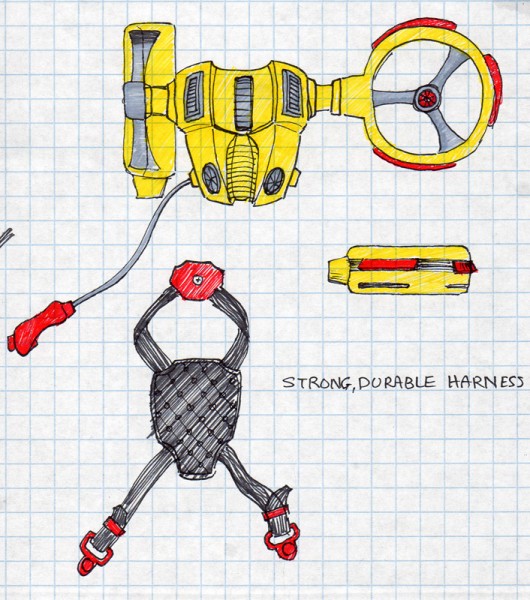
The harness, which is a hard pipe harness that hinges down over a body and clips into place using two swing-arms and c-clamp clasps, is very clever, and works perfectly. But unless you are very careful, it can break incredibly easily.
Then the clips that hold the engine housings onto the body are also relatively breakable. It might take some force, but they could break because they were printed vertically.
When you print a thin cylinder on a layered 3D printer, the layers fuse, but those layers are never as strong as a single layer is. A cylinder printed upright will snap like a twig very easily. The same cylinder printed sideways will be very hard to snap but will also not be very round.
It’s a trade-off. I created the first jetpack to look good, and not be terribly strong.
How To Fix It So I Could Sell It
How could I change the jetpack to make it so that I could confidently sell them without worrying someone would easily break it?
Harness
First, I harkened back to the Backpack Drone Carrier which I designed a couple of years ago. It held my aerial drone, and was a solar charging base as well as a launch pad for it. This used a harness made from elastic straps, and 3D printed connectors and strap adjusters. When I designed that, I wanted nothing to do with sewing. A complicated elastic harness might mean sewing strap bits together. I came up with a way that does the whole thing with one continuous length of elastic strapping with no sewing at all. Just heat-fusing the ends so they don’t fray.
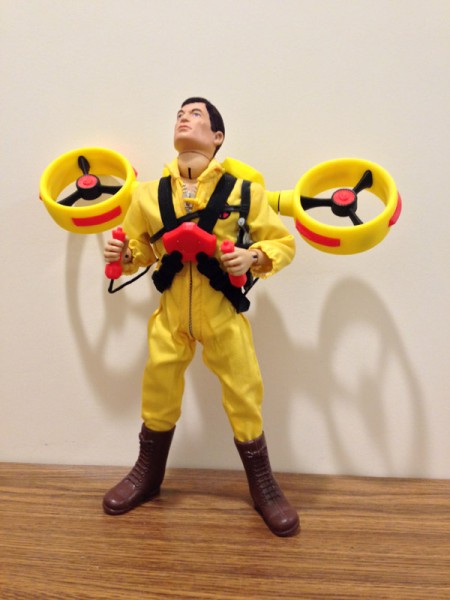
The jetpack was in itself an homage to, and a continuation of, the backpack GI Joe Action Pack sets of the past, especially the Turbo Copter. Those used straps as harnesses, either flexible plastic or elastic, clipped to a chest piece with metal clips.
Since that worked rather well, I thought I might be able to get away with that for the jetpack. So when I began work to completely redesign the jetpack, I had this new harness in mind from the beginning.
I created holes in the body that the strap would go into. I also designed it to screw together with 3 simple screws, but those screws would also clamp the elastic in place. I used a sawtooth strip on both the cushion seat and the front of the body piece to sandwich the elastic tightly, and it would not slip. Screws then go through the elastic to hold it in place on the body. Where the elastic folds in half, it fits into the chest harness piece and is clamped in place again by two screws.
PIC OF INTERIOR SHOWING TOOTH STRIPS AND HOLES FOR STRAPS – apologies. I still don’t have this pic!
The ends of the elastic are then fed into the strap adjusters and strap clips which fit nicely into the chest piece for an adjustable – and practically unbreakable – harness that I could now be confident could be sold to collectors without fear.
Engine Housing Clips
The original design printed the rotating engine arms upright, which makes for a perfectly smooth cylinder for easy rotation. However, that meant the clips that held the engine housings in place could be broken if enough force was applied. The layers could snap, breaking the clips.
So the solution was easy. Print the arms upright as usual, but make the clips separate pieces printed sideways. Sideways, the layers are both flexible and very strong. It would be practically impossible to break these new clips. They would get glued into the arms for a solid hold, and again, this makes the design much harder to break.
Complete Redesign
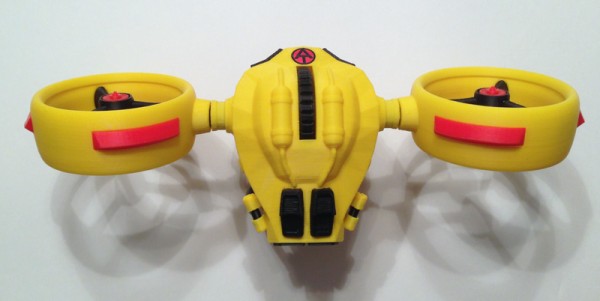
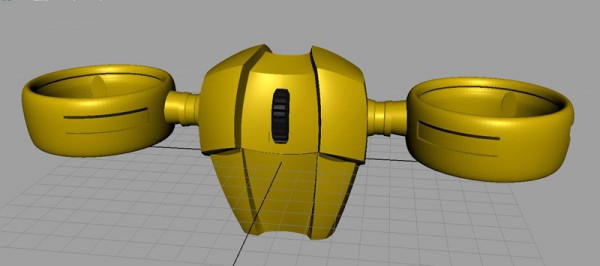
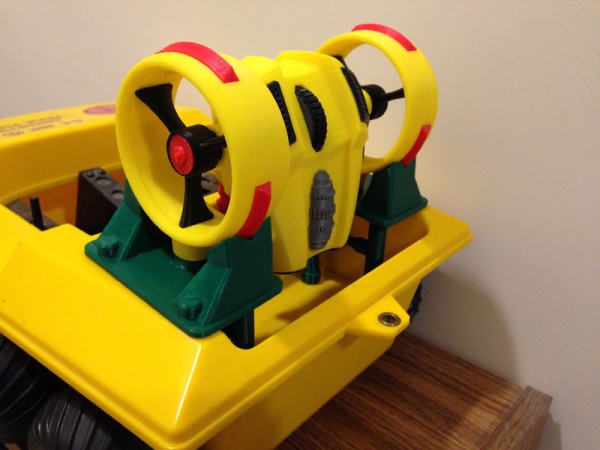
My original jetpack was bulky and clunky and not terribly smooth. This was fine for a prototype or proof of concept, and it served me well. But again, not something I thought was aesthetically pleasing enough to sell. So I came up with a new concept which was much smoother in overall design, a bit smaller, and would have smaller engines, and would fit into the Adventure Team Vehicle without the racks I had designed, (though a quick redesign of the racks made those useful again anyway.)
I began with tessellated cubes and used lattice deformers to warp the shapes into something cool and resembled my concept.
I soon had this ready:
I was able to take the functioning part of the thumbwheel and arms directly from the old model without much alteration, except to make them a bit smaller.
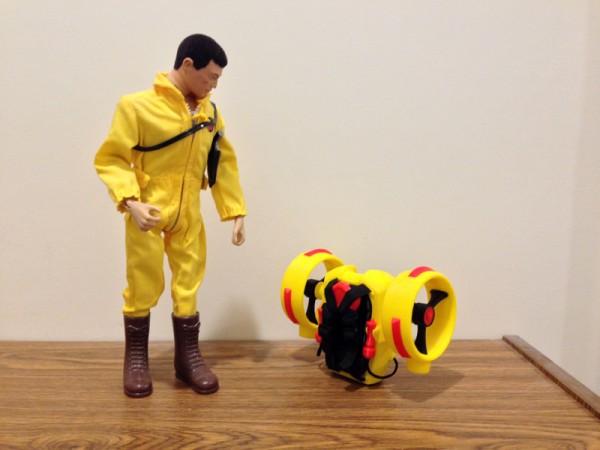
I redesigned the engine housings just a bit to allow for the hub and spokes to work better. Those were incredibly hard to assemble as they were, and were not feasible as originally designed.
I was going to print the struts (spokes) flat in order to make a stronger central hub overall, but I didn’t want to lose the smoothness. So I deepened the slots the struts fitted into on the hub, and then created sliding slots for the assembled struts into the housings so they could slide into place, rather than be snapped into place awkwardly and with some danger of ruining the parts.
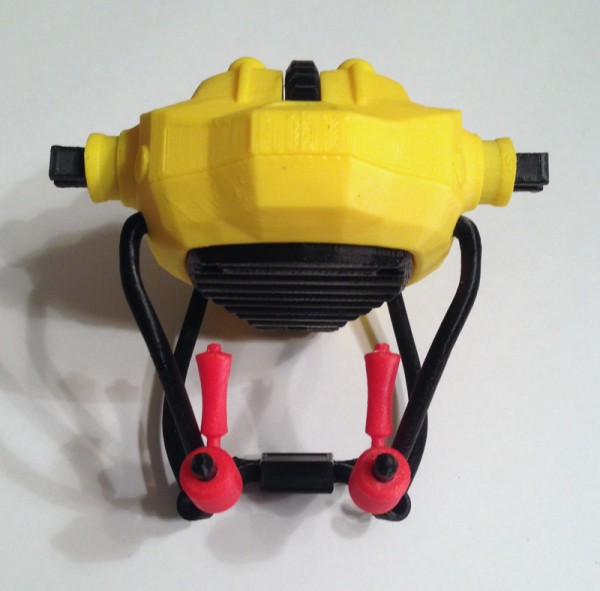
Why The Hub Bub?
Why the hub at all, you say?
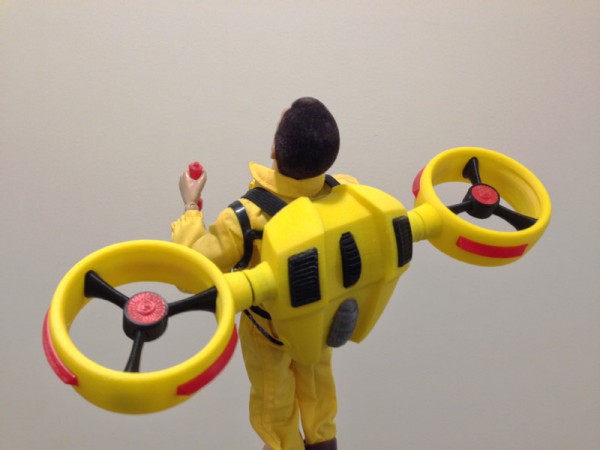
The engine housings themselves were designed to mimic the Dyson concept: air being pushed into the housing, and then pushed out through a ring around it, using an aerodynamic shell to funnel the air into a stable column. This, exaggerated to jet power, would provide enough lift for a human. It does not require that hub or struts.
The hub is there so when you remove the housings for storage or carrying, those can clip to the body. They are completely non-functional, though I did put a jet intake vent on it for looks.
Problems With The Thumbwheel
The thumbwheel provided an issue. Originally designed to snap together very tightly, and not easily comp apart (so you could pull the engine housings off without fear of pulling out the rotator arms) this new version was giving me difficulties in assembly which involved a clamp to push the arms onto square posts on the thumbwheel.
However, I found that the thumbwheel bent during assembly and the arms would never snap fully onto the posts.
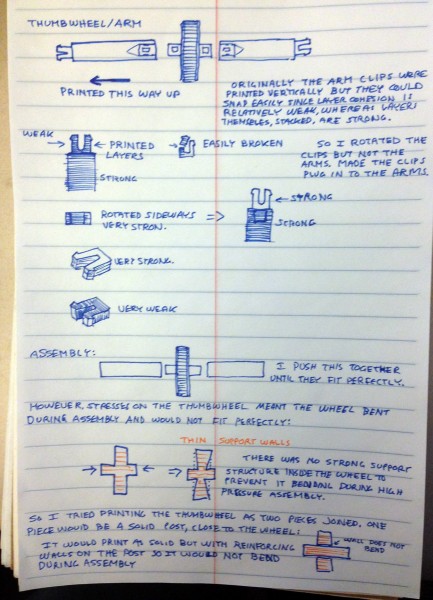
I knew why. The post that goes “through” the thumbwheel actually was not a solid post. It was a shell and a part of the thumbwheel. So when you pushed hard on both posts, the thumbwheel itself collapsed a bit and the clamping process could not get the arms fully onto the wheel.
I could fix this by printing the thumbwheel with denser support, but I think there’s a better solution: Design the post solid, and make it exactly the same size as a hole in the thumbwheel. The 3D printer would see these as two solid walls and not make a solid of them, but print them almost as if they were two parts. This would mean clamping the arms onto the posts would be easier because the post would be solid, and not just look solid. It should work.
Sellable Product
With these changes made, tested, iterated on and approved, I was able to start printing.
One of the other original reasons I was a bit hesitant was that this thing took a long time to print. Scaling it down a bit helps, and having two printers certainly helps. And having a fairly nice lead time before they would be needed helps. I believe printing 30 of these won’t be too bad. It may take more than a month, but would be worth the time.
I’m eager to get these into the hands of collectors and gauge their reactions. I anticipate a quick sell-out of the first run.
Approval
I sent the jetpack, along with a dark green ATV rack-mount for it, (along with some color swatches I printed along with my own designed carabiner) to Greg for approval. The upper brass liked it apparently, but liked the rack mount so much they wanted to offer it up at the same time as an optional companion piece. So now I have to print some of these as well.
Luckily there are only three individual parts, each have to be printed twice, and the pins four times each, in order to make one working rack. The two main parts are symmetrical so they work on both sides of the vehicle cargo bay, but with one part’s leg reversed. It’s quite a clever design if I do say so myself. The same legs work on either side of the tilted bay, but each one angled upward and the platforms snap to the legs.
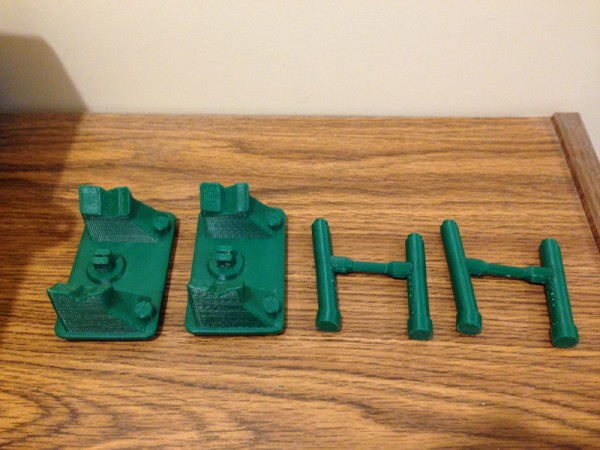
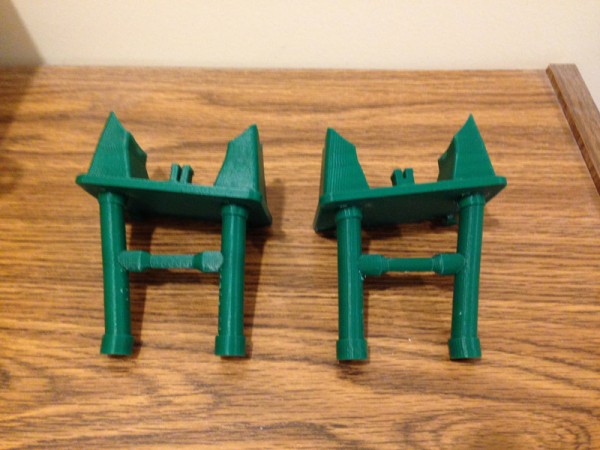
Of course the finished rack will not be in green, it will be in black to complement the ATV and the jetpack.
It Ain’t Always Easy
I was once intereviewed by an Afinia PR person. We chat on occasion and she loves it when I show her my latest 3D printed thing. She once asked me how often I get failed prints. I replied “Almost never.”
And that’s true. Sure, it happens sometimes. I’ll wake up, check the printer and find a huge hairball, but that is remarkably rare. Just a shade more often, I may get a print that has somehow caught on the print head and forced the print bed to skip, causing an offset.
The most frequent issue (and this happens more than I’d like, but still fairly rarely) is stress cracking. This is when the layers don’t fuse as strongly. I get it on some filaments even at my highest heat setting.
So it was frustrating to find out that when I had printed about a dozen of the body fronts for this project, a closer inspection showed me that I only had 3 good prints. Sigh. And it seems to happen mostly on my H480. Less so on my H479. The H480 just had its print head replaced a few months ago. You’d think it wouldn’t lose heat.
Anyway, it’s all part of the 3D printing process, and I’m just glad it’s a rare event.
ADDENDUM: On stress cracking. Yes, I sometimes get some depending on heat, but the frustration I was experiencing printing these jetpacks, I now realize, had to do with me buying a batch of old, outdated filament. I bought a 3 pack of yellow Afinia Premium ABS filament from a third party vendor on Amazon. It was when I was using that that I had so many jetpack bodies with stress cracks. I should have known there was a problem. These reels did not come in boxes, but in their mylar sleeves, which were scuffed up and buckled badly like these reels had been sitting in someone’s warehouse for a loooong time. I then ordered some fresh ABS from Afinia and did not experience that stress cracking.
I felt I should clear that up.
Final Words
Cotswold released the catalog, and here it is.
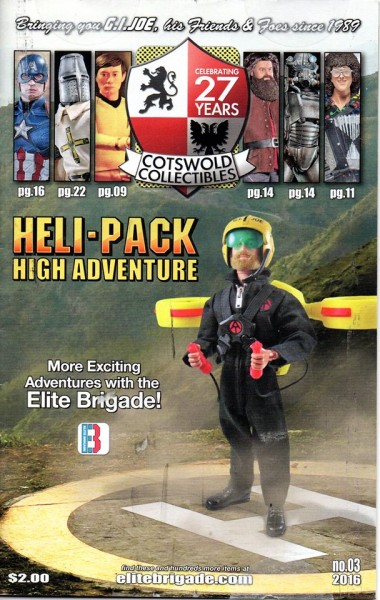
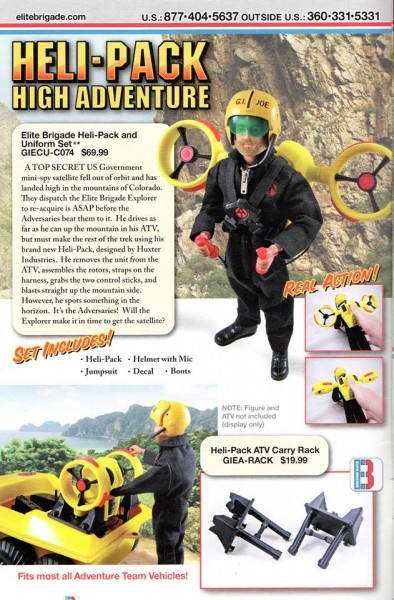
I created 30 jetpacks and 25 ATV racks, my thinking was about half the people who buy the jetpack would have a vintage ATV in their collection, so I figured 15. We kept getting orders, so Greg Brown at Cotswold kept upping the order until we got to 25, almost a 1:1 ratio.
Not bad.
We are currently working on future projects! Keep your eye on this space.
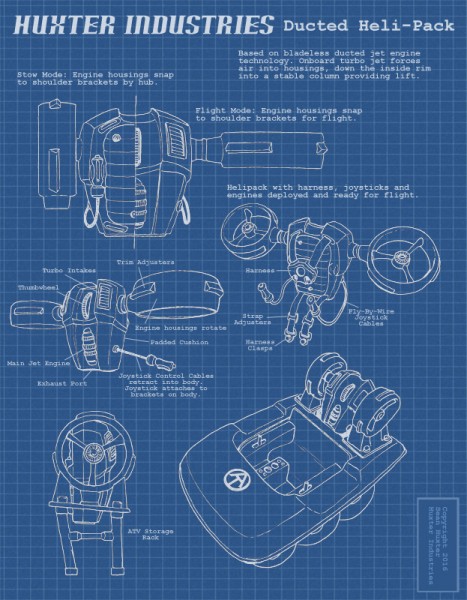
UPDATE: I created a blueprint and instruction sheet for the Heli-Pack:
Congrats on this, it looks great. I don’t have many hardware errors with my 479 either, I just get software freezes and crashes on my mac.
I recently had the entire head replaced on my H480, so my stress cracking problem was very likely not the fault of the printer. When I think back on it, I ordered a lot of Afinia Premium Yellow to complete this project. I think I went through at least 6 spools of it. But at one point I ordered some from Amazon from a third-party seller, and I got it and it was unboxed, and the plastic sealing bags were scuffed. My bet was these were old, and left around in a non-friendly environment. I then ordered 3 new reels directly from Afinia and those did not have the stress cracking problem. Plus their color was better. (the older reels were slightly faded.)
I think that teaches me an important lesson. Don’t skimp on material.
Other stress cracking I have usually happens when I get the temperature wrong. I use Octave Temp Switches which allows me to use a wide variety of filaments, and a lot of filaments come at different melt temperatures, and usually they are not specified, you have to experiment with them a bit.
If you print a little hotter than the recommended temperature, cleanup is a tiny bit harder, but the layer cohesion is much stronger.
I just saw your article and went to the Cotswold website only to see that the Heli-Pack is sold out. I was wondering when a new release might be scheduled? I have been doing business with Cotswold for nearly 22 years, going back to the very first Hasbro GI Joe collectors convention in New York, 1994, on the USS Intrepid. Hope to hear back soon, Randy.
I can’t commit to anything regarding Cotswold, of course… but this is something I think we would both like to pursue. The first run sold out before I even got them all shipped to them.
Pingback: Cotswold Project #4: GI Joe Adventure Team Heli-Pack with ATV Rack | Huxter's Words
Pingback: GI Joe Hi-Tech Communications Pack – Adapting a Found Object | Huxter's Words
Hi there,
Loving the updated 3d printed equipment for AT.
I have been making some custom 1/12 scale AT figures myself and curious if you could print to 1/12 some of your awesome stuff?
3D printing makes scaling things easy – in theory.
In practice, tolerances for pieces that fit together may have to be adjusted.
That said, I took my originally scaled donut-shaped Drone and scaled it to 66% and 50% and even though it had a lot of moving parts, it did seem to work.
So … yes?
Pingback: GI Joe – New Set – Catastrophe In The Gulf | Huxter's Words