
I have printed probably hundreds, if not thousands of individual things on my Afinia H479 printer. And I’ve learned some things that make printing easier with better results.
Today I’m going to talk about how the printer prints, and why it can cause issues when printing multiple small parts.
When the Afinia prints layers it often runs through the layer in a particular order. Then when it begins printing the next layer, it does this layer in reverse, which works. Or for that matter it may not be exactly in reverse, but it does often print the next layer starting with the part it just left, meaning it prints twice on that one part in short order.
To create the part, the order of printing really doesn’t matter – except it does.
It matters when at the end of a layer the bed drops to the next layer and begins printing with the same part again. This means if you had, say, six equal cylinders of just a few .mm in diameter, it goes around to each cylinder, prints that layer’s circle, moves on to the next. But at the end of the layer it prints one cylinder’s circle, the bed drops a layer’s height, and it prints on the same cylinder again without giving that previous layer any time to cool, then goes through all of the other cylinders in reverse order of the previous layer.
One of the things that makes for a more accurate, more precise print is cooling time. If the head lays down a layer on Cylinder A and then goes to B, C, D, E, F and G, the plastic on each of those cylinders gets some cooling time before the head comes around again with its molten plastic. However, the way the software prints layers means that G now gets two layers at a time. The first layer has not had time to cool before the second layer comes down. Then it goes back G through A, and prints A twice. So cylinders A and G can end up with slightly gummy layers where two layers printed right after each other.
I first noticed this when printing posts for my Thunderbird 3 variant rocket design I made very shortly after I got my printer.
The first thing I noticed is that after some shorter parts had printed, the taller posts got very gummy at the top, like they had lost their shape entirely. It didn’t take long to figure out that the reason was the cylinder printed in sequence until the shorter parts were done, then the head just kept going over and over this one post, and the result was like melted plastic.
These two photos depict the problem very clearly:
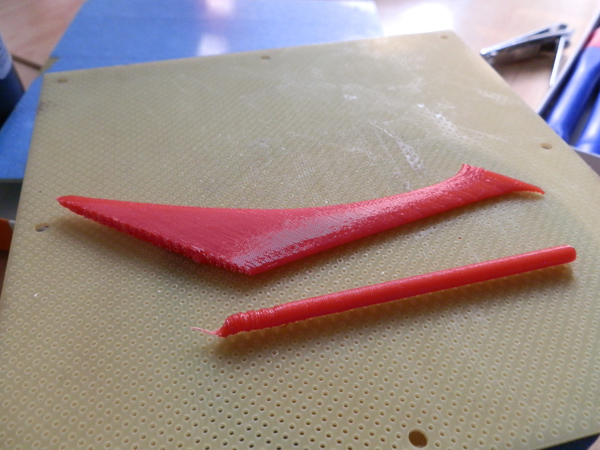

But I also noticed when I printed this part for someone else’s redesigned Thunderbird 3, it had three posts with some separation between them. Note how in this photo you can see they printed very precisely, without the gumming. Even in this model, one or two of the three cylinders got the multi-print treatment.
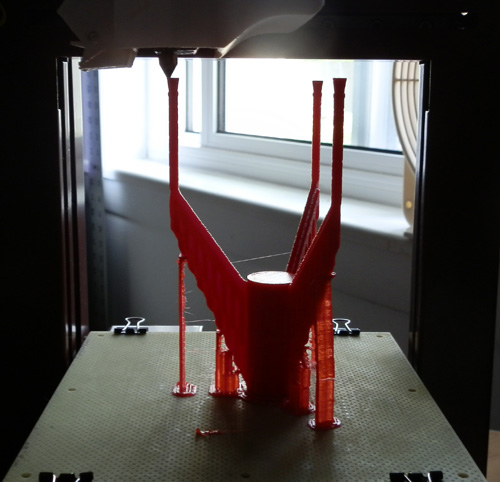
I soon began to print things with one superfluous piece on the print bed. This piece was thin, and taller than all of the others, and its purpose was to give the printer something to waste time on. When the head prints the layer of the parts I want, it is forced to go print this thing. This gives the plastic on the wanted pieces time to cool while the head went off to print this unwanted thing. And since it’s taller, it completely finishes my good parts and goes on to gum up this taller useless piece, and when the print stops, it doesn’t stop hot on one of my parts leaving that tiny hair of plastic on it to clean up.
I call this superfluous part a lightning rod. Consider that its purpose is to stand taller than its surroundings and stop them from taking damage from the hot thing.
Here, you see a lightning rod in use. (It has more detail than it needs because it is an actual part I need, but not for this print run. I used the software’s scaling tools to make it thin and taller than the main parts I’m printing.)
(It didn’t have to be quite this tall… I just got lazy. It really only needs to be one or two layers above the main parts you are printing. But that’s hard to gauge in the view window, so I play it safe.)
Now when I print multiple parts, I always print a lightning rod. The wasted time and plastic are not a concern to me. The rod is usually a very thin thing that I toss away after printing, but is thick enough to stand up to a tall print, but not thick enough to waste much plastic. More plastic is usually used on the raft than the lightning rod and I always end up with cleaner parts.
I am also going to use this knowledge to ask Afinia to provide a print mode that does not reciprocate adjacent layers, so that every layer goes around in the same direction. This will completely eliminate the problem of having one part get two layers in a row, thus making for a more mushy print.
Thanks for the tip!