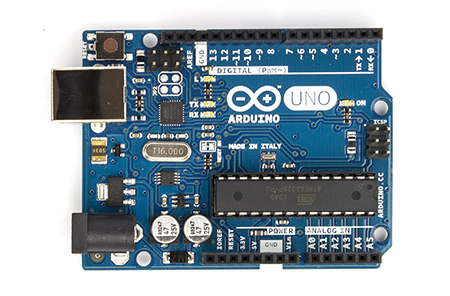
A few years ago, along about the time I was investigating 3D printing through, mainly, MAKE Magazine, I found that there was this rather fast-growing phenomenon surrounding a small electronic circuitboard called the Arduino.
I was interested, of course, and read a few articles which often showed some rather advanced projects, and I thought, “That looks cool, but that’s far too advanced for me.”
But I kept reading and watching what was happening, and when Radio Shack started selling Arduinos in cool kits with bunches of LEDs, sensors and other electronics, I figured I should investigate further – perhaps even get one.
But I didn’t really understand what was going on.
But like I was when I got my first computer, the Commodore 64, I was sure I could learn it and make some cool projects.
Recently I bought an Arduino, a Raspberry Pi (another circuitboard, but this one is a fully networked small computer, including USB ports, an HDMI port, and ran Linux) and an Arduino Micro, which is a smaller version of the Arduino.
But what exactly is an Arduino? Not much of what I read told me what I wanted to know. Most of the articles I read assume some knowledge of the Arduino.
One interesting fact: It was invented in Italy by two men and named after a bar they liked. That’s when I realized the name was familiar.
This poster has been hanging in my kitchen for nearly a decade. We bought it because it hangs in what used to be our favorite cafe in Norwood, MA. Here is that poster:
So maybe it was destiny that I get bitten by the Arduino bug…
It turns out my initial understanding of the Arduino wasn’t far off – it is basically a computer on a chip that controls various input and output channels, and understands computer code. So if, for example, I want to turn an LED on whenever I push a button, I could simply wire a circuit up to a battery (which is a heck of a lot cheaper) or I could use my Arduino to wire up a switch, and whenever that switch turns on, have my code (which is fed to the Arduino through your computer connected by USB cable) turn the LED on. By hooking the switch up to an input pin, I can detect it, then when it turns on, use an output pin to turn on an LED.
My Arduino is the Uno, but I also bought a Micro, which is a very small version with most of the same functions.
(Shown here larger than actual size)
What it is, essentially, is a series of ports directly controllable through computer code uploaded to the board’s internal memory and run like a portable computer. Each pin hole does something useful and you can mix and match those to make rather complex projects.
It is so much more than that, though. With a potentiometer (variable resister, like a volume knob on a radio) I can read an analog signal, which converts to a number, and then I can feed that number out to an LED on an analog output pin and voila – the LED gets brighter as I turn the knob. Again, something most people could do with simple circuitry.
But because the Arduino understands computer code, I can do so much more. I can, if I want, use that potentiometer, and have an LED readout give the NUMBER the potentiometer is reading, through an LED display, or a row of LEDs like a bar graph – whatever my computer code can tell the output pins to do.
Suddenly the possibilities become exciting!
Over the last few days I have played with my Arduino just a bit, and got some interesting first findings, including how to blink or fade an LED (or multiple LEDs at different rates) using the various analog output pins. I also found several sensors that worked, like a pressure sensor (that turns on when you touch it) and others. I have so much more to learn.
But I intend to document some of that learning here.
I’ll start with my first project idea: A simple dice rolling program that displays its number in a way similar to how a 6 sided die works, with 3 LEDs down either side and a single LED in the middle.
Coming soon…


