Impossible Mission – 3D Printed Robots

Recently I saw a 3D print of a robot and a runner from Impossible Mission, probably the best game ever written for the Commodore 64.

It is a marvel of perfection, that game.

And I have seen 3D prints before from these models. I found them on Thingiverse, by PixelPoldi.

They even appear in a book about the game and its sequel.

And so I downloaded the models and cut them up so they could be printed in multiple colors. The models on Thingiverse were single solids. Also, the models were designed to be pixel-square, which is not how a Commodore 64 screen works.

Pixels for a Commodore 64 screen in NTSC (where I lived and played) is 1 to .75, so they are a tad taller than they are wide. I scaled the models accordingly.

My results:

However, the more I looked at the robot, the less I liked it.

Comparing the pixel models from screenshots, I could see a couple of things that didn’t sit right with me.

First, the C64 Robot is created from a multi-colored sprite, which doubles the pixel width. So there are no single pixels, yet the model had several.

I printed out the actual sprite images, and used them to completely remodel a new, more accurate version of my Robot.

First thing I noticed was that instead of having a circular eye-piece, the sprite shows quite a wide rectangular eye-piece, much bigger than I remembered, when facing the camera.

(Note that the robots appear in-game in various colors, and I chose a different color scheme than the pixel images I found.)

I fixed some other things too, so that when facing the side, my new model was 100% pixel accurate. Sideways was a different issue, though.

The pixels were impossible. Modeled, the robot would have to have a painted face with no depth. But I managed even to make that work by making a front piece with 45 degree sides that fit into the eye-piece.

Here then is my final model, and you can even see that, while the rotating robot is intended to depict a cylinder, my version works pretty well.


Here they are, with floors modeled from the game, as display bases:

Hero Cards

The game I work on as a Technical Artist currently is Game of Thrones: Conquest. It’s no secret.

This past summer we worked very hard to introduce a new feature called Hero Cards, which players can collect and build up to help them in gameplay.

https://cdn-prod.gotconquest.com/wp/uploads/2020/11/09113527/GoTCArtofHeroes_1920x1080-1024x576.jpg(Pic from contconquest.com)

Each hero card is based on a character from the show and game. The card case itself houses a card, and has a symbol in a hexagon at the upper left.

For this game feature, I mostly supported the artists through profiling and optimization efforts to gain as much memory and rendering efficiency as we could, while delivering a lot of content.

A great team worked on this, and our Art Lead wanted to give the art team a token of appreciation for what was, believe me, a long and intense effort, so he and I threw around a few ideas, and eventually figured out that with my new Resin 3D Printer (an Anycubic Photon) I could put together something tangible the whole art team could have as a reminder of their amazing work.

But it had to be a surprise.

Only artists directly involved in the making of these gifts could be told. The rest were kept in the dark until they began arriving at doorsteps.

The Idea

We hashed out the idea of doing a real solid hero card for each of the artists involved, with their name on the front, and a photo of them as a printed card that would be inserted into a slot in the body, and sit into the space provided by the frame.

It started with an artist giving me a model of the card case itself in 3D that I could work with. I set it up as a solid 3D model I could print, and got to work. I had to make some alterations, and model some details that only existed in sprite art, like the scale mail lower front panel.

This is the 3D model of the back, but not necessarily the finished card, which was undergoing revisions throughout this time.

Here, you can see an early prototype 3D model, sitting on the print bed in my printer’s slicing software:

But I also was thinking a bit ahead. What else might a person want to use this card case for? I figured many people I work with play Magic: The Gathering, so I immediately made sure the card space could fit a Magic Card, or several, if needed. The gap is large enough to fit maybe four cards stacked.

The Prototype

So I started printing prototypes before I got the final backing, and printed up an early prototype to see if it was even feasible.

Here, I printed a short base, to test even how I should attach it to the print bed for a good print. I wasn’t yet ready to print a whole card, just to see if it was even possible. I printed a section to test a few things:

  • Could it print at all?
  • Could I print it without a ton of supports that would “bite into” the model?
  • Could I print a card gap that would work?

Though not visible in the art piece above, each card has a section for stars, to show their power and how much you have advanced them. For the artists on the project I decided they all deserved full 7 stars, and all filled out.

The early result:

Seemed I was ok to go with the project. I could print a card (likely) without too much difficulty.

But it was early days.

Here is what happens when the raft and support pull away from the bed when printing. This print (painted – see below) shows what can happen. The entire bottom warped because of print raft cohesion. It is one of the main reasons 3D printing with resin DLP technology can fail. If you don’t have the exact right bed leveling, the bed can be warped against the print bed just a hair, and it will refuse to hold, and while the rest of the print may work, that base is forever warped.

Many tests had to happen before I was sure I could even complete the project.

But it wasn’t long before I had a fully successful print:

Early prototypes didn’t even have the back detail yet:

Early concept for the back: We changed it later.

At this point I tried a Magic Card in the space:

Oops. I did something wrong.

I did some adjustments to the card scaling, but the main problem was the card could slot too low into the case. I simply raised up the inner floor, and got a better result.

Painting

For the project the intent was to paint it like a metallic finish, but I wasn’t sure which color to use. While the final card ended up looking a bit more bronze, I went with a battered metal silver spray paint rattle can (Krylon?) and the result was not at all bad. Seen here in its more finished back:

But since the card has a very nice amber inset in the middle, I was lucky enough to have some very nice amber resin, and printed the inserts too, and they turned out amazing!

Finished Prototype

I soon had a pretty good prototype finished, to show. Using my own surname. Each finished card would have each person’s full name extruding from the front.

Then I had to figure out the best way to portray the stars. I played with simple yellow vinyl, cut out with my Cricut desktop cutter.

But while they were nice, the real stars are a gradation from orange to yellow, so I instead went with paper printed stickers, printed and cut with my Cricut.

And since the stars were fitted into beveled spaces, I needed some way to press them in for a more permanent adhesion. I created a pressing tool that fits exactly into the star space, to ensure a solid stick.

Display Stand

During the prototyping period, it was suggested people might want a display stand, and I said “nothing could be easier”. Once you have a solid model, it is very easy to make a stand and use the original model as a boolean subtract to cut out the space needed for the card to fit into.

And here was another place we could use the theme of the art, gears, to make a great stand, and in the same amber color I made the back insert out of.

Here is a finished prototype, on display. Each card would feature a photo of the artist with their name.

The Package

But that wasn’t enough.

In the game, when you purchase Hero items, you see an envelope for a single purchase, or a pack for a larger one. It is sealed with a wax seal on parchment of different designs.

I was determined to deliver them in a pack with a wax seal.

My Art Lead wrote a note of appreciation, which I printed on one side of parchment paper, which I then folded each card into and sealed it with hot wax using a wax seal I purchased.

And sealed each card inside a parchment note of appreciation, in purple was, with a symbol that was very similar to the actual symbol used in the game, in a purple color that was also one of the colors used in Hero Card purchases:

Mailed them all out when they were done, and – duh… I forgot to mail out the stands with them, so I had to mail out a second mailing later!

But in the end, every artist working on Heroes got their own Hero Card.

HÜVER Powerups and Friends

POWERUPS

The last real game feature, other than saving the game, was Powerups.

These are floating objects that give gifts if you collide with them.

The Powerups appear randomly over random buildings, and have a lifespan. During the lifespan, the color of the Powerup fades, until you can barely see it. But as long as it is there, you can still hit it.

Each has a cylindrical timer gauge. This starts at the height of the Powerup capsule, and begins to shrink. When it becomes a flat disc, the Powerup disappears.

The gauge will let you know how much longer the Powerup will be around, so if you see a distant one with a short cylinder, don’t bother, it may be gone by the time you get there.

Currently I have 3 kinds of Powerup:

  1. Shekyls (cash)
  2. Fuel
  3. Repairs

Each Powerup type has 4 intensities. The lowest gives out the lowest payoff, while the highest, the most.

Each one has the icon of the type of Powerup, and rotates at a faster speed, the more valuable the reward.

Each has its own collection sound when you successfully collect its reward, and the sound volume is louder for more valuable rewards.

When a Powerup is created, you see a flash of same-colored light, and a ring. This is to let you know when one is created nearby. When it disappears, it goes out in a flash of light to let you know it has gone.

It also creates a metallic sound when created, which will give you an idea how far away new ones are, because of the volumetric sound which fades with distance.

FRIENDS

A week or so ago I put out the call on facebook for any of my friends and family who wanted their voice in my game to submit sound clips which I would put in.

HÜVER is an homage to a beloved Commodore 64 game, Space Taxi.

In it, you fly a taxi around a maze-like level, with a number of landing pads. A passenger appears at a random pad and yells “Hey, taxi!” (One of the first games for the Commodore 64 that used digitized voice clips.)

You fly to the passenger, land, and he climbs aboard and tells you where he wants to go, “Pad four please!” Then you take him to pad 4 and he gets off. Another passenger appears randomly, and so on.

But since my game is more of a touch-the-pads-in-order game, you don’t actually pick up a passenger on a pad, you just go to the next pad. “Hey taxi!” seemed less useful.

But I thought of a way to use it anyway.

Currently when a new pad is ready, you will hear one of my friends say “Pad Four Please” depending on the pad, from 1 to 9.

The initial fare is decided based on your distance to the target pad. And the fare begins to count down immediately. The longer you take to get there, the less fare you earn, so you are incentivized to get there as fast as you can.

So I decided that when you reach half of the initial fare, the same friend who called you now says “Hey taxi!” as in “What’s keeping you!?”

PLAY ME

This is a link to a ZIP file with the latest playable game – 64Meg.

PLEASE NOTE: THERE ARE A COUPLE OF BUGS OF COURSE.

Mainly, resetting the game (setting you back to default state) doesn’t appear to work in a build, yet it works perfectly in Editor. I tried two approaches, and both fail on a build, work in Editor.

So if you want to restart your game, find the file at this path and delete it.

C:\Users\<username>\AppData\LocalLow\Huver\Rolling Ball Physics Tutorial A\Huver_SaveGame.json.

(It’s called Rolling Ball Physics Tutorial because that’s how this project started out – as a learning exercise, rolling a ball around, painting floor tiles.)

You need only a PC that can play Unity games (and you can set the quality, so a slower PC with a bad video card can still play) and a USB XBOX 360 controller like the one that you see in the starting screen.

Unzip this file somewhere, and you should just be able to go to the unzipped directory and click on Huver.exe

I added Game Saving/Loading. It meant saving a LOT of variables, and the easiest way for me to do that is to make a variable object and save its entire set of properties to a JSON file. I wrote a Save method that pushed every relevant variable into a single object, and saved that object to a JSON.

Loading does the opposite. Loads the JSON and moves a bunch of variables around to where they belong.

Other than that, it is a perfectly playable game, and I think fun.


HÜVER Audio

I was scared of audio.

I didn’t quite know how to handle the many sounds I would want in HÜVER.

So I started with simple events. I discovered in Unity I could put an AudioSource on an object and script that object to PlayOneShot(sound, volume) and that worked well.

I set up an AudioSource, then made some AudioClip variables, and went searching for sounds. I found a lot of sounds by poking through the directories on my computer. I listened to a lot of standard Windows event sounds, and some bizarrely that showed up in the OpenOffice directory structure.

I used a few of those.

But I also found a site called freesound.org. I signed up and found some collision sounds, and some other interesting sounds to begin with.

Landing Pads

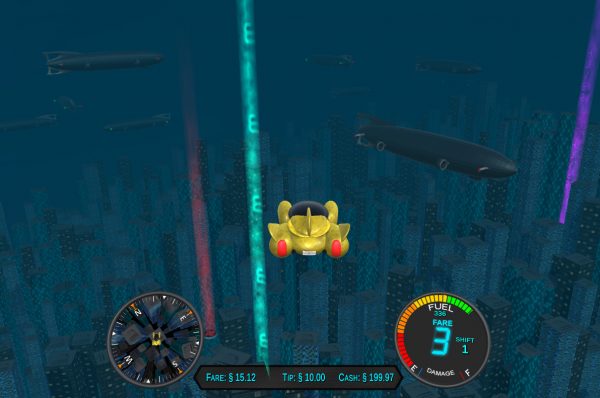
I started with the Taxi Landing Pads. I knew I wanted those to hum, so you knew they were active, and with stereo sound, you could determine where they were, at least which direction and how far away, from the sounds you hear in stereo.

So I attached a looping hum to an AudioSource on the light beam itself. That way, when the beam is activated by the game, the sound starts up automatically, and goes away when you land on it, since that removes the beam.

UI Panels

Then I tackled the UI panel. A sound when you begin a shift. Simple enough. Worked fine.

Then I wanted a sound for every selection in the Purchase UI. Every time you pulled the joystick to change shopping options, a sound would fire. That also worked well enough, except the hacky way I did my UI meant it was on an Update() loop and I had to check for it firing once, and then not allow it to fire again until you change options. Again, no big deal.

And a sound of warning if you tried to select an unaffordable upgrade option.

And a sound for a successful purchase.

Fuel Gauge

Then I wanted the fuel gauge to alert you when it was getting low on fuel.

I knew what I really wanted was a warning as you pass from one color threshold to another, with a dire warning once you were in the red, with perhaps a constant warning in that dangerous range.

So I got my daughter to record some sound samples:

“Fuel Yellow”, “Fuel Orange”, “Warning! Fuel Low!” and “Fuel Full”.

I put some reverb on those and put them right in the game, placing firing code whenever the gas gauge ranged within those color changes, and also having to make sure they didn’t fire off multiple times within those slim ranges, since this was also on an Update() loop.

Once you enter into the red, you get a constant pinging of warning, which gets faster and faster the lower your fuel level drops, emphasizing the urgency of the situation.

And suddenly I had a game with sound!

There are a few others, almost all of which are event-fired.

Collisions

I wanted to have some great impact sounds for when the taxi hit buildings and other things. First, the game really only considers two kinds of collision for the taxi: Airship and Other. If it hits an airship, I want the Tip amount to go down, but I didn’t think it fair to damage the car since you can collide with an airship without being able to see it, if it’s coming from behind, or in an area not in your viewport.

So no damage. But now it makes a very satisfying object-hitting-rubber-balloon sound. And the intensity of the collision directly drives volume, so the harder you hit it, the louder the sound.

But for buildings, I wanted to have graded sounds for the intensity of impact. Volume wasn’t going to be enough.

So I created an array of 10 sounds ranging from a tiny bump. to metal hit, to glass breaking, to a collossal crash. And it fires perfeclty!

Powerups

Then I added Powerups. Floating things in the city that give you bonus items if you collide with them.

I wanted those to make an arcade-like bling sound when you hit them. That was also very easy.

So what was left?

Taxi

Man, I was intimidated.

I didn’t know how to drive sound on the taxi, when the engines are controlled by four joystick axes, and a button for Turbo.

I didn’t want a lot of complex code, firing looping sounds at given volumes and pitches (yes, you can alter pitch!). I didn’t want to be checking to see if one sound was playing in order to play another.

But then it hit me.

I can put a unique AudioSource on the taxi for each joystick axis!

So I found a nice jet engine sound and looped it (freesound.org to the rescue) and then I remembered last summer cleaning off our plastic deck Adriondack chairs with a hose on tight beam, and the sound was awesome! I vowed to record it and use it for my engine noises. So I did.

Finding smooth loops was hard, but I managed.

But first, the main power. That’s the UP/DOWN thrust. I wanted a jet engine sound for that so I used the freesound.org jet engine sound I found.

But how to trigger it?

So it turns out the AudioSource can be told to play on start, and to loop. Perfect.

I determined I didn’t have to have any complex code to start and stop the audio whenever I change joystick intensity. Instead, I simply alter the volume and pitch based on the joystick’s position, making sure there was a constant low volume in the cases where I wanted the engines running when there was no joystick input at all (freefall) but when the stick was engaged, it would ramp up the volume and pitch to make it sound like the engines were working harder.

And it worked! Like a charm!

So then it was an easy step to add an AudioSource for FORWARD/BACKWARD sound, and for that one I used one of the loops I made by cleaning my deck chairs. Pitch and volume is controlled by forward/backward joystick amount. I easily adjust the pitch ranges by code values until I got something I liked

Same for TURN. I was able to easily do the same for Turning.

Then I added STRAFE, which uses the same sound as Turn (since they technically use the same engines) but at a different pitch, so you can hear the difference.

TURBO simply multiplies the pitch and volume a bit so it seems more intense when Turbo is engaged. Turbo is boolean, so it’s a simple yes or no to that pitch alteration.

And now, dammit, I have a complete sounding game!

Crashing

But oh… what about when you crash? Or run out of fuel?

One simple addition to the LoseControl() method, and I called PlayOneShot(losingControl, volume) and it plays a nice sound of a jet engine winding down. At the same time, I reduce the volume of the other four AudioSources to 0.

And it sounds amazing! You run out of fuel and you get the engine winding down to 0 as you fall through the sky.

NOW it’s done.

Sure, I want to tweak the sounds themselves, or even replace some, and adjust the pitches and volumes, but that’s all data.

HÜVER Test Build

Ok, folks.

It’s rough, but if you want to play a very early not-ready-for-prime-time version of my HÜVER game, here it is.

It’s a .RAR file, so you will have to unpack it. You can unpack the whole directory anywhere, and then run the Rolling Ball Physics Tutorial A.exe.

Win 10 may warn you about running software you downloaded… Unless a Unity build adds viruses, you’re safe to run it.

HUVER RAR – 60Mb

There is a READ_ME.txt file. I’m also posting it here:

HÜVER

by Sean Hüxter

Yeah, the executable is called Rolling Ball Physics Tutorial A because I started this project as a rolling ball game, but also as a tutorial, since it was really just to get the ball rolling.

Ba-dump-bum!

Early last year, while doing a lot of learning about the Unity Physics system with a rolling ball game idea I came up with more than a decade ago, I tried to make the ball jump, so it could avoid traps on the game board. Instead of making it jump as an impulse, I accidentally made it jump on an Update loop, so it gave an upward force every frame, rather than just the once – and suddenly my ball was hovering above the board.

I thought – wait… this is already way more fun!

So I pivoted entirely towards a flying car game.

Space Taxi is a Commodore 64 game that was hugely popular back in the 80s and early 90s. It was a 2D physics flying taxi game that had challenging levels, and the aim was to pick up and drop off passengers while preserving fuel, making money, and not getting yourself and your passengers killed.

It seemed natural to make an homage to that game.

“Pad Four Please!”

This game is currently in development, a few hours here, a few hours there. This is the result of about a year of that kind of involvement. So yes, at this stage, there is no sound, there is no way to save a game, but these things will be tackled next, if I can.

The game requires an XBox 360 USB controller. I bought mine cheap at Game Stop and it really works nicely.

The controls are laid out at the start of the game, but here they are:

Left Stick – Forward and Backward. Later, Left and Right strafe (but you have to earn that)

Right Stick – Forward for Up and Backward for Down, for hüvering. Also Left and Right for turning.

Left Trigger – Turbo (but you have to earn that too)

B starts the next shift

Left Joypad – Up/Down tilts the camera. A button resets it to default. (I find the default angle of 45 degrees to be quite good, but you may want to update the angle of the camera when first searching for Passenger Pickup/Dropoff Pad Beacons across the city

At the end of each shift you may be able to purchase upgrades, if you have enough money. A few are free. To select, use the Left Stick up and down. Centered will select the middle of 3 upgrades.

Y button confirms your purchase.

Flying

At first, flying is done using the Right Stick for up/down, and turns. The Left Stick is for forward/backward. This may seem counter-intuitive to some, since you may expect turning to be on the left stick. But it becomes very obvious once you purchase the Strafe Control that you really want the Left Stick left/right to strafe, since it gives the car a complete plane of control when landing.

But you don’t get Strafe right away.

Be gentle on landing and avoid hitting buildings. You can damage the car, and that can cause a crash (and therefore a §500 Deductible penalty) but before you crash, every bit of damage reduces your tip, as passengers dislike being shaken up. If you happen to collide with an airship, you may bounce around a bit, but you won’t take damage, but your passengers will get upset and lower your tip.

Pickup/Dropoff

Passengers are picked up and dropped off at Passenger pads that light up with blue beacon beams when they are the next target.

Your fare begins with a fare amount based on the distance to the pad from the previous pad’s position. Add to that a standard §10 tip which will reduce if you jostle your passengers too much.

Fuel/Charge and Repair

Watch your fuel gauge. If you run out of gas, you will crash, and incur a §500 Deductible. Make sure you have enough fuel to reach a Service Station or Home Base, otherwise you will crash, incurring a §500 Deductible.)

You can fuel up at any Service Station (red beacons) or your Hüver Home Base (purple beacon). While fueling up, you will also automatically be repaired, if you have taken any damage. Both recharge and repair work take time. And in Hüver, time is money. Fare continues to go down while fueling up, so don’t waste time getting more gas than you need, but do fill up if you still have a lot of fares to go, with low fuel.

If you fill up at Home Base, gas is half-price. Repairs are half-price. Fill-up and repair rates are also much faster, so you save money in two ways.

Shifts

Your Shift is composed of a number of pick-ups and drop-offs. Find the Pickup beacon and land on that pad. After the timer ring counts down and the beacon disappears, take off towards the next lit beacon.

At the end of a successful shift, your car will fill up and all repairs will be completed instantly at Home Base rates.

Upgrades

At the end of each shift you will see 3 possible upgrades. Some are free. If you do not have enough cash to purchase the upgrades offered, a red indicator will appear, meaning you cannot purchase at this time.

If you can afford an upgrade, select it by using the Left Stick up/middle/down, and hit the Y button to purchase. There is no confirmation screen, so if you hit Y, you bought it.

Then hit B to start the next shift.

Upgrades include:

Home Base Radar Indicator – Directional indicator to home
Platform Radar Indicator – Directional indicator to your next pick-up
Service Station Radar Indicator – Directional indicator to the nearest Service Station
Strafe Control (Left Stick left/right)
Turbo Control (Left Trigger while going forward or backward gives extra speed)
Larger Fuel Tanks
Extra Shielding
Lowered Deductible
More coming

KNOWN ISSUES:

There is currently no sound. That’s coming at some point.

You may see airships blip into view for a frame. That is an animation issue I have to fix.

The game does not allow saving your progress. I hope to add that at a later date.

My “fuel” paradigm began as gas, but I’m now angling towards electro-pulsers which need charging. Forgive the inconsistencies there until I can fix them.

It’s Amazing What An Hour Or Two Here And There Can Achieve

Hüver

This is not a comprehensive post. But it’s about the home hobby/learning game project I took on last year, and how it’s progressed, slowly, bit by bit, but surely, and with a lot to show.

I’m calling it Hüver. Partly as a take on Uber and Lyft. Because it’s a game about a flying taxi.

Last year I also got the Commodore 64 Mini, a half-scale C64 emulation machine with joystick controller. I re-discovered a lot of fun C64 games I played long long ago, and some not so long ago, as I still have my Commodore 128 fully functional, just stored in the attic for now.

Space Taxi is a fun game that is beloved by C64 users. And while I was writing a rolly-ball game something akin to Q*Bert, where a rolling ball with sunglasses had to paint the tiles of a floor, while enemies went around undoing that work and causing other mischief, including attacking, I tried implementing a Jump command.

In doing so I failed to make a jump, that is a single pulse when you push a button. It was supposed to detect button push on an Update loop, causing a single pulse to push the ball upwards, and just once.

And since I failed to prevent a repeated button detection on Update, instead, it applied that upward force once a frame until I released the button.

And suddenly my rolly ball was hovering. Still spinning (since I jumped while rolling) the Unity RigidBody kept it spinning, slowing down due to its rotational friction, but hovering nonetheless.

It was then I discovered that I was having more fun flying my rolly ball around in the air than rolling it around on the ground.

And as I had just finished playing a bunch of levels of Space Taxi (known for its realistic flying physics and awesome quirky level design), I immediately dropped my Rolly Ball game and started on a flying taxi game.

The first thing I did was jump into Unity, start a new scene in the same project (since some of my code was reusable) and build a Flying Taxi car to fly around with.

Not long before this I had seen a very nice vintage space car toy on eBay. It had a feel about it that I wanted for my game.

And since I wanted to get started, and not take a lot of time to model a 3D car like this, I went into Unity and began creating capsule primitives.

And this is how it all came together:

I later converted it into shapes I could bring into Maya and set it up to 3D print using my Anycubic Photon resin printer. These are painted models. I also did one in multiple colors on my Afinia FDM printers. Cleaner result, but not as high-rez.

So now I had my Space Taxi. Where to go from here?

Buckle up, because I’m hoping to post a lot of updates having to do with how I did things in the game and why.

Mostly it’s a story of how not to do things, how to half-ass them, and how to clumsily lurch towards a fun game.

New phrase you may have to learn: Tech Debt.

More Complicated Hunt AI

SMARTER HUNTING AI

In my previous post I talked a bit about my plan for AI chasing for a rolling ball game. I covered three separate targets to make AI smarter.

Dumb: Go after the player’s position.

Well, by the time you get there, player may well be long gone. He used to be there.


Smart: Go after the player’s future position based on his current velocity. Better.

However, if the player is trying to change direction with joystick, he’ll still be gone when enemy gets there, as he is not going in a straight line, but curving to a new position:


Smarter: Go after the player’s intended position, based on current velocity plus joystick’s direction. This means the enemy is heading towards where the player is hoping to be.

This is a pretty smart algorithm, but there is a problem depending on how fast the enemy is. One of the factors that you can tweak in making an AI enemy “better” is just by making it faster, dumber would be slower. However, at some point, the enemy will begin to race ahead of the player if it’s too fast. And I’ve tested this. If my player just goes in a straight line for a while, the enemy races right on by and says “Hey, I’ll meet you up here!”

“Hey, you were supposed to be here. I guess I’ll wait?”

There must be a better way still!


LERP BETWEEN TARGETS

So I had a thought:

What if the enemy tries to get to the player’s intended position if the two are far apart, but as the two get closer, the enemy’s focus slides towards the player. That means that as the two close the distance between themselves, the enemy goes more for the player’s current position and less for a future position!

(A LERP (linear interpolation) is simply a slider between two positions, based on a percentage, which can change on the fly. 0% focuses on the first target’s position, while 100% focuses on the second target’s position. Percentages in between focus proportionally.)

This sounds awesome!

1) I already have a MODE switch, between target = player; target = player’s velocity position; target = player’s intended position (velocity + joystick)

2) Keep track of the target’s position. This can be either player, velocity or intended, see above.

3) Keep track of a second position: This will always be the player!

4) Get an interpolation between these two angles based on a number between 0 and 1 (a Mathematical LERP). If mode is targeting player, nothing changes, as a lerp between two same values will always be that value.

5) Keep track of the distance between the enemy and the player. Cap this at some maximum and divide that distance by the cap. So if 10 meters is your max, and there is 30 meters between the two bodies, it still just uses 10 as distance. Divide by cap and the number will be 3 if distance is 30, or 1 if distance is 10.

6) Clamp this value between 0 and 1. That way, any distances greater than 10 won’t make a difference. But at 10 meters, the enemy is aiming towards the target (velocity or intended). At 0 meters, the enemy is aiming all at the player. And of course half-way there, it’s half-way.

If the Hunt Mode is set to player you will see no difference because both of the targets will be the player, and any Lerping between them gives the same result, so no change there.

However, for velocity position and intended position you get a sliding focus between the two targets.

And … I just tested it. It works rather well.

Here, the player and enemy are far apart, so the enemy targets the intended position 100%:


Soon, as they get closer together, the enemy begins to target 2/3 to the intended position and 1/3 to the player: (this slides, obviously. I’m using thirds to illustrate.)

And as the player gets even closer along that path, his focus slides even more towards the player. Here, you see it 1/3 towards intended position and 2/3 towards player:

And even closer still, the enemy now focuses entirely on the player, and not at all on the intended position:

This works pretty well in practice.

This is what it looks like over time:

However, it’s difficult for the enemy to catch the player at all times. The player can fairly easily evade the enemy because the enemy has momentum. If it’s pushed for some time towards a predicted position, then the player suddenly changes direction, so to does the enemy, but it does take some time, due to the momentum, so it may shoot right on by and then arc back to take up the chase again.

But then… that’s kinda what I want.

And each parameter in this scheme is variable.

The distance along the velocity vector can be short or long, which would alter the perceived intelligence of the Hunt AI

The distance along the joystick vector can be short or long, which would also alter it

The force the enemy is exerting towards its target can be mild or strong. This is a major factor in how “smart” it seems

The mass of the enemy matters too. If it is less massive, it can turn on a dime, whereas a heavier enemy will have to take more time to swing back around if it misses.

Each of these parameters can be set on the fly by a game, as it determines how smart it wants an enemy to be, whether that be level, or a timer, or whatever.


ATTACK!

My next step in this scheme is to set a radius around the enemy, and if the player gets inside that radius, the enemy is going to exert a very strong sudden impulse towards the player, which is basically a punch attack!

I will post stuff when I get that working.


Predictive Chase AI for Unity

Many years ago now, I designed a game on paper for iPhones. I never built it. Never new how.

However, now that I have gotten familiar with Unity I have been able to write parts of this game, as time permits. And as you can see from reading below my time is spread out pretty thin among my many interests.

That said, I managed to make a very playable as-yet-incomplete Hover Taxi game that I will write much more about in future.

But for now, back to my Rolly Ball game. Based on a game I wrote in BASIC on the Commodore 64, which was based not-so-loosely on Q*Bert, but with a level editor, I decided to make a game where you control a rolling ball with accelerometer. I haven’t quite cracked that part yet, so for now I’m using an XBox 360 controller and it works fine.

So far I have the ball rolling around changing the color of grid tiles. That’s the main game.

But there has to be more. Much more.

Enemies

Enemies start out pretty docile, just meandering around the board undoing your work, repainting squares back to their original colors. You have to stop them by hopefully pushing them hard enough to break them, or push them off the board if I allow that. (A no-edge board presents major problems for a player.)

Later, enemies begin to chase, and eventually get quite aggressive in not only chasing you but predicting where you are going and getting there first, and even adding a sudden pulse to push you suddenly in a different direction.

How Do I Make An Enemy Hunt?

I started a totally new Unity project to explore this AI idea:

The Player is a spherical rigidbody. That’s a physics object that can roll around and obey the game’s physics laws. To make it move, I use an analog joystick pad to add impulse in the direction the joystick is pointing, at the force the analog joystick is pointing. (ie: you can nudge the stick and get a small push, or jam it all the way for a larger push.)

So that’s been done for months.

But what about an enemy ball? How do I get it to be a threat?

Just telling the enemy ball to try to get to where you are at this very moment is not so great. By the time it gets there, you’re long gone.

So I set up a scene in which an indicator circle is placed at the Player’s velocity vector. That is, an X, Y, Z coordinate which indicates where the ball is going at any given Physics Frame.

If I set the enemy up to try to get there, by adding an impulse in that direction, that will be better. It will get to where you’re going. However, you’re not just rolling in a straight line.

You have a joystick to tell your Player ball you now want to head off in a different direction entirely, and because physics has momentum, you don’t suddenly go in that direction, but you angle towards it naturally.

So now I add another vector of the Joystick’s intended direction, and I add that vector to the position of the ball’s velocity position.

To visualize this, I created two indicators.

One is placed, every frame, at the position the ball’s velocity wants it to go.

The other is placed relative to that object, in the position of the joystick’s vector.

Each of these values is multiplied by an intensity variable, so I can tweak how much to tell the Enemy ball the player wants to get there.

I used two line renderers to draw lines between the objects so you can easily tell what the motion vectors are.

Here’s a screenshot to tide you over until I fill in the above with better shots when I get time.

Why No Updates?

Well first, updates were never very regular. But this time I just got burned out.

Toylanta

In what was supposed to be a great experience, I booked a trip to Atlanta for Toylanta, a toy collecting show that started as an alternative GI Joe Collectors’ Show, as an option for those who could not or would not attend the official GI Joe Collectors’ Club Convention.

I was lucky enough to attend two of those, one in Providence, because it was just down the road, and one in Dallas which I went through great pains to go to.

I loved both.

But since the Collectors’ Club shut down, I figured this would be a great opportunity to attend Joelanta (now Toylanta) and see a lot of people who have wanted me to go for many years. Friends I knew only online.

And I did meet many of my good friends there, and had a great time. And met many good new friends.

But the show kind of overwhelmed me.

Burnout

It put me on the back foot. It drained me. It should not have drained me. It should have invigorated me. But it drained me instead.

From March to mid August I have done NOTHING in my 3D printing hobby.

Orders languished. Many parts printed, but I found no compulsion to clean them up and assemble them. So they sat. And sat.

In fact, in that time I turned to my video gaming interest and began work on a new game in Unity.

Vijuhgames

Let’s face it. I’m a game creator. Always have been, since before I got my Commodore 64 in 1984. Hell, when I worked at Radio Shack, I started writing a TRON Light Cycles game on a TRS 80 Model III. And I wrote a Star Wars-like space shootem in BASIC on a Color Computer Model II.

My current game started out as a rolling ball Q*Bert kind of idea that I have had for more than a decade, where you roll a ball around and color squares on a grid. Evil villains would get in the way, and some would try to undo your work, and some even worse – would try to kill you.

I was in the process of this game for some time. Working on it a little bit here, a little bit there, but with no real eager effort.

Then one day I tried to implement a jump feature, where you hit a controller button and the ball would jump off the board. This would serve to avoid board elements, such as short walls or gaps.

And in doing so, I put in an Update() loop to trigger an upward impulse on the ball if you held down a joystick button.

Stupid me didn’t realize there was already a function to add a single impulse to a RigidBody, and instead put this on an Update() loop. And so when I hit the Jump button, instead of jumping once, I began to hover. All the while being able to still move around.

I had invented Space Taxi! (A Commodore 64 game I loved from my early life.)

So I began to see a new game take form instantly in my mind.

HÜVVER

Since March that’s mostly what I’ve worked on. I spent a lot of time creating a simple Taxi out of primitive shapes, and then began to work with RigidBody physics code to get the car to hover, turn, land on landing pads.

I created a city out of a single cube by scaling and populating them on the ground (on a floating cylinder world) and pretty soon I was flying around.

Then came goals, and achievements.

I soon had a pretty good-looking Taxi flying around with blue jet flames out of every attitude jet when I hovered, braked, turned, strafed. It was looking pretty good and played well.

I spent a lot of time then adding a way to make the buildings in the city take on clusters of height, so a center could be taller, outskirts, shorter, etc. And I put in 3 distinct buildings for variety.

Then I put in landing pads you had to make it to to pick up and drop off passengers. And repair/gas stations to fill up and repair damage taken from colliding with buildings.

Then I came up with the idea of achievements. After every level you got something new for the car.

Level 1: Radar so you don’t have to go searching for the next passenger pick-up point

Level 2: Radar indicator to point to the nearest repair/gas station

Level 3: Strafe control – makes landing much easier

Level 4: Turbo – jet across the city much faster

And more to come, such as larger gas tank, faster fill-ups, faster repair, auto-hover, etc. I can imagine MANY useful upgrades.

Then I put in a very rudimentary badly-implemented UI panel that simply told you what new upgrade you got. Eventually I hope to implement a choice system where you choose which upgrade you want out of a list of ones available at that level.

And the best part: It’s fun to play.

It uses an XBox 360 controller (USB) and is compiled from Unity.

At this point, I’m calling it Hüvver.

Merging Hobbies

I even used my 3D printing skills to print a model of my primitive taxi cab.

I finally got my Anycubic Photon SLA printer fixed by putting in the third screen it’s had. I got it cleaned up, put together right, and began printing again. Not a lot of prints. I find the process arduous. But the result can be amazing.

The first few prints of my Space Taxi, however, didn’t turn out well. One did, though, which I painted yellow with rattle cans and have at my desk at work.

I may begin updating this page to show my work. Concepts, what the original game was to be, what the new game is now, and what it aims to be later.

And an executable you can play.

Stay tuned.

But since then I also