When you buy an Aerobie (a wonderful flying ring invention that still is the thing furthest made and thrown by man), the first game you learn is “fetch”.
What I found out not long after my first Afinia print is that the first thing you really learn is to wear the damned gloves they send you.
Two prints after I got the Afinia, I sported two cuts on my fingers.
And after about 20 printed things, now, I have learned some. But not much.
I even cut myself – twice – through the gloves, when using the putty knife to pry the object off its rafting.
This morning I left one of the gloves downstairs where I was cleaning up an object last night. So I just decided to push away from my hands and fingers. But dammit, I still managed to, using a smaller chisel, slice through my thumb. The thumb contains a fairly main artery, and so this bleeding still hasn’t stopped fifteen minutes later.
I’m keeping pressure on it until it clots, so I can apply a band-aid, but, man…
And this was after I promised myself I’d be more careful.
No photos will accompany this particular entry. :-)
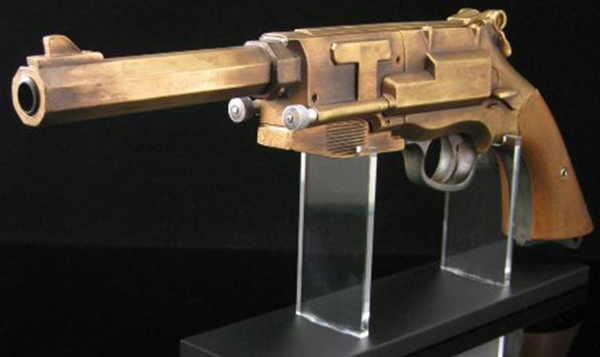
I collect pistols. Not real, functional ones, but prop pistols from Science Fiction TV shows and movies. I have some very nice ones including a model kit of the Galaxy Questpistol, a Steampunk pistol, a medical tracking gun from Doctor Who, more Star Trekphasers than I can remember, a very nice resin model of a Space:1999Stun Gun, a QMX Mal Reynolds pistol from Firefly, or more accurately from the film Serenity, and a gorgeous die-cast/plastic blaster from Blade Runner.
One of the projects I want to take on with my Afinia printer is to make theme-based display stands for these.
One thing that 3D printing doesn’t yet have, at least easily or cheaply, is a 3D scanner. I would love to be able to scan the pistols and use the exact dimensions as a template to build the display cases. Let’s take the Serenity Pistol, for example.
I searched online and found a model of it on Thingiverse:
So ideally, to model a stand that would take the shape of the butt of the gun, I cut the butt off, inverted it and printed it to see how closely it matched the QMX pistol.
I printed this in black. It was hard to get off the raft, and the hole was filled with support (normal) which was hard to get out.
I am reprinting it in a reel of blue premium filament I just got. The premium filament prints so much nicer.
There is, I believe, a systematic problem with printing with the cheaper Octave filament. Even Afinia’s web site store says that the extrusion temperature of the Octave filament is 210-250 degrees, while the head heats to 270. I found the hairs on the TB3 rocket project were likely due to the extra heat making the Octave filament “runny”.
I think most of my important printing will be done with premium filament from here on out, though I will probably need to print some things with the cheaper stuff.
Since the Afinia printer was glitching out, ending a print job by continuing a previous one, I had to shut down the print shop. Tonight, I risked the old method of formatting the Micro SD card to see if that would work because I was itching to print again.
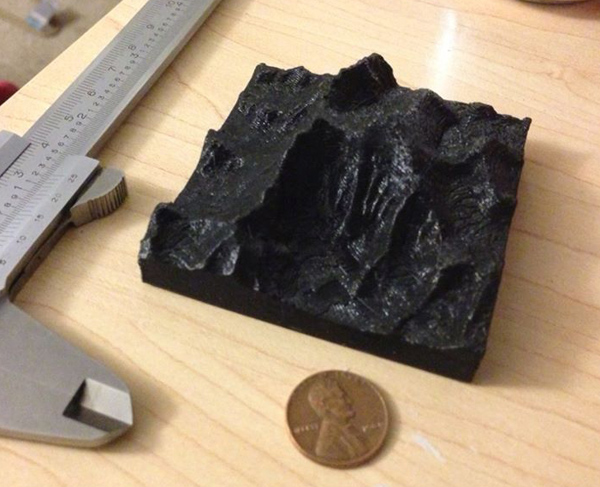
I printed this topographical model of Mount Everest in a 7cm square block.
This print, in Octave black (which tends to be shiny), did not end properly, but at least it did not end catastrophically, with the head damaging the print. I was able to shut down the printer before anything bad happened.
ASthis print was being made, Afinia updated their site, putting V1.19 of the software up, which promises a fix.
I immediately printed a filament clip (that fits on the edge of a reel, so the filament can be clipped to it when not in use.)
SUCCESS! The print ended perfectly!
I am now printing another thing, to be talked about later.
Update: I have since printed three things successfully, each item finishing perfectly, with no further glitches. Yay!
Despite the black and yellow vanes of my TB3 Rocket being redesigned, I was able to test-fit the old black vanes into the new body section. The yellow ones would not fit due to the redesign. I printed the new body section (with fingers reaching upward to accommodate the vanes) but the printer glitched out and broke the fingers, snapping the protective face plate off the print head assembly. (It was after that that I decided to shut down the Print Shop until a fix was in.)
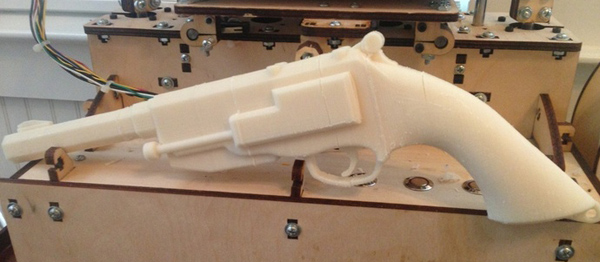
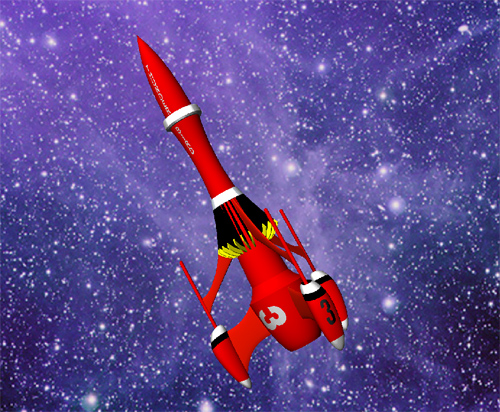
But for your edification, here is the TB3 rocket, just test-assembled, with the seven parts I have currently printed. Every part on this body will be re-printed due to design changes, except the nose cone which is fine. The pre-assembled rocket stands at 15″ currently. Once the engines are attached, it will be taller.
So I think you can see that real progress is being made. Once the print bug is fixed, I should be able to get this finished in a week or two. (There is still some considerable modeling to do to make the various parts of the engine arms fit with each other and the body.)
Note: The whole thing will be reprinted in highest resolution later, when I’m satisfied all the parts are “finished”.
The Afinia printer continues to glitch out when finishing prints, sometimes. If it was every time it would be easy to continue printing. I could watch it end and just shut it down. But I printed four pieces today, and three printed fine, and the last one glitched out. Before I caught it, it had pushed down onto the fine fingers of my latest piece, breaking some of them, and even popping the head cover off the printer head assembly.
Afinia promises a new version of the software that fixes this glitch, but I’ve been waiting several days since they said it would be up “probably today, maybe tomorrow”, and I still don’t have it.
The Print Shop is Closed until I can rely on the printer finishing properly.
On the plus side, I now have at least a test version of all of the main central body pieces of my TB3 rocket printed, and it now stands on its own, at over 15″ in height. And the interlocking fingers and black vanes slide into each other very nicely.
The piece that just broke has to be printed again anyway, because I redesigned the base after I started printing. I also have some more minor changes to make to make it easier to pull off the rafting.
The black and yellow vane pieces were redesigned after I printed them today, so they, too, will be reprinted, when I can.
Also, I think there are too many vanes going around the waist of the rocket. There are now 21 (one every 15 degrees, but with 3 gaps for the main fins.)
I think I’ll change it to 15, one every 20 degrees. It will thicken the body fingers, and I could even thicken the vanes themselves if I have to.
I think I’m going to be a bit upset until I can be sure the printer prints and ends the print jobs properly – every time.
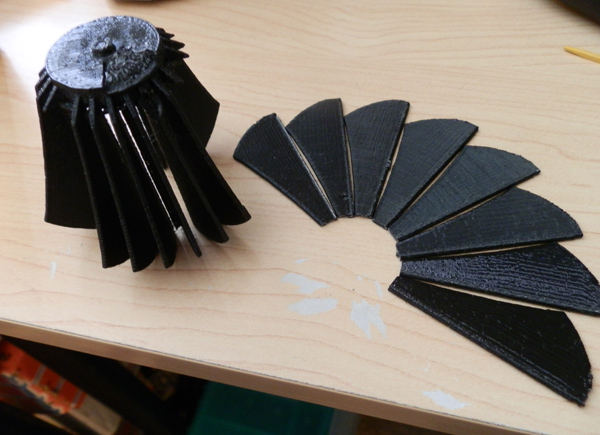
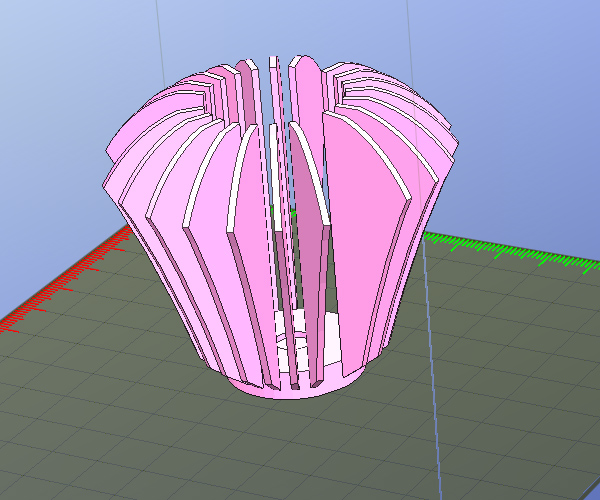
The printed part came out nicely, but the support material was arduous to get out of a cylinder walled by very thin vanes. The vanes began to break off, which I expected, but hoped wouldn’t happen. I am printing in a way that is not optimal for this printer.
Here’s the result. (Well, almost. I broke some of the vanes off on purpose after the part became useless.)
(Hey, I almost accidentally made a Turbine logo! :-)
So this morning I set the part up to print upside down and watching it was fascinating.
Here’s a video of the first bit. It’s not time-lapse. Feel free to zip around:
Here’s a video of the part as the vanes are about two inches tall. What I find interesting is that when the head disengages from any given vane, the vane wiggles. But note how perfectly vertical it is printing, with no extra support – just the thin vane it’s printing.
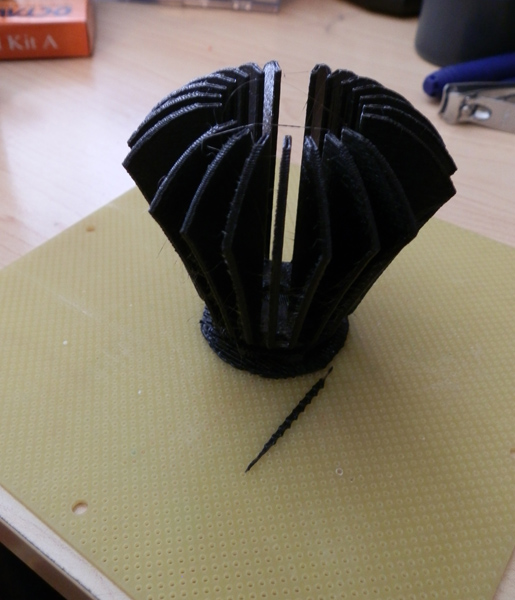
Here is the part fresh off the printer. See how printing it upside down removed all need for support material. Almost. There is some needed now because at the bottom there is a peg, and the area surrounding the peg needed some support.
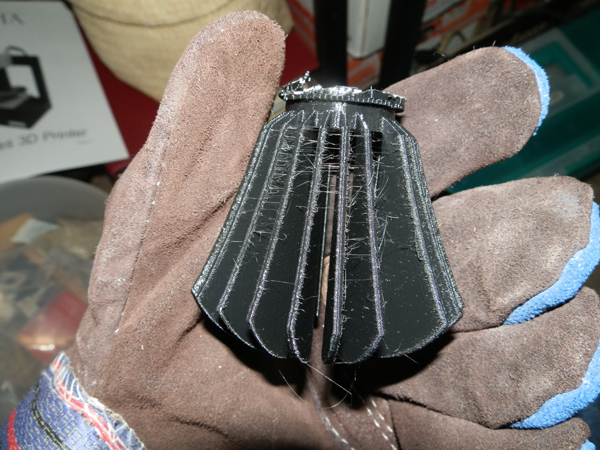
The black (lower quality) ABS plastic leaves fine hairs between the parts, but for the most part, at .2mm and Normal mode, it’s printing quite nicely. A brush would remove the hairs easily. They are spider-web-thin. (I’m holding it in a glove because I was trying to remove support at the top with sharp tools.)
Let me tell you now why I have to redesign this part:
It’s too flimsy. I cannot hold it hard enough to remove the support material without breaking the vanes.
So I’m redesigning this section.
I’m a bit stubborn. It would be incredibly easy to design the part so where the vanes stick out of the body, the body too is black. (And yellow for the lower vanes) but I want to do this right. So now I’m going to redesign the vanes with a central core, and then build the body with vertical teeth (much like the separate vanes) but the teeth will be thicker and stronger. And I’ll design it so the vanes will slip down a hollow cylinder, but stick out of the red body.
In theory.
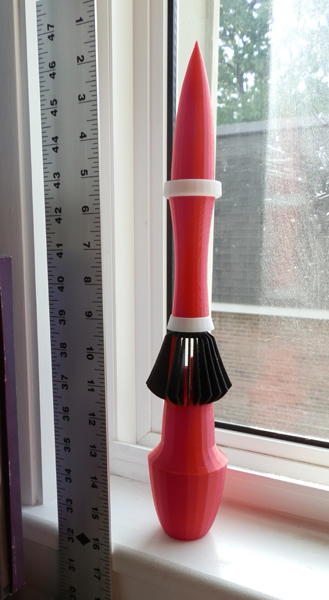
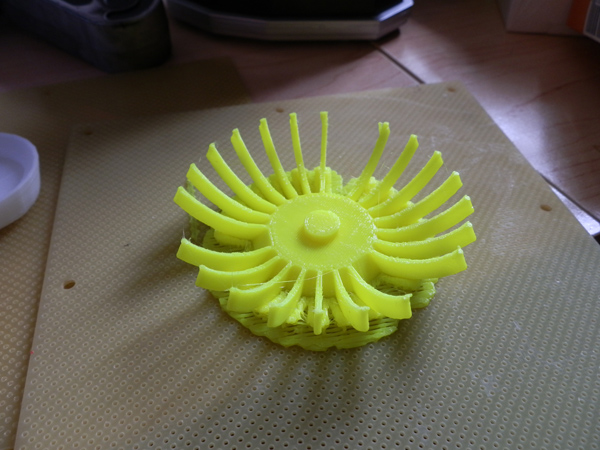
And now I printed the yellow vanes (in the old system) to see how they would print. Getting the support material off was a bit challenging, but I only bent one vane. Looks fairly good.
Here it is still on the print bed, before removal of any material.
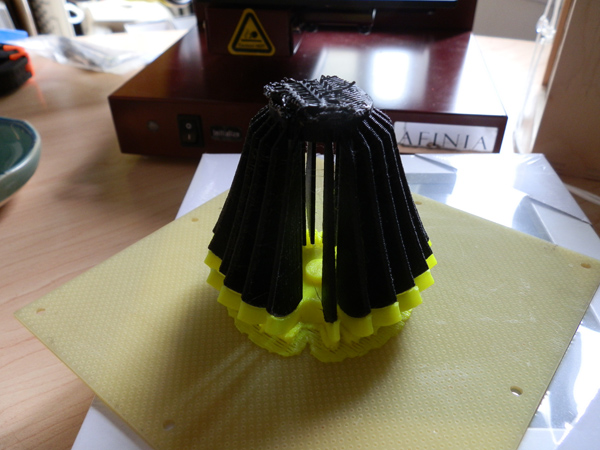
Here it is with the black vane part just resting on the yellow.
This is fine for test-fitting, but I remodeled the whole thing to work better, and be stronger, I hope. I’m about to print the updated mid-body section to see if it all works together. I’ll have to re-print these too, but these current versions will at least help me see if they will fit into the body section.
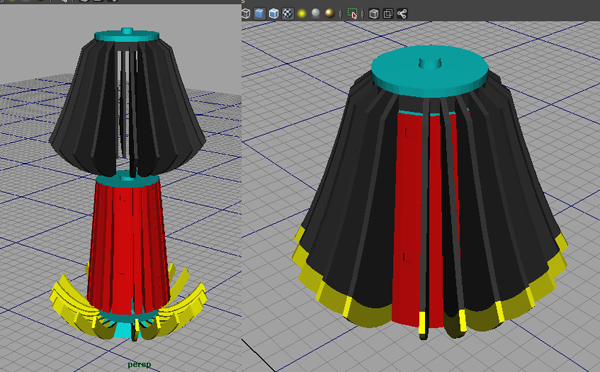
I spent some time tonight making three pieces of my rocket fit together without conflicting in space. That can be quite difficult when you’re trying to make it so 21 thin vanes slide into a cylindrical body part which has slots for those 21 vanes. And further complicating matters, the vanes themselves are part black and part yellow, meaning I have to print the black area as one part, and the yellow as another. And both of those have to slot into a red body part. Like so:
On the left you can see the red middle body part with slots. Slipping down onto that cylinder would be the 21 vanes of the mid-section’s black vane piece. The cap at the top stops at the top of the red body tube. Then underneath the yellow part of the vanes would slide up into the red cylinder. A delicate fit. If it works. If it does not, I will have to redesign this part if I want to print it on the Afinia without issue.
This is where I may have to eventually redesign the rocket to accommodate some of the limitations of the 3D printer technology.
Incidentally, in my modeling program I’ll be coloring parts of my model no one will ever see (when assembled) cyan in order to remind myself that those parts of the model will be hidden. Of course coloring the model has no bearing on how the model prints. It prints with whatever color filament I’m using at the time.
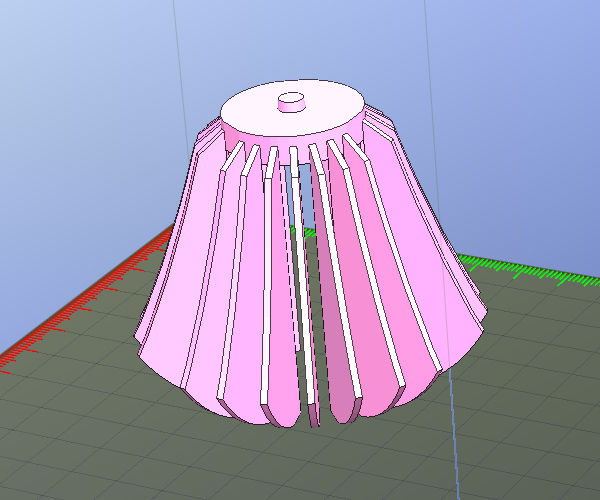
So I printed this piece tonight, at .25mm in Normal mode. It took not long under two hours.
I learned an important lesson. It can print these thin vanes ok, but they are very weak. And if I print this pieces oriented like you see here, the hollow inside (which is capped at the top) must print support material. And that means pulling thin support material away from thin vanes, and at the cap at the top you really have to get in there and remove rafting material. With 21 thin vanes in the way.
When I print this again, I will be printing it upside down. The angle allowed for printing without support is variable, but I’m almost sure that the vanes are at an angle slightly less than the maximum. So printing this upside down may just work. If it works as I hope it does, it will print like an upturned dixie cup, and the only support material needed will be just a bit at the “top” which has the peg protruding.
But, sadly, the printer glitched out again. When it finished printing this part, it didn’t finish cleanly, rather, it looked like it was trying to print a previous print job, forcing the print head down into the part.
I am assured a new version of the software fixes this, and should be live any day now, but I haven’t seen it yet.
Until this new software becomes available, I can’t trust the printer to print anything, as it freaks out at the end, and I’m afraid the slamming of the head into the plastic part can only damage the printer.
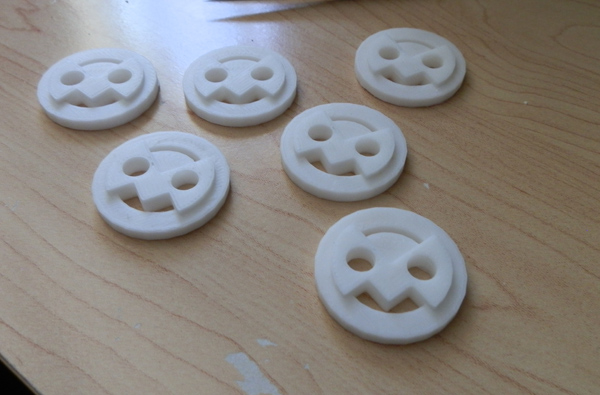
Browsing around Thingiverse, I found some owl-face buttons. My mother wanted some for a project, so I printed these.
They are about 1.3″ in diameter.
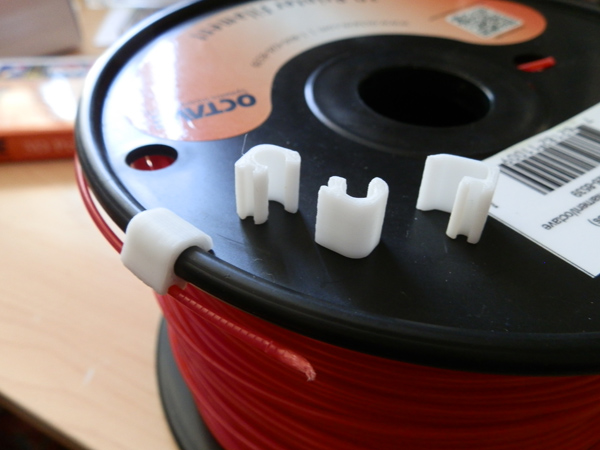
I also downloaded and printed some handy clips for the filament spools, for when the spool is not in use. Up to now I’ve been using masking tape to keep the reels from unwinding. Now I have these clips. I printed three for the Octave reels, (since I have three of those) and one Afinia reel clip.
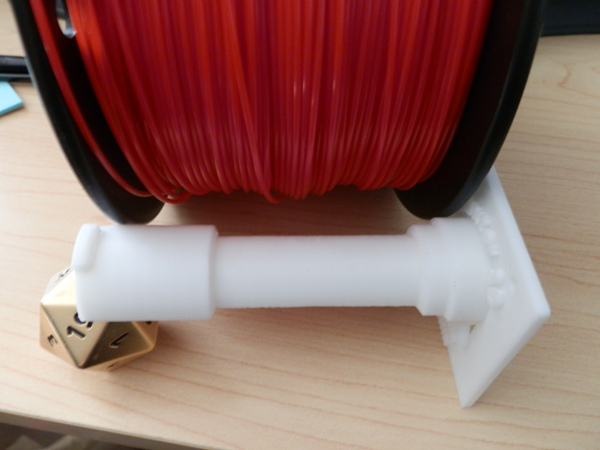
The Octave Universal Spool Holder is a nice idea. Replace the Afinia spool holder (which has the filament feeder attached) with an adapter that allows you to slide in holders for any reel you want, once you have printed that holder.
Well, I printed a holder for the two types of spools I currently have: Afinia; and Octave.
But then I thought, why swap those out? I can probably design one to hold both.
Since the Octave Spool Holder is wider, but has a smaller hole, and the Afinia spool is less wide but has a larger hole, I simply took the Octave holder, remodeled it from scratch, and inset a small area that sinks lower into the shaft.
Now, if the Octave spool is on, it will reach out to the end of the holder and be fine. The end tab will force the spool to stay close to the base, so it stays on the outer circular tube.
But if you use an Afinia spool instead, you can let it slip into the divot and it will stay there too.
So now, when I swap out my Afinia filament with my Octave filament, I won’t have to swap out the spool holder.
I printed one out earlier, and found that some of the edges had to move, so I did a quick move of some vertices in my modeling program and reprinted it.
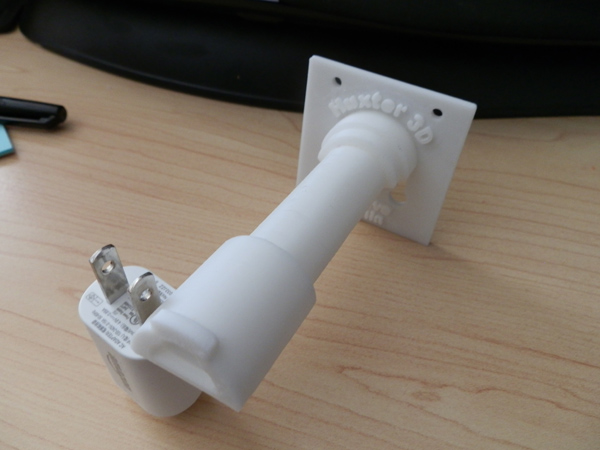
Here is the finished product. It is branded with my name, and at the bottom, the words Afinia and Octave to indicate this works with both reel types. It is sitting on an Amazon charger just for posing.
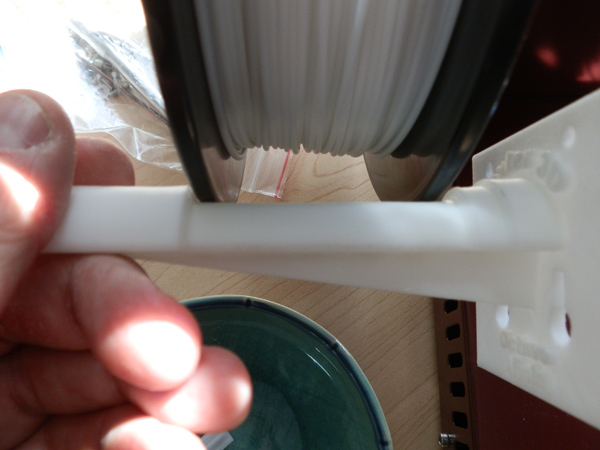
Here you see how the wider Octave reel would fit on the holder:
And here you see how the slimmer Afinia reel would slip down into the smaller groove:
As I get reels from different companies, I may be able to adapt this piece to be even more multi-functional.
After finishing the two cylindrical pieces, (the body tube and the nose cone) I then printed the bottom section of the TB3 rocket.
It printed well. Then, when the print job was finished, something bizarre happened.
Instead of dropping the bed it acted like it was still printing a previous job. The hot extruder head pushed itself into the plastic and the printer clicked a lot and before a couple of seconds had passed, I reached back and shut the thing off.
No major damage, but I was weirded out.
Skip to 8:30. (Sorry the video is so long. I no longer have any video editing software that works.)
I e-mailed Afinia and they replied very quickly, saying that it could be a corruption in the memory card, a fragmented file, or even a bad .STL file that I tried to print.
I printed a second test item the next day, hoping it was a one-off issue, but when this 1″ head model had printed, I got a similar result. It finished, but instead of lowering the bed, it kept printing. And from what it printed, I assume the job it’s stuck on is the job I printed a couple of days before – the two cylindrical rocket shapes.
Afinia says they have a new version of the printing software that supposedly fixes this particular bug, and in the mean time they informed me I could remove the Micro SD card and format it myself, and that may work.
So I unscrewed the base of the printer and removed the Micro SD and put it in the multi-memory-card reader in my computer and did a quick format and put it back.
Can’t do a test print at the moment, getting ready to go out to dinner. But I will try tonight and post.
Update: When I got back from dinner I printed a Lego piece. It ended successfully, with the head resetting normally. Looks like the format of the Micro SD card worked. Whew!