Tri-Dart Royal Rocket Liner

The Tri-Dart is an elegant ship used to courier royalty in and around the galaxy. Sleekly designed to slip through air during launch and landing, it also has no problem navigating the space lanes. Powered by the powerful Vera-Thrust engine system, the ship can travel almost as fast as the fastest intra-galactic military rocketship. It is also available to discerning clientele for commissioned private cruises. See our brochure.

This is how I describe this rocket on Thingiverse.

I wanted to play with simple spherical shapes using similar spherical shapes to boolean-subtract to see how the vaulted arches could form a working rocket ship.

I think the results are interesting at least:

rocket-tri-dart-01

The engine is booleaned out of the groined vault formed when three tall spheroids were cut away from the main body:rocket-tri-dart-02

The 3D Veiled Virgin

As a teen I glimpsed a photo of a marble sculpture of Giovanni Strazza’s Veiled Virgin. It amazed me. It is a perfect sculptural illusion which depicts a sheer gossamer veil in hard solid stone.

IMG_3356.JPG

There are several examples of this effect in the classical art world; a famous example residing in a convent in St. john’s, Newfoundland which as often happens in life, I never visited because I lived there and took it for granted. The sisters there are rightly intensely proud of their Veiled Virgin.

So this week I found a 3D model of Strazza’s Veiled Virgin on Turbosquid. I have never paid for a 3D model but the perfection of the artist’s work, modeling from photographic references, deserved money and I paid it.

I printed it on my Afinia H480 3D printer.

IMG_3353.JPG

New Thunderbird 3

Thunderbirds is 50 years old this year. ITV is celebrating this anniversary by introducing Thunderbirds Are Go!, a new CGI TV version of the original, updated quite a bit and intended to reach a new youth audience.

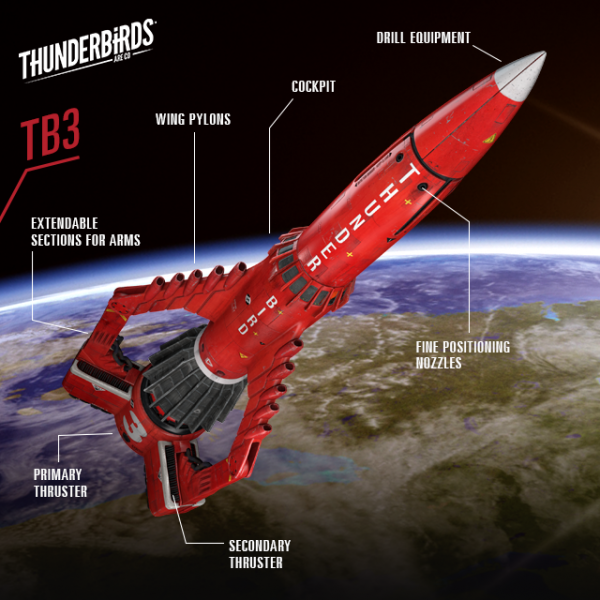
Three episodes in, I can see real potential. They’ve done a few things ardent fans dislike, like making Thunderbird 3 go on routine space garbage maintenance runs, but one thing they did very well was re-imagine the Thunderbirds themselves, the amazing vehicles used in International Rescue.

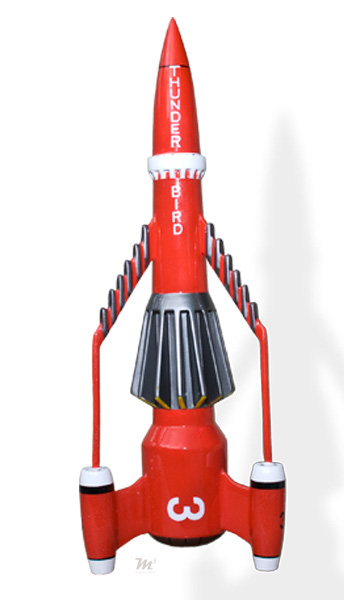
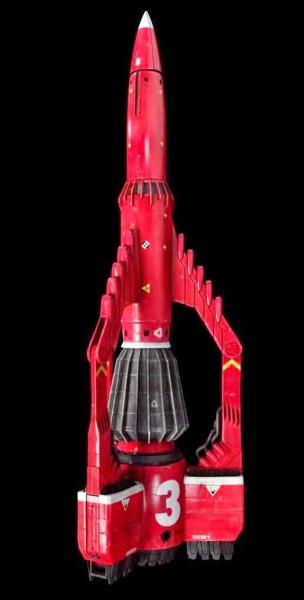
Here is the original Thunderbird 3 on the left, and its update. This one was a bit jarring for fans because Thunderbird 3 has suddenly taken on some square aspects that led many to call it the Lego version:

tb3-model-01 tbagtb3

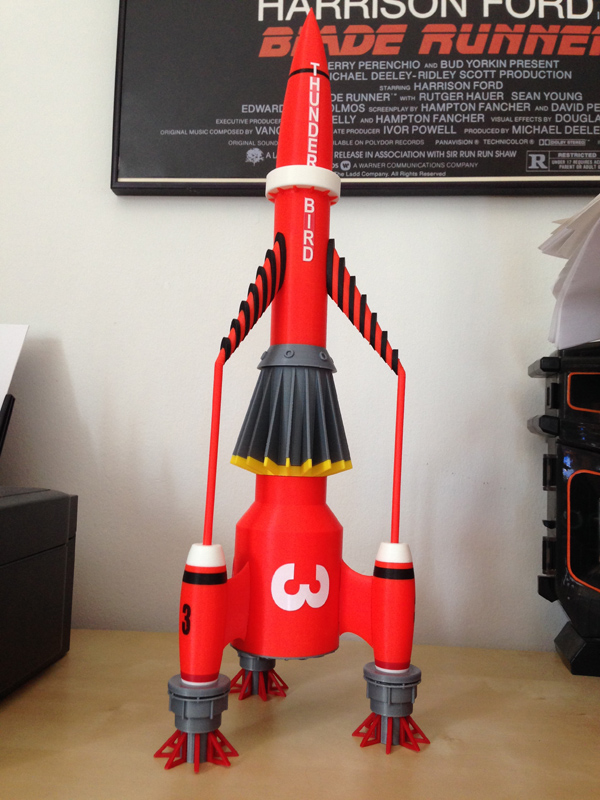
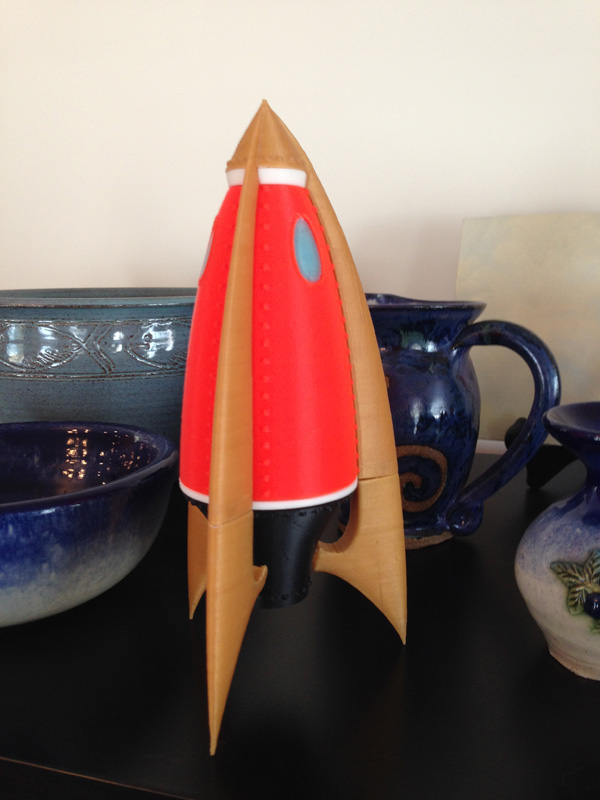
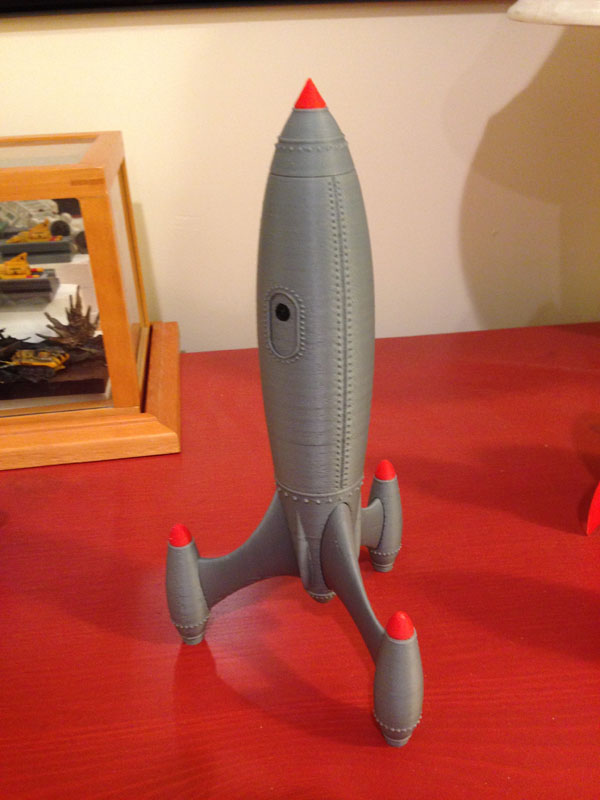
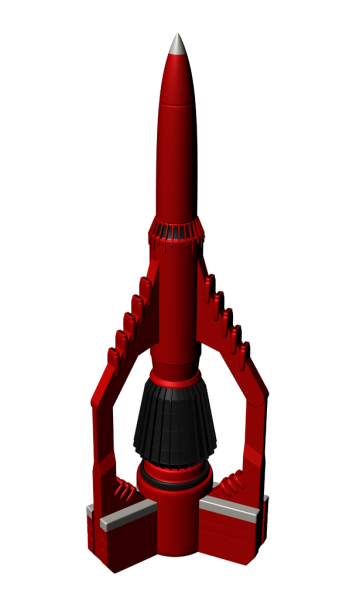
And while I spent some time last year modeling a very nice version of the original:

tb3-lb-engine-housings-02

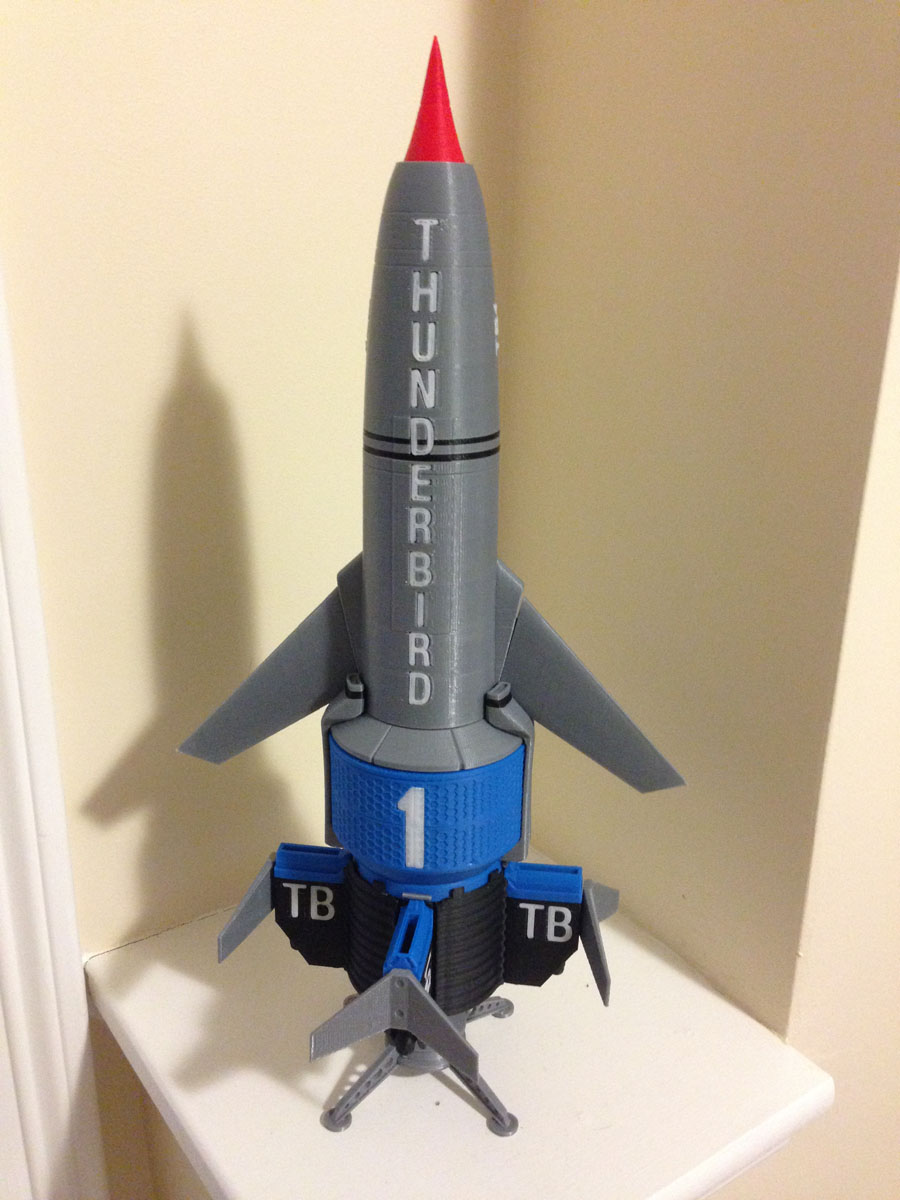
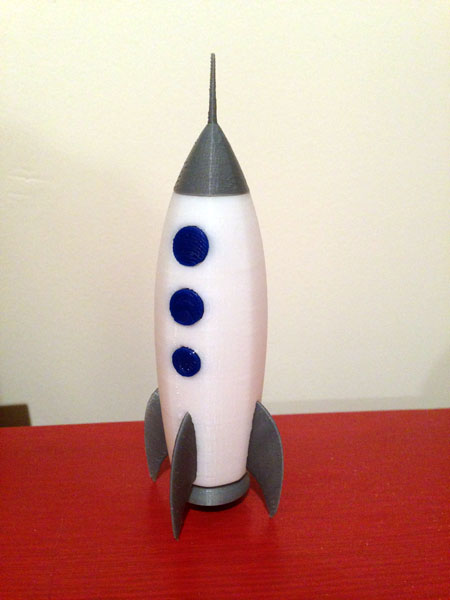
…and a lot of time on the new Thunderbird 1 as well:

tag-tb1-3dprint-fully-assembled-on-display-topside

I thought it was time to model the new Thunderbird 3. (And as well, perhaps look into modeling the old Thunderbird 1, but that’s for another post.)

So I spent about two hours last night modeling, and here’s what I’ve come up with so far. There isn’t a lot of detail yet, but the framework is there:

tbagtb3tb3-test-render-01

Clearly, proportion and detail will have to have some work done, but the first step is to flesh out a fairly accurate basic model, then fix the issues.

UPDATE: April 20 – Model Is Mostly Complete

I spent the last two days printing test pieces to prove the concept of the two main hinges that allow Thunderbird 3 to use its arms to grasp items in space.

arms-open

I found that it all worked ok, but with varying brittleness. Circular hinges can be brittle if they are not thick enough, and I’m constrained by scale here. But I thickened them up after finding a breaking point, and hopefully now it works.

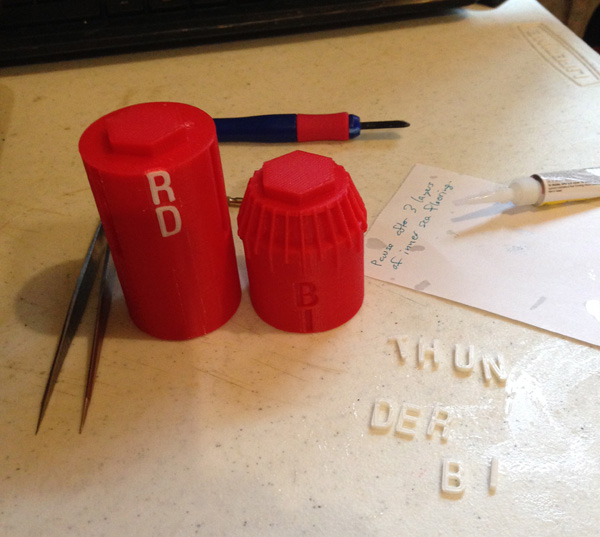
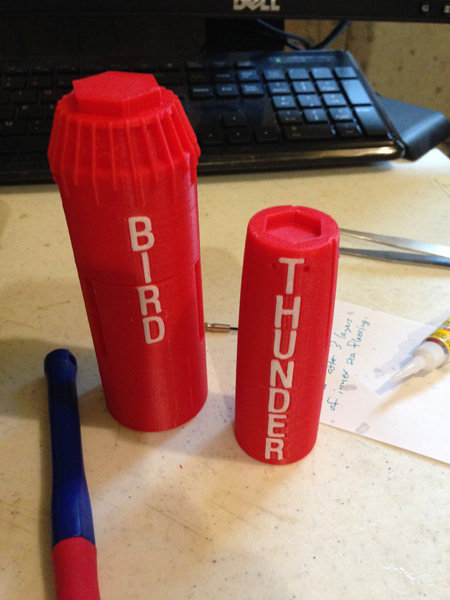
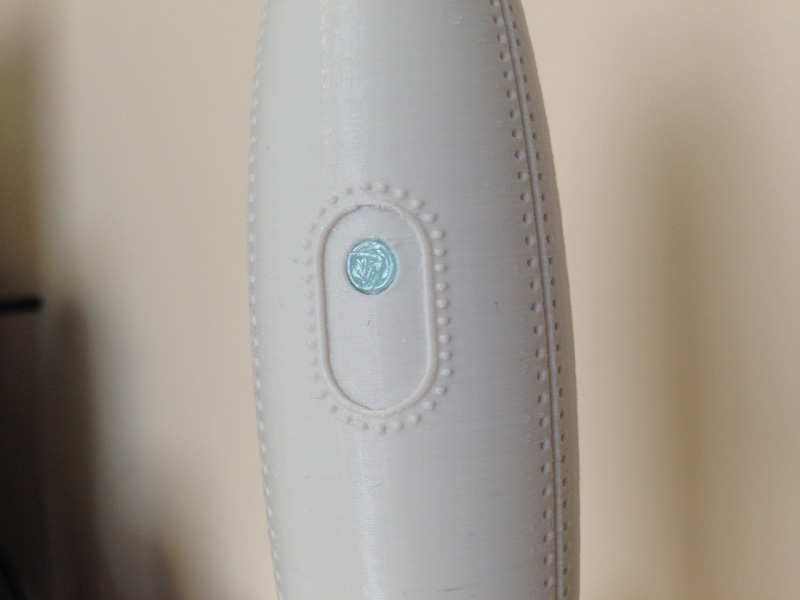
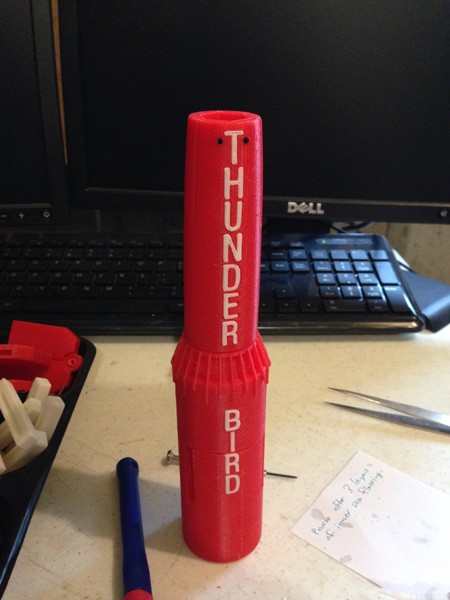
I then spent time adding body detail, including inlaid “THUNDERBIRD” and “3”.

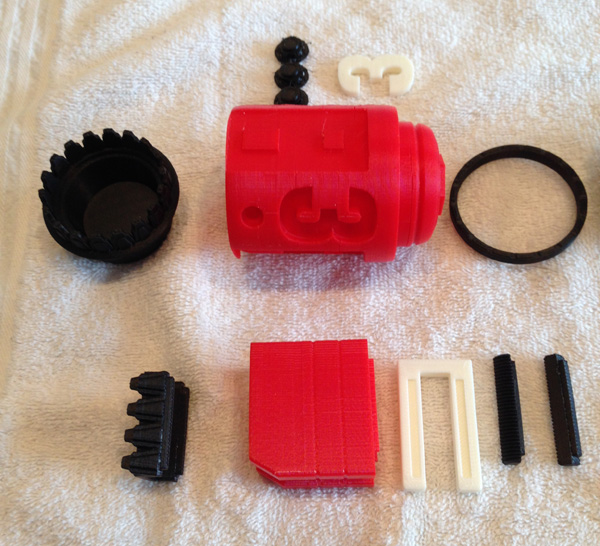
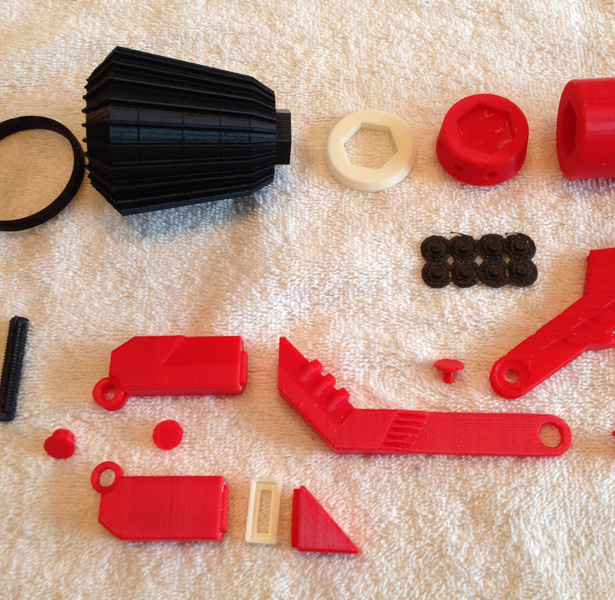
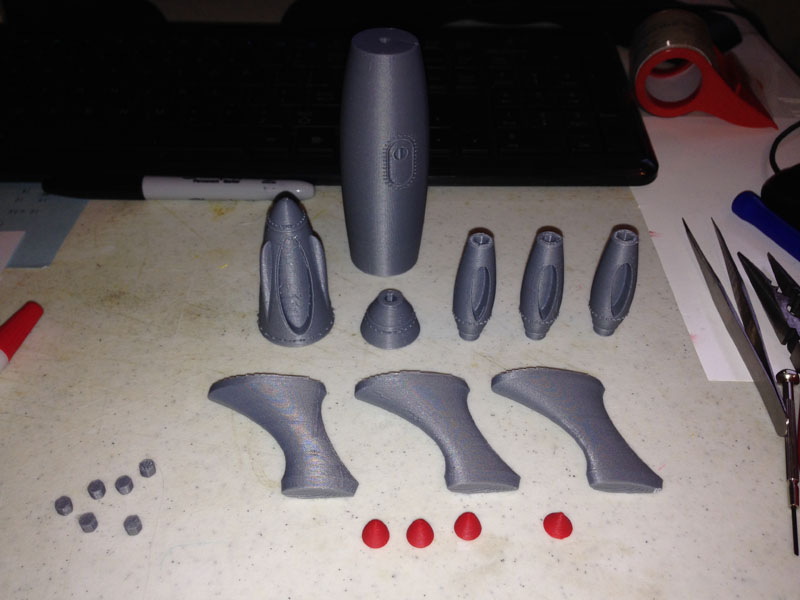
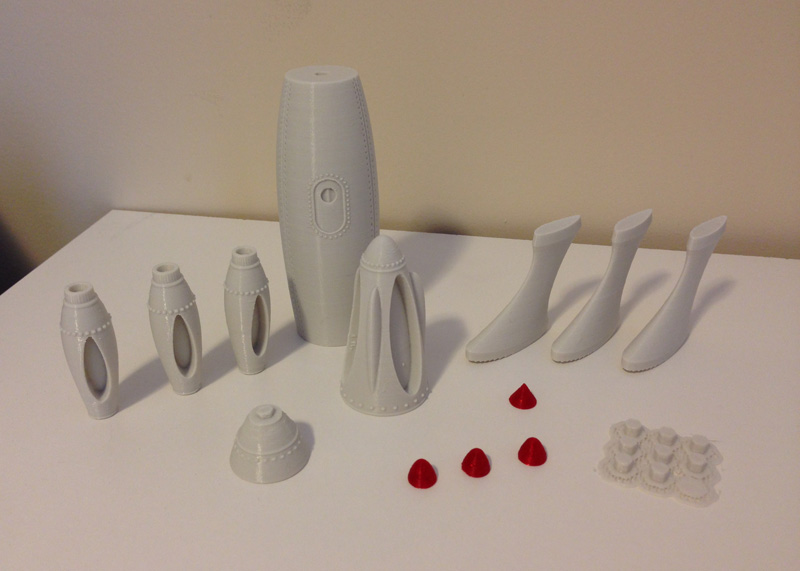
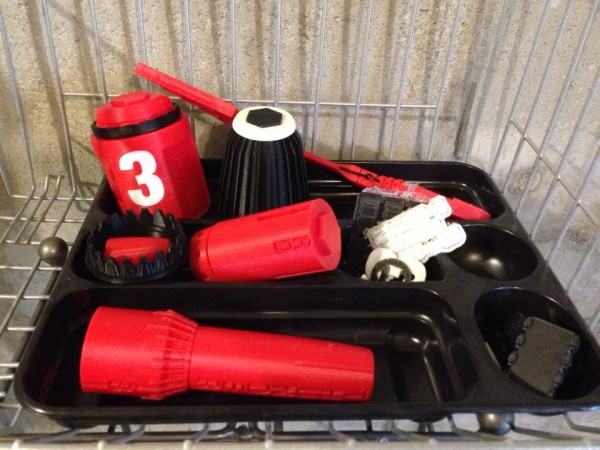
So here is an exploded view of all of the parts needed to put this model together.

tb3-new-parts-explosion

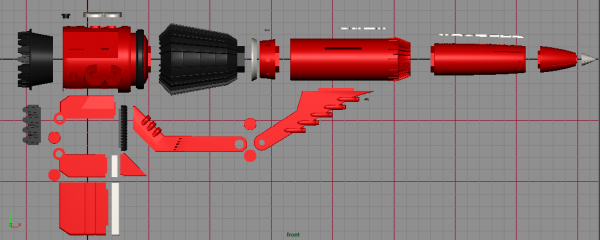
Note that a lot of the parts shown have multiples, such as the entire arm assembly, the “3”, several inlaid body details, etc.

This orthographic side view does not show a lot of the detail, not because of the size of the screen grab but because of the flat lighting.

I decided to make life easier for me when it comes to the cables that attach at the bottom of the arm “elbow” section. I modeled holes. I’m going to use flexible black filament cut into lengths for the cables. Clever, I think!

UPDATE: April 22 – Printing has begun. 

Here is a tray full of parts. And some test-fitting with occasional slight tweaks and re-printing. I’m doing the whole body and one single arm now, and when that arm works, I will print the other two arms.

tb3-parts-in-progress-01

UPDATE: April 24, 2015 – Assembly

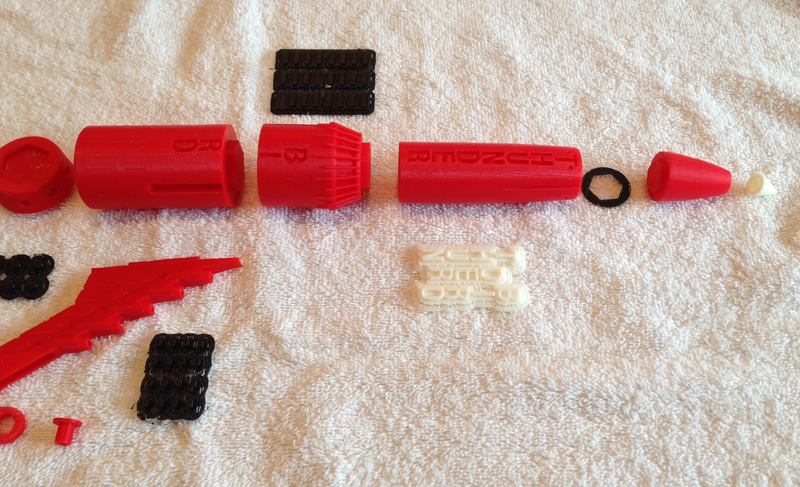
Here is a layout of all the parts (noting that this only shows one of the arms):

newtb3-parts-01 newtb3-parts-02 newtb3-parts-03

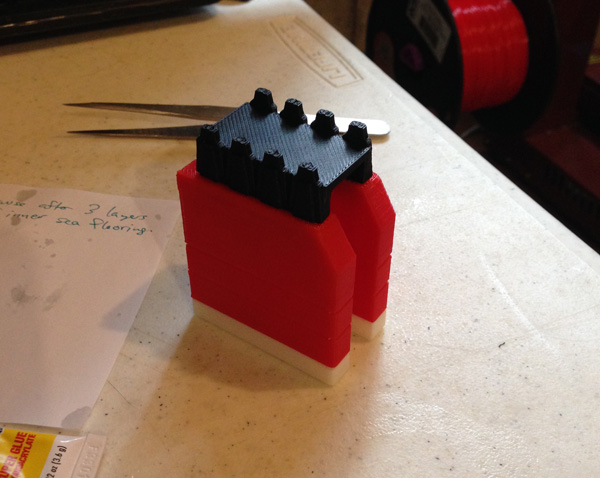
And now we begin by assembling the body from bottom up:

The “3” is inlaid into the body, with the black ring attached. The vanes have the first white ring glued.newtb3-assembly-01

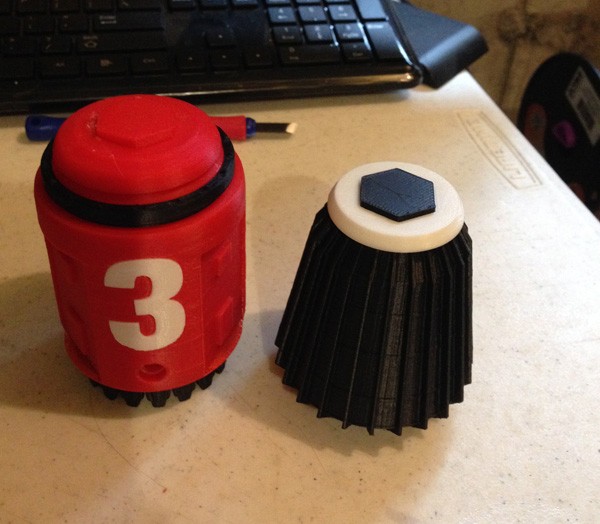
Then the vane section is attached to the bottom, with the connector ring on top:newtb3-assembly-02

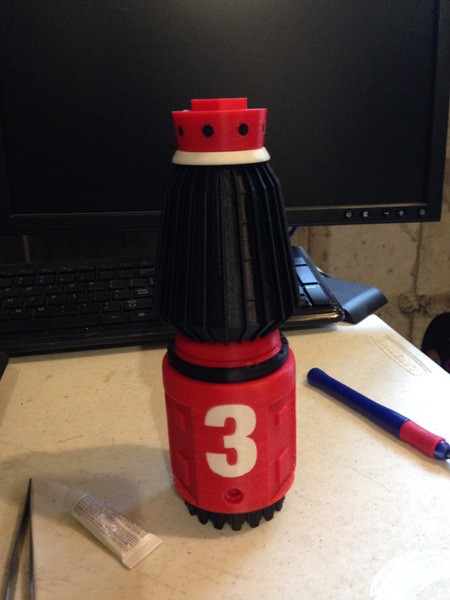
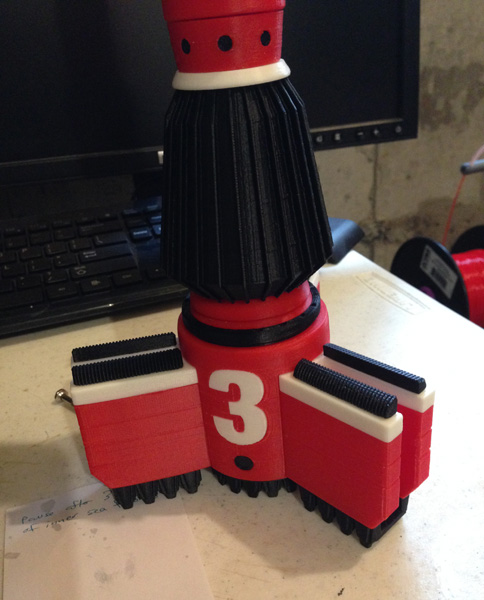
The “THUNDERBIRD” text gets inlaid:newtb3-assembly-03

newtb3-assembly-04

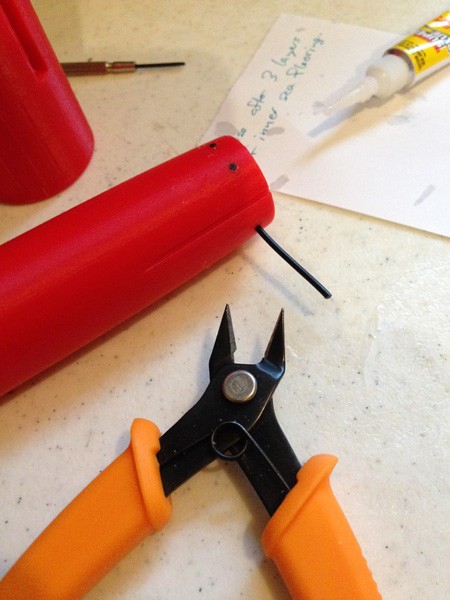
The fine positioning nozzles are just raw black filament, inserted into holes and cut:
newtb3-assembly-05

Stacked:
newtb3-assembly-06

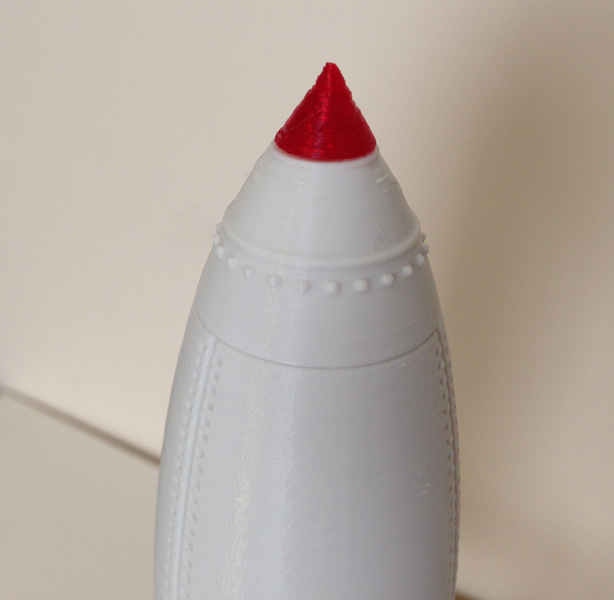
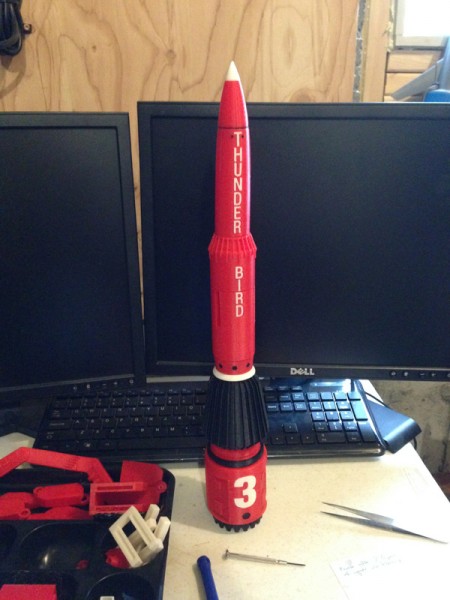
Nosecone added, and entire body assembled:
newtb3-assembly-07

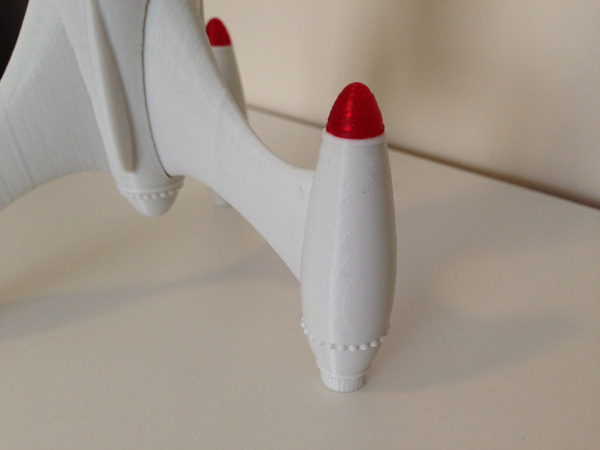
Now for the arms. Here, I begin attaching the secondary thruster housings:

newtb3-assembly-08
newtb3-assembly-09

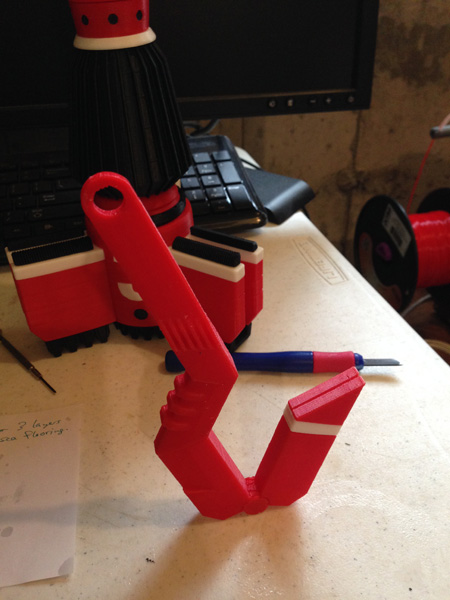
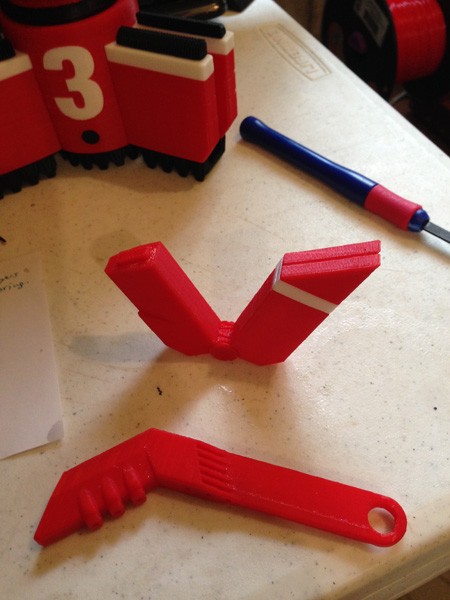
Now for the articulated arms. Each Arm has two joints, one at the “shoulder”, and one at the “elbow”, if you want an analogy to an actual arm. The “hand” consists of two triangles which in the show extend and open. In this model, that would be difficult to achieve properly so I’m just using a solid closed claw “hand” in this model, and later will model an extended version. These hands are not glued in place, so later, I can just pop these out and replace them for the fully extended hand grapples.

First, the “elbow” joint is made with three rings, two on one piece, and one on the other. A two-piece pin inserts into the hinge and glues together:newtb3-assembly-10

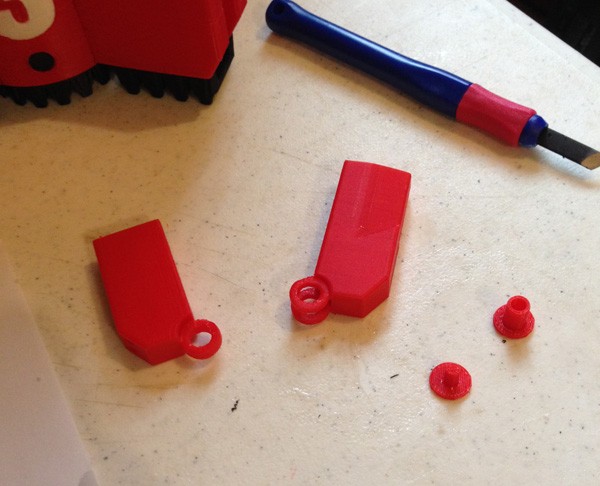
Which makes them hinge nicely:newtb3-assembly-11

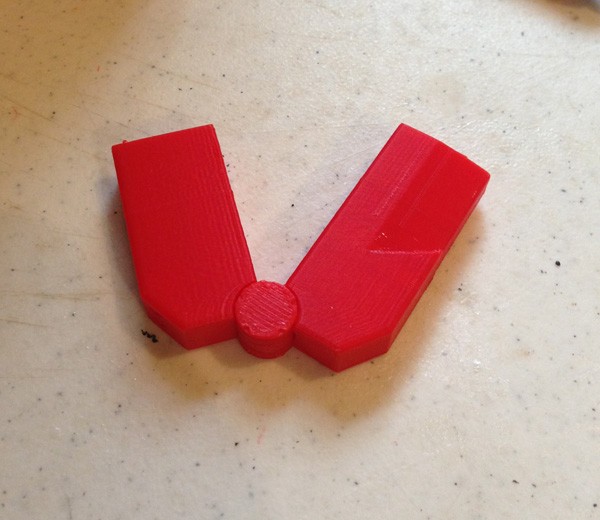
I test-fit the wrist cuff and hand to the elbow piece:
newtb3-assembly-12

The lower arm is glued to the hinged section:
newtb3-assembly-13

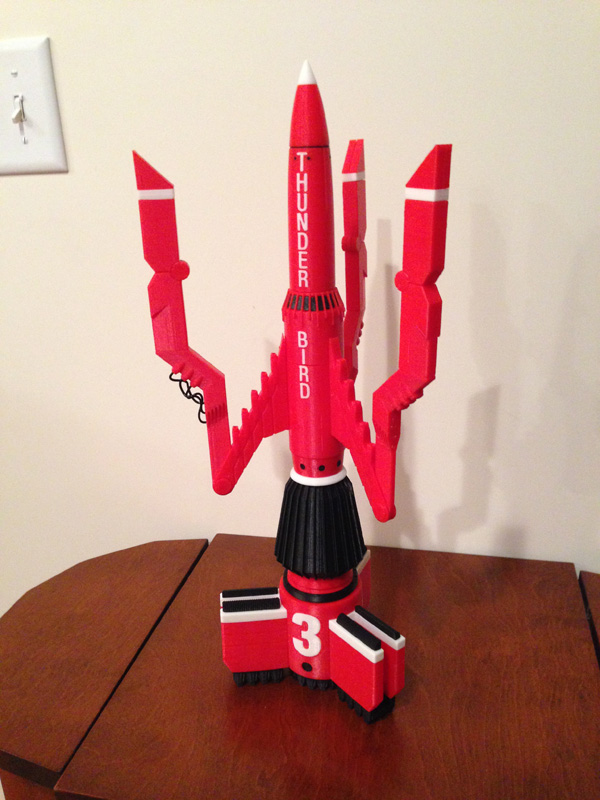
These get attached to the upper arms in exactly the same way with more two-piece pin pairs, forming a two-jointed arm system. Then 24 windows get glued in place.
newtb3-assembled-01  newtb3-assembled-02

newtb3-assembled.03

So the arms extend in exactly the same way they do in the TV show:arms-open

You may notice the hydraulic cables that work the elbow joints. They are raw black filament melted into shape into six holes on each arm. In this photo you only see one arm done, but in my final picture, they are all done:

newtb3-done

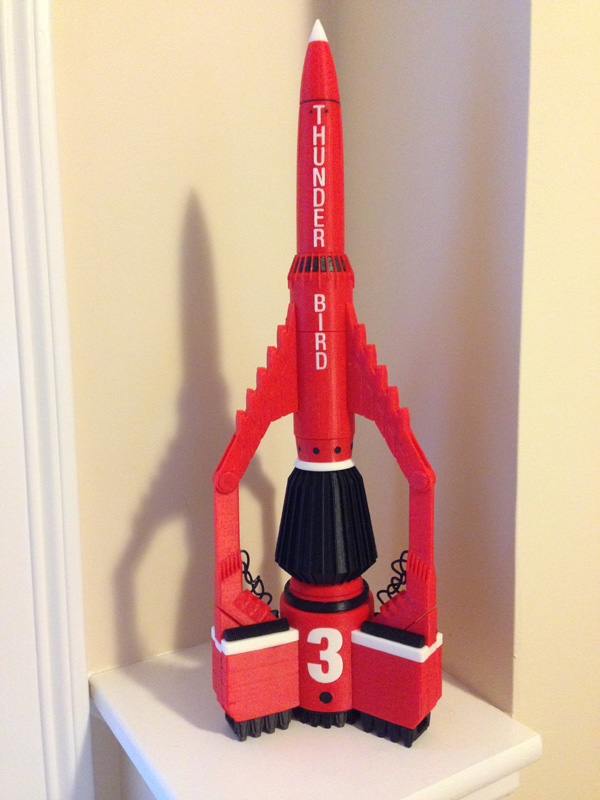
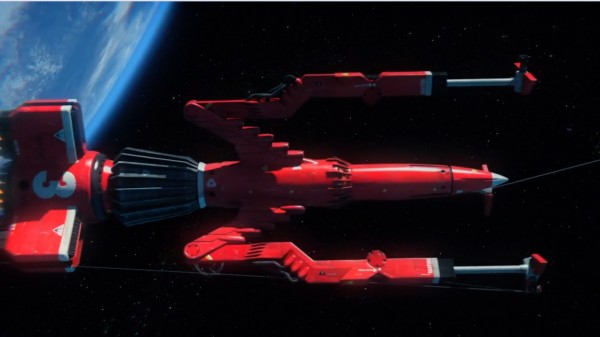
For what is a pretty decent version of this:

tb3-diagram

Menorah for a Friend

For Hanukkah this past year I made this for a friend.

menorah-01

I’m sure it’s not perfect, but I did try. Each holder has a bolt to prevent melting of the plastic. This s really a prototype. I had hoped to print it in metal at some point but that would be incredibly expensive. The Shamash (helper holder) is the tallest one at the back and contains a blue candle. These are simply birthday candles, and this Menorah was meant to be symbolic, not actually used (since buring the candles down will likely melt the adjoining holders.) But I enjoyed making it for her.

Luxury Rocket

In my continuing series of rocket designs, I spent some time last week designing a sleek rocket whose fins sweep down the entire length of the body.

lr-full-01

It’s hard to see, but rivets line the body on either side of each fin, and along both rims of the engine section. The window is printed in glow-in-the-dark blue because I like how that looks as reflective glass.

Here is the underside, showing re-use of an engine detail that I modeled for an entirely different purpose but have used in several projects since.

lr-rear-01

It was first designed for a GI Joe project, an ice blaster.

at-ice-blaster-front-view-01I used that central core (fused into one part) to create a jetpack for a Corgi which I designed and printed for a friend. (I did not design or model the dog, I just used it with my own jetpack design.)

I also used it on my Jetpack Rocket:

rocket-jetpack-2

My rocket collection so far:

2015_04_rocket_collection

Left top right: Luxury Rocket, Rocket Jockey Ship, Silver Bullet Rocket, Fathers Day Rocket, 3DAGOGO Rocket, Jetpack Rocket, Regular Joes Rocket(s). (One for me and one for each of the Regular Joes.) (That’s the Regular Joes Podcast, which, if you’re not listening to it, you’re missing out.)

Jetpack Corgi!

My friends Chonny and Jess have two corgis and Chonny and I once discussed 3D printing a corgi with a jetpack. While I would find modeling a corgi arduous, I was not above downloading one. I can’t remember where I found it but I did manage to find a good corgi. The body was a bit long, so I cut that down a bit. But I did design this jetpack with the Rocketeer jetpack in mind.

jetpack-corgi-02

jetpack-corgi-03 jetpack-corgi-04 jetpack-corgi-06

Rocket Jockey Rocket – My Unapologetic, Blatant Rip-Off

I admit it. I really liked coolrockets.com‘s Space Tub. I have one here. I’m thinking of selling it, though, as I really have to get rid of the bulk of my toy collection. Here it is:

coolrockets-space-tub

So before bidding this one a fond farewell, I opted to make my own version of it, with minor changes, so I don’t have to be lonely no more.

Here are the parts:

rocket-jockey-parts-01

Body in two pieces, rear and front, pegs to fit them together, a cockpit which has two window sections, unlike the original, a cowl to fit around the cockpit, with a fin slotted into the cockpit, and two on the sides, which form a perfect triple rocket. Top it off with an engine and nose spear.

And it looks like this when completed:

rocket-jockey-assembled-sitting-01rocket-jockey-assembled-01

And to finish it off, to be like the original, I added a sewing pin:

rocket-jockey-pitot-tube-01

And here he is alongside his larger brother (printed at 1.44x scale) with a slightly larger sewing pin:

rocket-jockey-with-big-brother-01


Silver Bullet Rocket

I love retro-designed rockets. I’ve done several now, and I’m just getting started.

This one is designed after some 1930s ideas, and is even similar (though mine has fins) to the one that took Bugs Bunny into space to meet Marvin the Martian for the first time.

Here’s mine, the parts laid out:

rocket-silver-bullet-parts

Which assemble to form:

rocket-silver-bullet-pose-02  rocket-silver-bullet-pose-01

So far I have designed and printed a rocket based on a Fathers’ Day Card my daughter gave me:

rocket-fathers-day-first-test-print

Then I did one from the 3DAGOGO T-shirt from a contest I won:

3dagogo-rocket-with-shirt

Then I did one for the Regular Joes Podcast after their new logo, a white and gray rocket:

rocket-regular-joes-01

Then last weekend I designed the Jetpack Rocket (based on the jetpack I made for my friend, which I modeled on a corgi dog for him.)

rocket-jetpack-1

UPDATE: May 2, 2015 – PLA Version

A while back I got a reel of Afinia Premium PLA filament in gray. I had never used PLA before, and for some reason I had some issues printing on my H479. I don’t know why. I more or less abandoned it as a material after a few tests. Then I got a Makerbot red transparent PLA not realizing it was PLA. I thought it was ABS. I used that a couple of times with similar results. A lot of spiderwebbing (very thin traces of filament stretching between spans between parts.)

This week I revisited the PLA with my H480 (basically the same printer with some nice extra features, but more or less the exact same printing system) and this time I got really good results. So I thought I would do a more comprehensive test print of my Silver Bullet Rocket.

So I printed each piece in Fine (slowest, most accurate) mode, with .15mm layers (highest resolution) in PLA.

Here are the results:

The Parts: (minus the door window, because I forgot I needed it when I took this picture.)silver-bullet-pla-test-parts

The door, with aforementioned window (printed in blue glow-in-the-dark ABS. This is the only ABS part on this particular print) – But look at it close-up. It printed very nicely!silver-bullet-pla-test-closeup-door

The engines and caps: (I have to say, I really like that translucent red!)silver-bullet-pla-test-engine-closeup

The nose section. (At this size, the cone was a little untidy)silver-bullet-pla-test-nose-closeup

The finished print.silver-bullet-pla-test-full

Claus-Bot – New Bot Shoppe Robot

claus-bot-01

It was Carol’s idea! I swear! She envisioned a Santa Claus robot, and of course its main feature would be disproportionately large claws.

So I set to work designing a slightly retro look, with white helmet reminiscent of the Battlestar Galactica Viper pilot helmets (original series) with a fin that looks like it belongs on a bullet train from the 1920s.

I was originally going to give him skis and a jetpack engine, but I thought better of it. I thought of snow-cats, which have very wide treads, and completed the design with white jet intakes down the front  and a headlight beam on his belt buckle, and snow goggles.

claus-bot-02 claus-bot-03

ZoomFloppy Case

ZoomFloppy is a great little circuitboard I bought for $35.00. It connects to a PC through USB and allows you to connect Commodore 64 disk drives (1541, 1541-II, 1571, 1581) directly to the PC for reading and writing to .d64, .d81 files, etc. This allows you to use a Commodore emulator (like VICE) which uses these files as images of the original disk.

zf-zoomfloppy

It’s a great way to archive your old disks too, but also to revive your interest in the Commodore 64 without having to go out and find an old C64. Any PC (or Mac, or heck, even a Raspberry Pi) can run the VICE emulator and you can have a fully functional Commodore 64 at your fingertips.

c64_startup_animiert

To start, I measured the distance between the mounting holes on the circuitboard:
zf-caliper-measure-topzf-caliper-measure-sides

(Note, the numbers on the calipers are not accurate… this was for visual reference only.)

Then I printed an X-shaped test strip with cones where the screws should go, so I could test fit it onto the circuitboard and see if I had the dimensions just right:

zf-screw-test-confirmation zf-screw-test-fitting

Once I knew the test cross fit, I could be confident those dimensions would work on the case.

I measured the connectors so I could cut spaces for them, and printed a rough frame that should fit the ZoomFloppy:

zf-case-test-1-bottom-frame zf-case-test-1-bottom-test-fit

Then I did it again, refining the spaces in the gaps for each connector, and rounding out the hole for the LED, since the square hole was just for position testing.

zf-case-test-2-bottom-frame zf-case-test-2-test-fit

When that was secured, I printed a completed bottom:

zf-case-test-bottom-full

Then I printed a test top, though this print came out less than perfectly, I was able to use it to test position:

zf-case-test-top zf-test-case-top-fitting

It was time to print the first test print in color – white.

zf-case-halves

I printed these floor down. My printer was having some issues with warping and the case top and bottom did not come out perfectly flat, but I think that’s a print-bed heating issue I’m working to resolve. But it worked out fairly nicely. Printing it “upside down” allows the connection between the top and bottom halves to fit just about perfectly. The warping would only affect the case top and bottom, and not be a major issue.

I etched out a space for a Commodore logo, and a strip at the top that would have a smaller version of the logo with the rainbow color strips familiar on the Commodore 64’s case, then the ZoomFloppy logo on the right. Each strip was printed in a separate color, and fits into a thin slot on the logo strip.

zf-case-detail

Next I secured the two halves with screws, sandwiching the ZoomFloppy board perfectly.

zf-done

This shows the bottom, with the four screws and the four rubber feet I attached to prevent slipping. (Bought in any craft or hadware store.)

zf-case-bottom