Vending Machine Bubble UFO – Flying Saucer – 04

I wanted to make another UFO, this time using a 2.25″ spherical vending machine bubble capsule, one of the newer versions, not the acorn-shaped ones.

So I perused the internet for ideas and found one that I really really liked. I admit I took a lot of the design directly, and then added some stuff of my own, including re-using legs I created for Thunderbird 1’s display stand, with some alteration.

Here’s the final result:

ufo-04-finished-01

Here are the constituent parts:

ufo-04-parts

The bubble is clearly not 3D printed – it’s the clear half of a vending machine spherical capsule.

Assembly:

Two halves of the saucer, along with the purple interior console and green seat:ufo-04-assembly-01

Front grill and green headlights:ufo-04-assembly-02

Green vertical thruster and legs:ufo-04-assembly-04

Five green tail lights:ufo-04-assembly-03

Beauty shots:
ufo-04-finished-05 ufo-04-finished-02 ufo-04-finished-03 ufo-04-finished-04

Inspiration:

I am often inspired by models, things I see in every day life, and in searching the web. I found this one and liked it so much I only made small modifications. Apologies to the original artist. I loved your work so much I had to use it.

IMG_3853


Borosilicate Glass Storage Rack – A Modular Design

The Afinia H479 and H480 (I have one of each) comes with perf-boards to print on. These work fairly well for most purposes, but the boards warp with the stresses of cooling plastic layers, and it’s difficult to print something with a wide bottom that is truly flat, but this is often necessary.

Luckily Afinia also sells sheets of Borosilicate Glass that clamp down to the heated print bed. Alone they do nothing, but when the glass is coated with a thin film of ABS slurry (a mixture of 10% bits of ABS plastic and 90% acetone by weight) something actually magic happens: The print sticks to the unwarpable glass like crazy, and then when it cools, it pops up as if it was almost never attached. I mean I have no idea how this works, but man, it works!

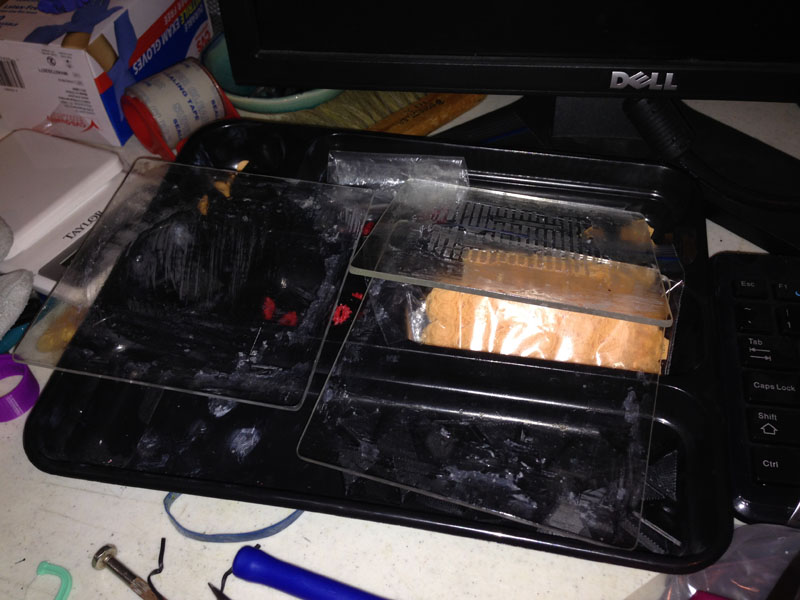
I bought three sheets some time ago and that’s perfect to keep a print flow going. But one of my cats knocked one over and shattered it, and I dropped one, leaving me with one. So I bought three more.

Now I find that they are cluttering up my already cluttered work surface:

glass-plate-mess-01

(And this is me organized!)

So I thought I needed some place to store the sheets of glass waiting to be used. I came up with a modular rack system.

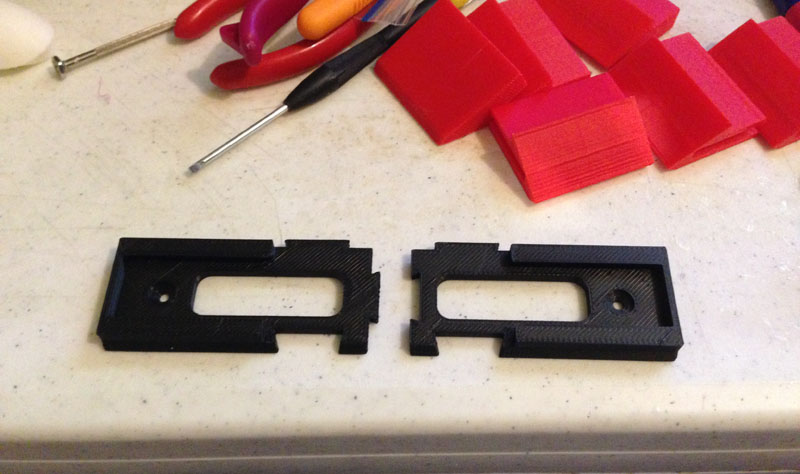
Since my Afinia can only print a 5x5x5 volume, and the rack base pieces had to be over 7″ in length, I cut the parts up in two halves with jigsaw tab and slot design so they can snap together. This works very well, snapping very tightly with perfect matching tolerances!

Here you see the two halves apart,glass-plate-base-parts-01

then snapped together:glass-plate-base-parts-02

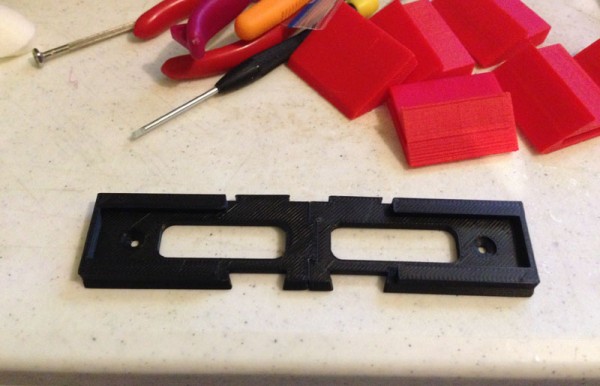
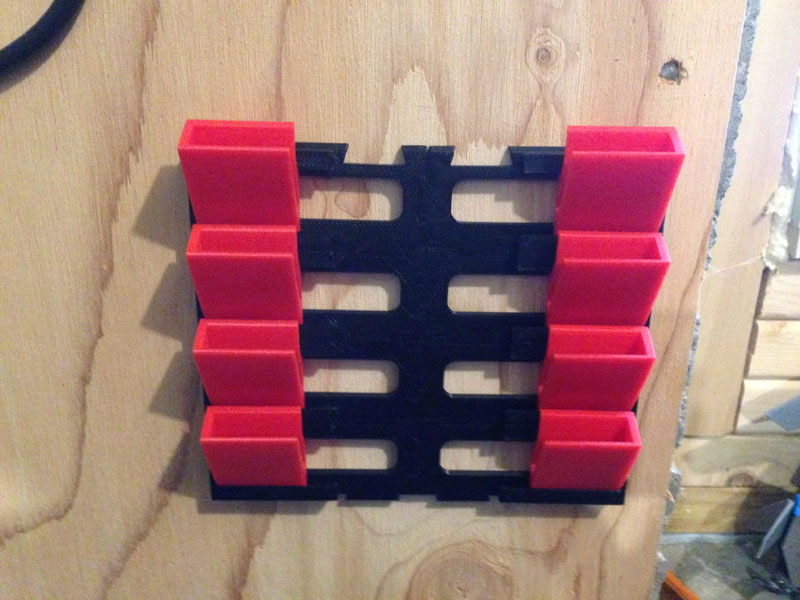
Screw holes on the sides allow me to screw this into a plywood wall that is just above my print table.

Then I created these slotted holders that can slide into the base pieces:glass-plate-base-parts-03

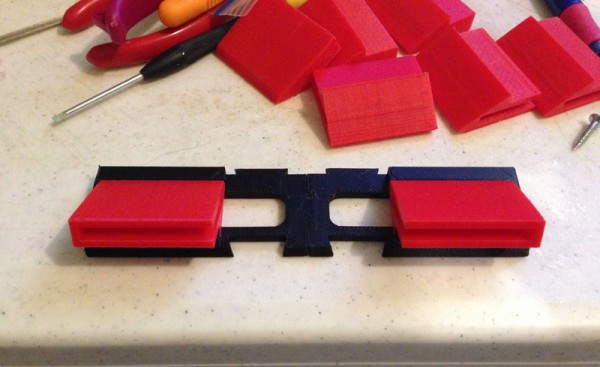
(I have since redesigned those a bit to allow easier insertion of the glass by flaring the apertures a bit, see the final pic.)

So I printed four sets, snapping them together. Since I designed the slot system to not come apart easily, I only need to screw in the top and bottom rack bases, though I could, if I wanted, screw them all in place.

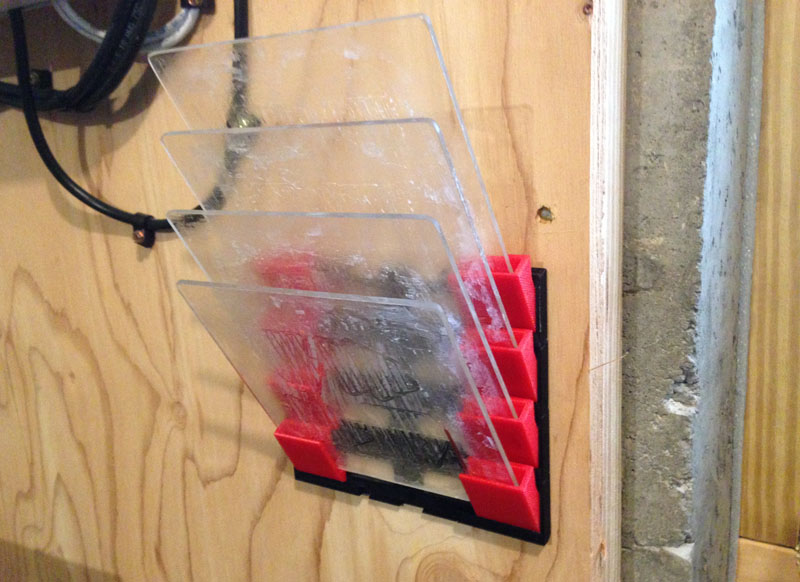
This is the improved slot design. Slightly less wide, but flared so I can put the sheets in easier, yet they still hold well.glass-plate-base-installed-01

And here are the borosilicate glass sheets in place, perfect, out of the way, and easy to grab when I need one.

glass-plate-base-installed-02


Bubble-Capsule Flying Saucer UFO-02

Introducing UFO-02. I have not given these names, just numbers in the order of creation. UFO-01 can be seen here, and UFO-03 can be seen here.

UFO-02

ufo-02-01

UFO-02 is a more hard SF flying saucer, with buttresses supporting the bubble-capsule dome.

ufo-02-02

It also has red surface detail printed in a beautiful cranberry-red translucent PLA material.

ufo-02-03

It has plated heat sinks on bottom, with a sewing pin which looks like some kind of 1950s energy weapon on the bottom.  The landing gear is also reminiscent of the era.

ufo-02-04


Bubble-Capsule Flying Saucer UFO-03

Introducing UFO-03. Yes, UFO-03. I created UFO-02 a while back, based on the UFO-01 posted here.

ufo-03-02

I adapted my original UFO design which uses small vending machine bubble capsules, so the system could be interchangeable, so that any top can fit with any bottom through the use of two peg holes which match.

ufo-03-03

This is UFO-03, a more colorful flying saucer with major parts in blue, with white bubbles underneath. When I had printed the first version (roughly printed at .25mm layer thickness) I thought it needed landing gear, so I adapted the bubble underneath to be landing gear.

WERBLZ – A New Character

UPDATED – July 28, 2015

I have been insanely busy – no time to create and or print things. But this weekend I found time to create a new creature I have been doodling for many months.

Introducing WERBLZ.

werblz-01

Alien creatures designed to werble. Thusly:

I’m using vending machine 1″ bubble capsules in this design, like I did for my “Mars Retaliates” UFO designs.

This time, the bubble encloses a brain with eye stalks revealing a very alien creature (with white gloved hands for some reason :-) and a mouth in his body.

I designed everything, and modeled all but the brain. For the brain (which I will likely model myself later) was downloaded from Thingiverse, and was uploaded from MRI data by Thingiverse user hyla.

There is a 1/3″ metal nut in the base making the Werblz rock back and forth. So far I have not got the center of gravity right, because while he will wobble, he will also fall down. He’s not supposed to fall over. I’ll fix that later.

Here are more angles.

werblz-02 werblz-03 werblz-04

And here is the new version (front) with yesterday’s prototype. The new one has a lowered center of gravity for better werbling. werblz-05

And yesterday I printed a green and gold version:

werblz-green-01

And a movie of all three:

As with my UFO set, this is designed to be expandable into all sorts of cute creatures.

Coffee Any-5-4-3-2-1?

I was at Starbucks recently. With my hands, I can’t hold a hot coffee easily. Sensitive skin. So I use one of those cardboard sleeves. Every time. What a waste.

So I thought “Hey, I have a 3D printer. I should print a solution to this waste problem. I should make a sleeve that fits a standard coffee paper cup.”

And so I did. I realized, hey, I have just finished this amazing model of the new Thunderbird 1 from the new TV series Thunderbirds Are Go, and part of that model would work really well as a coffee holder:

tag-tb1-3dprint-fully-assembled-on-display-topside

So I took just one small portion of this model and adapted it to fit a standard coffee cup by basically tapering it to the exact angle of the cup. (This took a few test prints and iterations.) The great thing is that inside the surface, a 3D printer prints a hollow lattice work, which is a natural insulation from the hot cup.

tag-coffee-cuff-01

I posted the result on facebook on the Fanderson page. The response was more than I expected. I expected a few “Oh, that’s kinda cool”, and even a few “Doesn’t belong here.”

What I got instead were people trying to buy it, and someone even said “This is exactly why I come here.”

Then one guy said “Hey, let me know when you do Thunderbird 4.”

That gave me an idea. I could do all 5 new Thunderbirds! I already had Thunderbird 3 modeled:

newtb3-done

So I made a cup based on 3, then did 2, 4 and 5 based on images of each ship as taken from the intro to the new show:

tag-opening-all-portrait

And here they all are:

tag-coffee-sleeves-all-cropped

TB5 takes the elements of the golden cylinder, broken up by superstructure lattice, with a horizontal 5 inside a black element:tag-coffee-sleeves-tb5

Thunderbird 4 uses the prominent red stripes, with a bit of body plating, and engine cowl:tag-coffee-sleeves-tb4

Thunderbird 3 uses the black ring at the top, and the engine flanges at bottom, and a black inlay seen on the original:tag-coffee-sleeves-tb3

Thunderbird 2 uses the distinct yellow striping, and obvious engines, but also the circular shoulder hinges that lower the retro jets on the ship:tag-coffee-sleeves-tb2

Thunderbird 1 uses the honeycombing (even on the number) seen in the original:tag-coffee-sleeves-tb1

Turbine’s Original Logo

turbine-logo-original-lightwave-flipped

I started working at Turbine almost 19 years ago. May 15, 1996. When it came time to come up with a logo, Mike Sheidow drew this in Photoshop, which became our logo:

turbColour

I modeled the “machine” in Lightwave for some quick video segments for our game, “Asheron’s Call”. Ian Wilmoth (I think) refined the model some for the final videos, and that model became the second version of the logo:

turbine_logo

A few weeks ago I found my Lightwave model and got it converted to FBX files and worked on it. I was able to print this, making the fan spin.

Now I have to go back and remodel it to reflect the extra detail that this version didn’t have.


Just For Fun (and smart ecology) – Thunderbird1 Coffee Sleeve

Usually when I get a coffee in a paper cup I have to use two cups. The cup is usually too hot for me to hold. Most coffee houses now fix this by supplying a corrugated cardboard sleeve which makes holding the hot cup bearable.

I decided to stop wasting extra cups and extra sleeves and print one of my own. (Yes, you can buy them too, but where’s the fun in that?)

So I adapted one element of the new Thunderbird 1 (from the new TV series “Thunderbirds Are Go”, based on the original 1965 series “Thunderbirds”) as you can see here, and make a Coffee Sleeve based on Thunderbird 1:

tag-coffee-cuff-01 tag-coffee-cuff-02

What’s great about this is that inside the mass of the sleeve (what would be solid if this were an injection-molded part) is a lattice of support material, not a solid plastic interior. So that lattice works as a insulating material, with air to prevent the transmission of the heat to the hand. It’s like magic.

You can see the honeycombing and the number “1” which are taken directly from my recent 3D model of Thunderbird 1 seen here:

tag-tb1-3dprint-wings-assembled

Which is taken from the ship in the show:

tag-tb1-cgi-model-02

Here is an image of the honeycombing as seen on a physical model WETA/ITV is displaying at shows and their offices all over the world:

tag-tb1-physical-model-underside


Bubble-Capsule Flying Saucer UFO-01

Making Flying Saucers With Bubble Capsules

Every store has them. Vending machines with promising trinkets in small bubble capsules. I have for some time now wanted to begin making printed objects that incorporate the use of these capsules.

First up: Flying Saucer

ufo01-06 ufo01-04 ufo01-05

This was my first test version. Second print. The first print, the bubble didn’t fit snugly, and the bottom was missing that red gem-light. Also the landing gear legs were a bit too flimsy. I thickened those up just a tad, but it helps immensely.

This print does, however, show off the major weakness of layered printing. Shallow curves that are flat (rather than tall) show up as very visible layers. But I posted these images on facebook and the response was highly encouraging. People liked them and didn’t seem to worry too much about the print limitations.

This is printed at .15mm layers (my printer’s maximum resolution) in FINE mode which is the slowest, for the most accurate, best possible print.

I’m pretty happy with it.

UPDATE: April 30, 2015 – Assembly

Here are the parts (some still with support and raft) that make up UFO-01. Don’t forget, the bubble capsule is not printed, but is from a vending machine.

ufo01-parts

And here are the parts after the lights, landing gear and connector pegs are cleaned up:ufo01-parts-cleaned-up

Ring Rocket

A simple name, but I wanted to create a rocket based on the shapes I used in a demo video I did in 1994. In that video I had space fighters attacking a battleship. The rear section ended up looking a lot like the rocket you see here. I also wanted to stray a little bit away from the standard colors for a rocket, and experiment with green instead of red with the more standard white, black and silver color schemes. Even then I caught myself putting a touch of red in there:

ring-rocket-01

It is interesting to note that I originally wanted a green stripe around the solid ring at the rear, but I abandoned that idea in favor of printing that entire rear section, fins and ring and all, in one print run. This turned out to be impossible based on the arced curves. The printer needed something solid to raft up to, and this shape was not providing anything. So I sliced the ring where the green stripe appears. Then my printer warped a bit while printing, warping up the connecting seam to about a millimeter in difference, which is something that happens with my printer on large base area prints. So I took the opportunity to model a thin stripe. I actually like it.

ring-rocket-04

The rocket stands on those six “feet” molded into the fins. A keen eye can see a green cone inside the air intake chamber. This forms an inverted cone to match the nose cone, which sits right above a familiar engine piece, which I have used in several previous rockets.

ring-rocket-06

The air intakes are for atmospheric travel, using the turbine engine. Interstellar travel uses an internal air mix, so the turbo intake is only operational in atmosphere.

Twelve windows surround the nose section, with buttressed window frames for safety.

ring-rocket-05